Tuesday, March 29, 2011

Sukhamvit Soi Five fried chicken

This is a modified version of a recipe I found about a year ago in theatlantic.com's brief-lived food section. It's still in the archive, but it's hard to find and only one other blogger seems to have written it up. The article accompanying the recipe is by Jarrett Wrisley who attributes it to Mr. Pee, a Bancock street vendor whom he met selling chicken outside the Foodland Supermarket on Sukhamvit Soi Five in 2001.

My only change was to use a whole bunch of cilantro instead of 10 cilantro stems and 4 large cilantro roots. I presume that made the marinade greener, but as I've never encountered a cilantro root, I don't know if there's any other differences.

Ingredients:
1 head cilantro including stems, chopped
14 (count'em) cloves garlic, peeled and crushed
1 Tablespoon black peppercorns
1/2 teaspoon red pepper flakes
2 teaspoons salt
2 Tablespoons fish sauce
2/3 cup chicken stock
3/4 cup plus 2 Tablespoons rice flour
1 chicken, butchered into serving pieces

1. Blend the cilantro, garlic, peppercorns, pepper flakes, salt and fish sauce until smooth. Add a little chicken stock to get everything moving around in the food processor. Remove to a large bowl, and stir in the rest of the stock. Add the rice flour gradually until a smooth loose batter forms. Add a little water if it gets too thick.

2. Add the chicken, coat well and refrigerate overnight.

3. Bring chicken up to room temperature. [I laid the chicken out on a tray to speed the process along.] The batter will have thickened up to a paste so make sure it's spread on the chicken evenly. Or, at least try to do a better job of it than I did.

4. Heat oil to 350 and fry around 5 minutes on each side until the center of the meet reaches 160 degrees. It should be more of a copper than a golden brown. [I had trouble cooking the chicken through before the crust burnt with my later batches so watch your oil temperature.]

Let cool a few minutes and serve with sriracha.


The raw batter is spicy and harsh so it's surprising that the cooked crust is more prominently salty. And the spicy notes are more in the Colonel's 11 secret herbs and spices vein than anything notably Bancockian. That's a little disappointing, but it's very tasty for what it is. The meat is flavorful and juicy. The crust is crackly crisp while being well adhered to the meat and inextricably merged with the skin. Gorgeous stuff and very easy. The sriracha isn't necessary, unlike for a lot of mediocre Thai food, but it adds the missing heat and a touch of acid that pops the chicken's flavor nicely so give it or your favorite other hot sauce a try.

Sunday, March 27, 2011

CSA week 15 wrap-up, week 16 start-up

My cooking went mainly according to plan last week. I did do a stir fry using the tatsoi and mushrooms and I did bake a chicken with the grape tomatoes. I added some potatoes there too which wasn't a bad idea, although switching out the garlic for a shallot was.

I also made a leek pie as planned, sort of. I decided to use sliced potatoes for the crust but I sliced too many and put a layer in the middle too so it was sort of a gratin. Plus I added a couple eggs to the cream and cheese the recipe called for so it's sort of a quiche too. It's interesting enough for a post, but I didn't measure anything or take pictures while I was making it so I don't think it would work.

Finally, I used the mizuna as a pizza topping which worked surprisingly well. I still haven't gotten around to making the dill curry, but I've got all the ingredients in hand and even have some naan, so it's just a matter of feeling like doing it.

Well, there's also the matter of the full freezer and the lack of empty storage containers for the leftovers. I hopes of doing something about that, I left both the kale and the escarole behind this week. There's also the matter that, on Saturday morning, I hadn't used the mizuna yet, so I still had that plus half the collards so I really didn't feel the need to bring two close equivalents home with me.


For those remaining collards, I ought to use them as I've already got a big bag of them in the freezer. I don't want to make a traditional mess of greens but it's hard to find other recipes when search results are flooded with variations on the Southern standard. I'll have to put some more effort into it.

As for this week, nothing remaining really needs a dish built around it. Maybe the green beans or beets, but there's not a whole lot of either. Those are side-dish amounts and that's easy.

I do have a lot of cilantro already, but it doesn't look like it's holding up well, so this might just replace it instead of adding to it. There is a Bancock fried chicken that calls for cilantro stems and roots that I might make, though. Also, I'm considering a roasted beet and strawberry ice cream.

If I don't go that route (probably because I didn't resist eating the beets immediately after roasting them), I might take another shot at a strawberry banana sorbet. My post on my first try two years ago is still getting Google hits, but I wasn't really happy with how it turned out. I'd like to give the searchers something more successful.

The only thing I haven't got any ideas for is the sprouts. I've used them before with cold noodles and on sandwiches but I want to do something different. I'll have to give that one a bit more thought too.

Wednesday, March 23, 2011

Polenta-stuffed collard rolls

This is my Italianiated version of a grits-stuffed collards recipe from Southern Living's 1001 Ways to Cook Southern cookbook.

Step one is to soften the collard greens. I blanched them for one minute, but the original steamed them. That's probably a better idea as there's more steaming later and you don't end up with an extra potful of water to deal with.

Step two is to make a fairly stiff batch of polenta. I included olive oil, garlic and prosciutto (actually Serano ham, but shred it, frizzle it and add it to polenta and I think you'd have a hard time telling the difference) and finished it off with copious Parmesan and a bit of dried mozzarella.

While that cooled to a workable temperature and a pliable texture, I cut out the tough stems from the collard leaves--six leaves for around 1 1/2 cups of polenta. These were big leaves so I could have used another half cup of polenta, really.

To do the wrap, I overlapped the stem-end lobes of the leaf and placed a 3-Tablespoon dollop of polenta a few inches from the bottom. From there it was just a basic burrito fold--once over, fold in the sides, then a tight roll up.

The rolls went into a steamer for as long as it takes for the collards become as tender as you can expect them to get. It'll vary depending on your leaves; Mine took about 10 minutes.

I served them halved with an herbed tomato sauce dip.


There are a couple small problems with this dish. First, because you have to cut so far up the leaf to excise the tough stem, the rolls want to split open at the seam. That's fine once you're plating and want to cut them in half anyway, but it makes them difficult to manipulate out of the steamer. Second, the flavor of the collards just doesn't mesh with the Parmesan or tomato sauce as well as I had hoped they would. I should have kept it Southern and used Cheddar or Monterrey Jack or some-such and served with hot sauce like the original recipe said to do. Well, it was worth a try.

Sunday, March 20, 2011

Dandelion and spring onion french dip

Now for the more interesting thing to do with dandelions and caramelized onions that I promised. But before going into the sandwich itself, let's talk caramelization. I've used the word before, but I've really just meant browning the onions or whatever. Real caramelization is something else entirely. It's kind of like how both grilling and slow smoking go by the name barbecue. Here's how I went about doing the real thing.

First I sliced up the spring onions, cleaned them well, and put them into my giant cast iron pot with just a little salt and a little oil. The angle's not good, but it's about 2/3 of the way full.

After 45 minutes covered at medium heat they're fairly well reduced and there's a good bit of liquid accumulated. At this point I removed the lid to let the liquid boil off.

About an hour later, the liquid's just about gone and the onions are starting to collapse. There's been a bit of browning [It's more attractive with white onions.], and the pot is starting to sizzle a little at this point. I turned the down to medium-low and started stirring more frequently, about every 10 minutes instead of every 20.

A half hour later, the onions have cooked down even more, have browned appreciably and are melting into kind of an onion jam. Cooking longer would be better, but there's real danger of burning so I pulled them out at this point. The flavor is kind of like browned onions, but sweeter with a lingering mellow complex savoriness. Really lovely.

Now that I've got my onions, on to building my sandwich.

I started by stemming and blanching my dandelions. Then I put a cup of beef broth in a pan, cooked it down a little to concentrate the flavor, added a dollop of caramelized onion and then the dandelion.

While that simmered, I laid a few slices of roast beef on top to warm through and cook just a little. After the beef was warmed up, I grated some sharp cheddar cheese on top. And finally, I assembled the sandwich with all those components plus some tomato.


The dandelion is carrying a lot of beef broth so the bread got properly wet just after I took this picture. I had a little cup for dipping too, but I didn't really need it.

You've got the beef's savoriness against the sweet onion, sharp cheddar, slightly bitter greens and the acid of the tomato--just a lovely combination of flavors. Would browned onions have worked as well? Not really. That would be good too, but it would be more a standard cheese steak flavor profile. This is something different; the caramelization brings out more of a pot roast aspect to the beef so there are different elements coming to the fore. I should make it both ways and compare and contrast, really.

Saturday, March 19, 2011

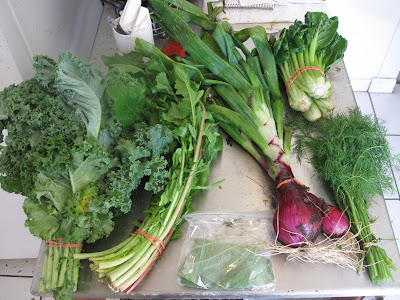
CSA week 14 wrap-up, week 15 start-up

The only thing out last week's box that I've posted about is the hoja santa so I've got a fair bit unaccounted for. For the most part I did what I said I would last week. I made chips from the kale, which turned out a bit disappointingly as I overloaded the pans so they cooked unevenly. And I did do something interesting with the spring onions and dandelions as I had hoped--it's interesting enough for its own post which I'll probably have up tomorrow. I found a curry for the dill too, but I had it slated to make on Friday and I wasn't feeling it. I'll try to get to that soon. The tatsoi, on the other hand, I completely forgot about and only rediscovered as I was putting this week's share away. I intend to do a stir fry using it, this week's oyster mushrooms and the lobster tail I picked up at the market this morning. Probably with black bean sauce; that should go nicely with those ingredients.


What else have we got this week? I left the lettuce behind as I've already got a head sitting untouched in my refrigerator from two weeks back. No sense wasting another.

I want to do a French leek pie or possibly use the leeks in a beef barley soup. I haven't settled on that.

Mizuna's always tricky to deal with. Maybe a pesto? Probably with noodles one way or another.

Parsley will find itself used, so no worries there.

I want to make the baked chicken with cherry tomatoes recipe again as it was so very easy and so very good last time. If I can stop snacking on the tomatoes, I'll do that.

I've already mentioned my plans for the mushrooms so that just leaves the collards. They're so large I'm thinking they'd be really good to stuff. Just what with, I'm not sure yet, though. I could also see making hopping john as it's been some years since I've had that. We'll have to wait and see.

Wednesday, March 16, 2011

CSA week 14 - Camarones verdes

I found this recipe on the New York Times website with lots of basil with a bit of mint and tarragon substituted in to try to simulate the flavor of hoja santa. Well, no need for that for us lucky few. I traced it back to what looks like the original, from whence I got the Spanish name. It was buried on the third page of a Google search that ought to have popped it right up; Weird. Anyway, that page says it was published in the Dallas Morning News in 1998 as a preview of Diana Kennedy's cookbook: My Mexico. The NYT version only credits Martha Schulman, the author of the piece, but she did make some changes. For one, she broils the tomatillos rather than simmering them which seems an improvement to me. My version will mostly follow the NYT procedure with the big change of swapping out half the shrimp for potatoes, partially because the dish could use both a higher veg to meat ratio and partially because that's what I've got.

Ingredients:
1/2 pound tomatillos
3-4 hoja santa leaves
2 smallish hot chilies, de-stemmed but not de-seeded
1 pinch anise seeds [substituting for maybe-poisonous avocado leaves]
1/4 cup water
5 large garlic cloves, crushed
1 large pinch salt
2 Tablespoons olive oil
1/2 pound medium shrimp, peeled and de-veined
1/2 pound something else like potatoes or zucchini or more shrimp

1. Broil the tomatillos on a baking pan for 3-5 minutes on one side until charred [they'll start popping audibly at this point which is helpful], flip them over and broil 3-5 minutes more until that side is charred too. Remove to a blender or food processor making sure to keep the released juices.

2. Tear hoja santa, leaving the bigger veins behind [pretty easy actually]. Chop the chilies. Add both, the anise seeds and water, to the tomatillos. [Note from after the fact: also add one canned or dried-and-reconstituted chipotle pepper] Blend until smooth. Taste and season conservatively. Set aside.

3. Cook your something else until almost done [unless it's more shrimp].

4. Put garlic and salt in a mortar. Crush. Add olive oil and crush some more until you form a paste.

5. Add some more olive oil to a large pan and heat over medium-high heat. Add your something else if you want to get a bit of color on it. Season the shrimp then add it to the pan and cook about 2 minutes until not quite done. Remove both to a bowl.

6. Add garlic mixture to the pan and cook 30 seconds until aromatic. Add tomatillo mixture, bring to a boil, turn heat down to medium low, and cook around 5 minutes until the 1/4 cup of water has boiled out and the sauce has thickened slightly. Return the other ingredients and cook a few minutes more until everything is cooked through and the sauce coats the chunky bits.

Serve with tortillas if your something else wasn't starchy.


The sauce has the same tart, oddly herbal/medicinal flavor that I had a hard time describing the last time I made something using the combination. I doesn't pair particularly well with either the shrimp or the potatoes, but it doesn't actively clash either. You taste it, then you taste the shrimp but there's kind of a disconnect between.

Last year, I suggested adding some chipotle so I'm going to try that now to see if that helps matters... Yeah, it helps a whole lot. It lays a foundation for the tartness of the tomatillo and rounds out the hoja santa. It even makes the flavors blend with the shrimp. I can now honestly recommend making this dish if you add a chipotle or maybe some pimenton back in step two.

Monday, March 14, 2011

Canistel coffee coconut custard pie

This is a variation on a Minimalist sweet potato pie recipe. I particularly liked the addition of coconut milk which I thought would blend nicely with the canistel.

The original recipe used a cracker crust but I wanted to try a vodka crust instead. Vodka pie crust, if you're not familiar with it, is a recipe that came out of Cook's Illustrated a few years back. The vodka adds moisture that doesn't promote gluten formation so you end up with a wet dough that you can hand press into the pie pan without worrying about overworking it. Then the vodka evaporates away and you end up with a flaky tender crust without all the hassle. I was fairly happy with the results with the caveats that a) it's so wet it slumps if you try to blind bake it and I wish someone had made a note of that in the recipe and b) either my pie pan is a weird size (and now that I've measured it, I think it is) or the recipe makes rather too much dough for the two crusts it says it makes. I didn't care for the thick crust but other folks liked it. Maybe it's just me.

One other thing. I've made variations on this pie twice. The first time I used 14 ounces of lĂşcuma pulp and the second time pulp from three canistels which was more like 10 ounces. Either works, but adjust the number of eggs: four for 14 ounces, three for 10. The original recipe calls for 2 medium sweet potatoes which isn't really helpful in pinning down the amount. Oh, and lĂşcuma is a close cousin of canistel that's popular in Peru and Chile.

Enough ado, here's the recipe.

Ingredients:
2 Tablespoons ground coffee
1/2 cup water
3 or 4 large eggs
1/2 - 3/4 cups sugar, adjusted for the sweetness of your fruit [light brown if you'd like, but it makes the results taste more like pumpkin pie than canistel]
1 cup coconut milk
spices to taste [I used 1 teaspoon cinnamon and 1 teaspoon allspice but I could have used more.]
1 large pinch salt
pulp from 3 or 4 canistels
1 pie crust

0. Preheat oven to 350 degrees.

1. Add the coffee to the water in a small pot. Bring to a boil, turn off heat and let steep for 10 minutes.

2. To a food processor or blender add the eggs, sugar, coconut milk, spices and salt. Strain in the coffee. Blend until well combined. Add the canistel. Blend until smooth.

3. Pour mixture into pie crust and bake for 40 to 50 minutes until it is mostly set but the center couple inches are still a little jiggly.

Right [minus the coffee]:


Slightly overcooked:


Again, right [minus coffee]:


and slightly overcooked:


The textures of both are very smooth and the crust came out nicely tender. The second is overcooked, so it's not meltingly creamy. The first pie had a much lower fruit to egg ratio and came out a little starchy. I've made the ajustments to the recipe so yours should come out just right.

The second pie came out a lot more mild after baking than the mixture was raw, which I should have expected given my experiments with baking canistels. Still, the flavors are all still there. It starts with the canistel up front, maybe a hint of coconut and finishes with a bitter hit of coffee. It could use an extra quarter cup or so of sugar, but that's hard to tell going in. It tasted just fine raw so make it a bit sweeter than you think it should be. The combination of coffee and canistel works really well and is, I'd like to point out, my innovation, although I'd think it an obvious one for any pastry chef with any experience using canistels. It's really easy too, so well worth a try.

Saturday, March 12, 2011

CSA week 13 wrap-up, week 14 start-up

I have to say I appreciated not having too much produce to deal with this last week. I usual need a break around this time of the season. The only thing I made worth mentioning beyond the beet chili and radish chips is a radish-top pizza--
before:


after:


Pretty good if you don't mind a little bitterness. The radish-tops were just hearty enough to wilt but not crisp during the 7 minutes in the oven so I was pretty happy with the resulting texture.


Lots to deal with this week and I don't think I'm going to be able to take the easy way out and make chips. Well, maybe with the kale.

If I don't make kale chips, I'll probably save the kale for later. It freezes quite well and is pretty versatile if you slice it thin.

I'm thinking of cooking the dandelion greens with the spring onions which should caramelize up nicely if I can get my stove to cooperate. I know I've gone to that flavor combination several times previously, but it is really good. I will try to do something a little different with it this time around, though.

I've got a shrimp and tomatillo recipe picked out for the hoja santa and a curry for the dill. That leaves the tatsoi which should make a nice addition to noodle soup or maybe fried rice. It seems sturdy enough to handle a stir fry without collapsing.

Wednesday, March 9, 2011

Beer-braised sausage and kale

This is an odd take on gruenkohl und pinkel that I made even odder by making a few poor choices interpreting ambiguities in the recipe. I do think it has promise though, so I'm going to post about it anyway.

To back up a step, what's gruenkohl and pinkel? Well, it's beer-braised sausage and kale--Didn't you read the subject line?--and the name is pretty much the recipe, although I understand you can optionally add a slice of ham. It's a northern Germany thing and sounds appealing enough that I would have made it just like that if I didn't have a blog to fill up.

The unusual version I attempted comes from Dave Copeland, Salon.com's food writer, who has added some possibly ill-advised Italian elements which I've de-emphasized in my version.

Ingredients:
1/2 pound raw sausage, German or Polish would be best, but use your judgment, casing removed
1 medium white onion, chopped
5 cloves garlic, minced
1 pound kale, washed, de-ribbed and torn or cut into largish pieces
12 ounces dark beer
1 pound dried pasta [I used fresh which maybe could have worked if it wasn't my falling-apart spinach pasta], something thick and chewy would probably be best.
1 Tablespoon mustard [I used prepared mustard, but I see now that the recipe just says "mustard". A full Tablespoon of dried mustard is a whole lot, isn't it? I think he means prepared mustard. But not the strong yellow sort I used. Something more mellow would be best.]
salt and pepper
1 cup grated Parmesan [The combination of Parmesan and dark beer does sort of work but I'm not at all convinced it's the best choice for the job. Most beer/cheese recipes that I've found use cheddar, but not many use dark beer. Still probably a better bet than Parmesan. I could see blue cheese and dark beer, too, maybe.]

1. Heat a little oil in a Dutch oven or large pot over medium high heat and brown sausage, breaking it up. Remove to a bowl.

2. Add onions to pot and sauté until softened, about 5 minutes. Add garlic and cook briefly until aromatic, then add kale. Toss kale to get it all somewhat wilted. When there's enough room in the pot, return the sausage and add the beer. Bring to a boil, turn heat to medium low, cover and cook until kale is tender, 15-20 minutes.

3. Meanwhile, cook your pasta to al dente.

4. When kale is cooked, stir in salt, pepper and mustard. Add the cheese. When the cheese has melted into the beer, add the pasta and simmer until finished cooking, 1-2 minutes.

Served garnished with a little more cheese and maybe some more mustard too.


The batch I made ended up a weird mishmash of flavors that didn't really work too well. I think you can pretty much tell that just by looking at it. The Parmesan and the mustard particularly don't mesh and the mushy fresh pasta was a huge mistake. But, like I said, I think there's some promise here. I did like the sauce the beer and cheese formed and it did compliment the kale nicely. The kale itself was cooked well and I could see the textures working with a different sort of pasta. So avoid my mistakes and you'll probably enjoy it. Or just add kale to a standard beer cheese soup instead; That might be nice.

Monday, March 7, 2011

So I added the beet to the chili after all


Since I was going in a Cincinnati direction with the chili spices--cinnamon, cocoa, coffee--and those are flavors that beets can work with (have you ever had beet chocolate cake? It's pretty good.), I decided what the heck and tossed it in. It's not bad. Really, it's too mild to make much of an impact against all those other strong flavors, but it adds a little sweetness and a little tartness missing from the mix otherwise. Also, the beets do make a contribution texturally. I used beef shanks so I have shreds of meat instead of chunks; the beet bits are the only component with any bite to them.

Upon consideration, I've decided that I should have pickled the beets first. Then I'd really have something.

Saturday, March 5, 2011

That was no turnip!

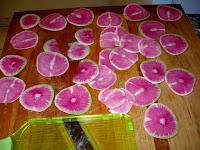
When I sliced into my supposed turnip and discovered it was red inside I checked the newsletter. Only the full shares got turnips; What I had was a watermelon radish. No need to change my plans, I figured. Radish chips are no weirder an idea than turnip chips.

One thin slicing and deep frying later, here's the result:


For the most part, after all that frying, it doesn't really matter what root vegetable you started with, particularly when you cook them just a little too long like I did, but the slightly undercooked ones retained a little of that distinctive cooked-turnip sweetness which, combined with the savoriness from the browning and the crisp crunch, made them pretty darn good. If you're careful, this is a pretty good application.

I just did a quick Google and found that I'm the second person to come up with this and post about it. Jane Spice took hers out of the fryer at the right time. Yours should look like hers do.

CSA week 12 wrap-up, week 13 start-up

No surprises in the wrap up this week. I had the arugula with pasta like I said I would and pickled the green beans as per plan too. I did throw some of the cherry tomatoes into the pickle jar so that's something.

This week should be less predictable simply because I have no idea what to do with this stuff.


One turnip, one beet, one pepper. Not enough of anything to base a dish on and they don't really add up to anything. A gratin, maybe. Wrong sort of potatoes for a gratin though and it seems odd to go out and buy more when I've got this pile plus leftovers from Thursday's yukina soup.

I do have a perverse impulse to add the beet to an espresso/cinammon/chipotle chili I'm making. Probably best if I resist that urge as the recipe is odd enough as is.

I don't really know what to do with the head of lettuce either other than, I suppose, just eat it. You can probably sense my lack of enthusiasm from how I nearly cropped it out of the picture. The beet and turnip tops might work in a salad. I usually prefer to cook them a little, though.

This week's strawberries have less flavor than last weeks, so I think I'll have to cook with them instead of eating them out of hand. Maybe I can use the beet here instead.

I took a spare canistel from the extras bin and when they ripen, I should have enough pulp accumulated to work with. That won't be for a week or two, so I'm not going to commit to anything yet, but if I'm going sweet with the beet, I'll want to do something savory with the canistel.

That leaves the potatoes. Good size for chowder or roasting. Or juggling. If I decide on juggling, I'll let you know.

Thursday, March 3, 2011

CSA week 12 - A couple of yukina savoy recipes

One stir-fry and one cream soup. Normally, I'd just give them a passing mention in the weekly round-up, as they're simple stuff, but there are so few yukina recipes on the web that I wanted to put these out there for bewildered folks to find so they know a couple more options.

I separated the leaves and stems for these because I had two heads of yukina, both large enough for a full dish, and I wanted the variety. If you've got just one head, either one would work using the whole thing.

Let's start with the leaves.

Yukina savoy and pork stir fry

1/4 pound pork, sliced thin [I only had a center cut pork chop on hand which isn't the right cut for stir frying. Use something more tender, like loin.]
1 Tablespoon soy sauce
1 Tablespoon rice wine
2 teaspoons sugar
2 teaspoons cornstarch
1 bunch yukina savoy or leaves from 2, about a pound, cleaned
a few cloves garlic, minced
an equal amount ginger, minced
2 Tablespoons black bean sauce [I used black bean chili sauce since I like it hot]
1 Tablespoon peanut oil

1. Mix the pork with a bit of soy sauce, a bit of rice wine, a little sugar and some cornstarch. Maybe some sesame oil. No need to measure precisely. Let marinate around 20 minutes.

2. Meanwhile, stack the yukina leaves and slice them crosswise into ribbons about half an inch wide. If you're using the stems too, slice them into pieces a half inch wide too.

3. Get your garlic, ginger and black bean sauce ready.

4. Heat a wok really really hot. Add the oil. Add the garlic, ginger and black bean sauce. Cook briefly until aromatic. Add the pork (along with the marinade) and stir fry until it loses its pinkness. Remove to a plate.

5. Add a little more oil to the wok, swirl it around then add the yukina. If you're using the stems, add them first, stir fry until mostly cooked, then add the leaves. Toss the leaves around a bit so they all gets somewhat wilted. When there's enough room, return the pork. The yukina will be releasing some moisture (plus there will be some water still clinging to the leaves from when you washed them) so a sauce will start forming. As the cornstarch on the pork dissolves, it will start to thicken. It's pretty variable so add a little water if necessary or add a little more cornstarch (dissolved in an equal amount of water first) until the sauce is thick enough to cling to the leaves but not goopy. When you've gone from stir frying to simmering, turn down the heat to medium and cook until the leaves are tender.

Serve with white rice.


Yukina works pretty well here as it's sturdier than spinach, but doesn't need to cook nearly as long as, say, collards. Plus it's got enough flavor to stand up black bean sauce.

And now for the stems.

Cream of yukina savoy soup

1 bunch yukina savoy or stems from 2, about a pound, cleaned
whatever other green vegetables you've got lying around [I used a spring onion and a couple handfuls of parsley leaves], chopped
1 large or 2 small potatoes [white or russet would likely be best], diced
1 Tablespoon butter
1 Tablespoon olive oil
4 cups chicken stock
1 cup cream [or sour cream or yogurt if you'd like it tangy]
salt and pepper and possible some other spices or herbs

1. Break the yukina stems into pieces no more than 5 inches or so long.

2. Add the butter and olive oil to a dutch oven over medium-high heat. When the butter has finished foaming, add whatever vegetables you'd like to get a little color on, in my case the spring onion. After a bit I added the parsley. [Maybe parsley leaves taste good browned. Who knows?] If you're using the yukina leaves, you should probably wilt them down now.

2. When the vegetables a softened and browned to your liking, add the potato and cook 2 minutes more. Add the yukina stems and the chicken stock. The vegetables should be just about submerged. If not, add more stock to cover. Bring to a boil, cover, reduce heat to medium low and simmer until everything is tender, around 10 minutes.

3. Remove everything to a large bowl and cool until you can get it into a blender without burning yourself, around another 10 minutes.

4. Blend well in batches, straining the blended soup back into the dutch oven. Yukina stems tend to be stringy, so even with serious blending, I had to strain out a good wad of gunk.

5. Add the cream and season to taste. Now's the time to add any additional flavors that you think might go well with what you've got so far. I added some pimenton which I though went nicely with the celery notes in the soup.

6. Put the pot back on the heat and bring back up to serving temperature.

You probably ought to garnish it because otherwise it looks like this:


I should have saved a little spring onion to sprinkle on top.

My soup ended up tasting somewhere between cream of cabbage and cream of broccoli. Not what I expected, but pretty good. And, like both those soups, tasty served cold too.

Like I said up top, nothing groundbreaking here, but both successful applications of yukina. If you're not sure what to do with yours, I can recommend either strategy.