Showing posts with label cheese. Show all posts

Wednesday, November 24, 2010

CSA week one - Blue cheese, bacon and walnut green bean salad

Last minute Thanksgiving side-dish idea! I'm eating it by turkilessly and a day early myself, but you've probably got all the ingredients on hand and it would make a fine substitute for the usual green bean side-dish you had planned.

I modified this from a recipe I found on the Something blog. Kim Carney, who posted it, said that it came an issue of Parade Magazine. I tracked down the article and found it was by Sheila Lukins, author of the Silver Palate cookbook. Maybe I'm the only one who cares about proper attribution, particularly as I did change things around, but I care and it's my blog, so there.

Ingredients:
1 thick slice or 2 thin slices bacon
1/4 cup walnut pieces
3/4 pound green beans, stemmed and snapped into sensible lengths
2 ounces strong blue cheese, crumbled (the original recipe called for twice this. I cut it down to 3 and still found it a bit too much.)
1/2 Tablespoon Dijon mustard
1 Tablespoon red-wine vinegar
1 clove garlic, finely minced
1 Tablespoon parsley, finely minced (If you've got flat-leaf, or for some reason you like the texture of curly, chop less finely.)
1 and a bit Tablespoons extra-virgin olive oil

0. Bring a sizable pot of well-salted water to a boil.

1. Cook the bacon in your preferred manner until crisp. Reserve the fat. Chop the bacon.

2. Toast the walnuts.

3. When the water comes to a boil, add the green beans and cook until just tender, about 4 minutes.

4. Meanwhile, mix the mustard and vinegar in a medium bowl. Add the garlic.

5. Add the bacon fat (I had a teaspoon's worth) and enough olive oil to bring it to 1 1/2 Tablespoons total. Whisk until well-emulsified and slightly thickened.

6. Remove the green beans from the water into a colander. Run under cold water briefly and pat or spin dry.

7. Lightly mix the beans with the walnuts, cheese, parsley and bacon. Add the vinaigrette. Do not mix well or the chunky bits will all migrate to the bottom. Mix judiciously.

Serve with turkey.


This is quite a nice combination of flavors and textures. Texturally, the green beans had a bit of firmness left to them, the cheese was meltingly creamy (which is important. This is a warm salad and wouldn't work nearly as well if you let the beans cool all the way down before adding the cheese.), the bacon and walnuts crisp. The parsley is pretty much lost. You should probably use a couple Tablespoons so it can assert itself a little more.

ON the flavor end, the blue cheese dominates at first in each bite, but any combination of the other elements can rise to the front depending on the particular forkful you got. The vinaigrette lends just a little tang and doesn't overwhelm the other flavors. I liked the walnut and green bean pairing particularly, probably because I toasted the walnuts right to the edge of burning. That flavor pairs with the beans much better than raw walnuts did. Bacon and walnut is a very pleasant paring, too.

Hmm...I think I've just had an ice cream idea.

Wednesday, May 5, 2010

Green tomato hoja santa galette

I vacillated for a long time over whether to follow through with my plan to use hoja santa in this. The other elements--green tomatoes, onions, bacon and goat cheese--are easy to see together (if you've been reading a bunch of savory green tomato pie recipes anyway) and there was a fair chance of ruining the whole thing with a wild card like hoja santa. If I only had to answer to myself and didn't need material for the blog, I probably would have backed down and just thrown in a little oregano instead. But that wouldn't be worth writing about would it? So, in that spirit, here goes...

Ingredients:
2 thick slices bacon, chopped
2 green tomatoes, thinly sliced
1/2 medium onion, thinly sliced
3 ounces fresh goat cheese, crumbled
2 leaves hoja santa, deveined and chopped
salt and pepper

Crust ingredients:
1 cup flour
1/4 teaspoon salt
6 Tablespoons cold unsalted butter, cut into chunks
2-4 Tablespoons cold water

1. Blend flour and salt in a food processor. Add butter and process until incorporated and the mixture has a crumbly texture. Blend in water until the dough just comes together.

2. Dump dough out onto a work surface. Form it into a ball, split into two, flatten and put into refrigerator to chill for 30 minutes. Preheat oven to 400 degrees.

3. Meanwhile, put bacon in a medium cast iron pan and cook over medium heat until well rendered, browned and crispy (stirring as necessary). Remove bacon to a paper towel.

4. Add green tomato and onion to bacon fat in pan. Salt lightly to draw out juices and cook until tomato starts to soften and onion becomes translucent. Add hoja santa and cook briefly to wilt and blend flavors. There's plenty of cooking later so don't overdo it now. Remove to a bowl and chill in the refrigerator until the dough is finished chilling.

5. Mix cheese and bacon into tomato mixture.

6. Take one of the dough rounds out of the refrigerator and, on a well-floured surface, roll out into 9-10 inches diameter circle. Drape the dough into a pie plate, optionally, to make it easier to fill. Fill with tomato mixture and fold excess dough over top. Spray exposed dough with olive oil and bake for 40 minutes until tomatoes have dissolved, the cheese has melted and the crust is golden brown. Cool for 10 minutes and serve.


The flavors here have pulled together nicely. Bacon and onions are a natural pairing. Goat cheese makes perfect sense with them. The green tomatoes add an almost citrusy tartness and the hoja santa an odd herbal aromaticity. It strikes an odd note just through its unfamiliarity. I'm still trying to decide if I like it. It's not bad, but is it an improvement over, say, oregano? ... Upon consideration, I think that when there's just a hint, it blends nicely with the green tomato flavor and counterpoints the smokiness. When there's a lot, it's weird and distracting. It's good, but I should have used less. One leaf would have done it. Two did seem like a lot, but with ten in the pack, I thought maybe I could use it more as a vegetable component than an herb. It's really too strongly flavored for that, though, at least in this sort of application. Maybe in a salad, though.

Thursday, April 29, 2010

CSA week 20 - Beet, dandelion and potato gratin

I think this is officially the last of the CSA dishes for this year. Well, I've got some turnips left, but two weeks after the last delivery is probably a good place to stop counting. I think I'll do a full wrap-up post for the year some time this weekend after I've thought it over for a bit.

I was hoping to do something with the dandelion greens separately--a Sephardic soup--but I wasn't able to find the Spanish-style corned beef or kosher chorizo to do it up right.

I think the dandelion greens will have a good home here. I found a few beet gratin recipes that used mustard greens and dandelion is a fair approximation.

I'm using potatoes as well in emulation of a recipe by Chef Lance Barto from the restaurant Strings in Denver. When I found his recipe I liked how he layered the two separately for a two-tone effect. And since I've got a few extra potatoes in the pantry to get rid of, why not give it a try?

As isn't unusual with semi-improvised recipes, this didn't work out perfectly and there are lots of possibilities for improvements. I'm just going to tell you what I did instead of writing up some imaginary version; you can adjust as you see fit.

Ingredients:
1 bunch dandelion greens
2 teaspoons olive oil
4 cloves garlic, finely minced
1 handful parsley, cleaned and chopped
3 medium beets, peeled and thinly sliced
3 medium potatoes, peeled and thinly sliced
2 cups cream
1 cup milk
6 ounces goat cheese
3 ounces Parmesan cheese
salt, pepper and fines herbes to taste (or tarragon and chervil if you don't have a fines herbes blend)
good quality mild red wine vinegar

Step zero, preheat the oven to 350 degrees.

I blanched the dandelion greens in boiling water for 3 minutes. Let them cool, then chopped roughly. Then I heated the oil in a medium pan over medium high heat, added the garlic and greens and cooked until aromatic and tender. Moved them to a bowl, let cool and mixed with the parsley.

Nex I heated up the cream and milk in the same medium pot I blanched the greens in. While it was heating I added the goat cheese, forcing it through a slotted spoon to break it up. And I used my microplane to finely grate in 2 ounces of Parmesan cheese. I also added the salt, pepper and herbs at this point. Vigorous stirring and a couple minutes of simmering dissolved most of the cheese but it was still a bit lumpy.

Then I layered the beets on the bottom of the baking dish. My slices were very thin so I got five layers or so out of it.

The dandelion mixture went on next. And the potatoes over that.

I poured the cheese mixture over top, shook and tapped to get out air bubbles and lifted up the edges a bit to get it to seep down through the strata.

45 minutes at 350 degrees with foil over top then I removed the foil, forgot to check the potato for doneness, grated on more Parmesan and topped with a layer of panko bread crumbs. Then back into the oven for another 8 minutes to get it browned and crispy on top. That didn't do the trick but 2-3 more minutes under the broil did.

After 10 minutes of resting, it was time to slice out a piece. The potatoes and beets were a little underdone so back into the oven for 15 minutes. No real change so back for another 20. I'd recommend baking at 400 degrees to try to speed things up if you make this.

OK, after all that baking, I'm really hungry and it's finally ready.
The sauce didn't thicken up much, though. Not enough cheese dissolved in it and nothing absorbant in the solids. I should have added a few eggs in there. The liquid sauce carries the red tint around too so that screws up the cool presentation I was hoping for. Well, it's sort of there. A smaller, deeper pan would have emphasized it more.

Visual aesthetics aside, it tastes great. The potato is pretty much filler, but the combination of the softly sweet beets and salty creamy cheese sauce accented by the garlicy greens and toasty crisp topping is pretty fabulous. A few drops of vinegar adds a tang that brings out the beets flavor and cuts through the fattiness. I can see why so many beet and goat cheese recipes use it. It's a very nice added touch.

The flavors were best a bit before the potato got to the texture I wanted so, if you're going to try making it, best to leave it a little al dente. Also beware the dreaded pink drips of irrevocable staining.

This needs a little more work, but it's definitely in the right neighborhood and good enough to be worth perfecting. I wonder how replacing the potatoes with turnips or radishes would work.

Monday, April 5, 2010

CSA week 18 - Chard and turnip gratin

Not the most complicated or unusual recipe to start the week with, but I encountered some trouble getting the ingredients I need for the other recipes I've got planned so it's the only one I've got ready to go. Also, the only other chard and turnip gratin recipe Google finds is a substandard one I made last year. As far as I can tell nobody's been looking for such a thing, but if anyone does, I want them to find something better.

I started by putting together the mise en place for the gratin assembly and preheating the oven to 375 degrees. And finding an 8-inch cast iron pan.

The chard needs to be blanched a bit. Our small bunch was particularly young and tender so I simmered the stems for a minute, added the leaves, and simmered for one minute more. Then I rinsed them in cold water to stop the cooking, squeezed out the liquid and chopped them fairly finely. I mixed that with chopped parsley and shallots, thyme and salt.

For the cheese, I mixed about even amounts of Kilaree, a young Irish cheddar and Havarti.

And I sliced, paper thin, three medium turnips.

Here's the first layer; Isn't it pretty?

That's a slightly overlapping single layer of turnip, a scattering of the chard mixture, a scattering of cheese and two Tablespoons of chicken stock and two Tablespoons of cream.

I think I got four layers before running out of chard. I topped with the last of the turnip and a layer of mixed Parmesan and bread crumbs and then covered it with foil.

40 minutes at 375 degrees foil on, 20 minutes foil off and a few minutes under the broiler and here it is:


The cooking brings out the turnip's sweetness which balances with the slight bitterness of the chard and the rich salty cheese for a nicely balanced combination of flavors. There's even a little toastiness from the topping. The turnip still has a little firmness to it, the chard a little chew and the top crisped up nicely. I went a little heavy on the stock so it's a little watery, but otherwise it's really very nice indeed.

Friday, January 22, 2010

CSA week six - Kale and ricotta salata salad

The particular sort of kale we got this week, Russian Red, has a reputation for being relatively tender so I looked around for recipes where I could use it raw. Raw kale salads were kind of a foodie trend last year so there are a fair number of recipes littering the web. I settled on one that I found on the Bitten blog where it says it's credited to Kim Severson from the New York Times. But a little research turned up that it appeared in the January 2007 issue of Gourmet where it's credited to Lillian Chou and described as "inspired by an antipasto that's popular at New York City's Lupa." I know you don't actually care about any of that stuff, but I'm a librarian so I'm picky about correct attribution even as I stretch the bounds of fair use of other peoples' intellectual property.

Anyway...

Ingredients:
1 1-pound bunch tender kale, trimmed and stemmed
1 large shallot, finely chopped (about 2 Tablespoons)
juice of 1 meyer lemon (about 1 1/2 Tablespoons)
salt and pepper to taste
1/4 cup extra-virgin olive oil
1 cup ricotta salata (or feta. Anything semi-firm and salty, really. I used the 1-year aged farmers cheese that screwed up my salt cod dish last week.), crumbled or coarsely grated

1. Roll up the kale leaves and thinly shred.

2. Whisk together shallot, lemon juice, salt (not a lot) and pepper. Slowly whisk in the oil.

3. Toss kale and cheese with the just enough dressing to coat well in a large bowl. Check and adjust seasoning.

I added some small-diced tomato which I think added some pleasant brightness. Some pine nuts for crunch would be nice too, but I'm all out.


The salad has a lovely combination of light freshness and hearty earthiness as each bite fades from the dressing to the kale as you chew. And it is a bit chewy-- this is kale not baby spinach--but not at all excessively so. I found both flavor aspects to be great pairings with sirloin tip. I wouldn't want to actually add meat to the salad, though; it stands very well on its own. If you wanted to add something to make it a little heartier, maybe hard boiled egg?

Thursday, December 31, 2009

Greek zucchini pie

I had a few different ideas of what to do with the zucchini this time around. My first choice was a couscous dish, but I decided to put it off until I can get hold of some merguez sausage (which means probably no time soon). This, instead, is a cross between these zucchini galettes, originally from Bon Appétit magazine, and a more traditional Greek kolokithopita. Or maybe it's just a quiche; I dunno.

Ingredients:
crust:
1 cup flour
1/4 teaspoon salt
6 Tablespoons cold unsalted butter, cut in chunks
2-4 Tablespoons cold water

filling:
1 large zucchini and 1 small summer squash, grated
1 small onion, sliced
2 cloves garlic
3 1/2 ounces well-flavored feta, crumbled
1/3 cup Greek yogurt [I substituted the sour cream I had on hand, but yogurt would be better.]
3 eggs
1 small handful flat leaf parsley, chopped
a little bit of fresh mint leaves, chopped
a little bit of fresh dill, chopped [I was out, but it's a traditional compliment to the other flavors in this dish.]
salt
pepper
pecorino romano or kefalotiri cheese if you can get it

0. Preheat your oven to 425 degrees.

1. For the crust, mix the flour and salt in a food processor. Add the butter and pulse several times until the butter is incorporated and the mixture looks a little coarse. Add the water Tablespoon by Tablespoon, pulsing in between, until the dough just barely comes together. Remove the dough to a work surface, work it into a ball, split in half, flatten each piece into a disc, wrap in plastic and chill in the refrigerator for a half hour.

2. Meanwhile, grate the zucchini and squash (or whatever you've got), mix with 1/4 teaspoon salt, put in a colander and let sit for a half hour. Afterward, squeeze out most of the moisture.

3. Heat olive oil and/or butter over medium-high heat in a medium pan. Add the onion and cook for a few minutes, stirring occasionally, until softened and slightly browned. Add the garlic and cook until fragrant. Add the zucchini and cook five minutes more until the zucchini is softened and slightly browned. Remove from heat.

4. Mix feta, yogurt and eggs in a large bowl. Add the zucchini mixture and the herbs. Add salt and pepper to taste.

5. Remove one of the dough discs from the refrigerator and roll out to about 10-inches in diameter. Place it into a 9-inch pie pan and adjust it so it's lining the pan properly. Pour in the filling and grate the romano cheese over top. I folded the excess dough over the top for a bit of the galette feel. You could top the pie with the other half of the dough instead if you'd like. I ended up saving it for another recipe.

6. Bake the pie at 425 degrees for 15 minutes. Reduce the heat to 375 degrees and bake for 25 minutes more until the filling is set and browned and the crust is golden. Cool at least five minutes before serving.


The pie filling is fluffy and the crust light and crisp so no faulting it on texture, but I'm disappointed in the lack of a strong zucchini flavor. I would have thought the purging and pan frying would have intensified it, but no. The pie's flavor is mostly just savory eggs, feta tang and fresh herbs. Maybe the zucchini flavors blended with the herbal notes? I think it's in there somewhere. Well, I'm not being judged on my use of the ingredient so it doesn't really matter. What's important is that the results are pretty tasty any which way.

Saturday, November 28, 2009

CSA week one - My Thanksgiving dinner

I'm alone again this year and when that happens I generally feel compelled to create some approximation of a traditional holiday meal: poultry prepared whole, a starch and a vegetable or two.

This year I made a flattened pan-fried chicken, wilted mizuna, a turnip gratin and stewed roselle.

That first was from a recipe I saw on a local cooking show I saw while visiting my mother earlier this month. It's the specialty of a restaurant either in Philadelphia or Wilmington whose name I paid insufficient attention to catch. The show skipped over some details so I really only picked up a three-part technique:
1. Remove all of the chicken's bones, leaving the skin in one piece.
2. Fry it skin side down until the skin is browned and crispy.
3. Flip it to finish.

It might have struck you that step one is the tricky bit. You're not wrong about that. One further detail I did see in the show was to cut out the chicken's backbone and then squish the bird flat as if starting to butterfly it, but after that I was on my own.

I cut the backbone a bit too narrowly, so I started with the bits remaining and sliced towards the center, under the rib cages, until I hit the clavicle to get each side off in one big piece. That went pretty smoothly and didn't slash up the meat too much. I had to dig deeper to get out the thigh bones and the keelbone and basically shredded up the chest area to get the wishbone out. Some of that required more digging around with my fingers than careful slicing with my boning knife. But here it is with the main body deboned. Not too bad. I thought chilling the chicken to firm up the meat would help, but it actually got easier to work as the bird warmed up.

Deboning the legs and wings was a little tougher. I ended up slowly turning the legs inside out, pulling out the bone, scraping the meat off and snipping the tendons as I went along and then peeling the skin off the very end. Finally I poked my finger into the skin like an inverted rubber glove to turn it back right side out. The first joint of the wing worked similarly, but the second and third joints were hopeless so I just chopped them off and stuck them in the stockpile. (it's a pile of bones for making stock. Stockpile. Ha.)

And there you go. One boneless chicken. I generously seasoned both sides with salt and pepper, heated up a couple teaspoons of olive oil in a 12-inch cast iron pan and dropped it in, skin side down. I started with the heat at medium-high for 15 minutes and then turned up the heat to get the skin browning. I could tell by smell when it was ready to turn. After the flip, I could see into the center of the breast meat through the slices I had pulled the wishbone out of so it was easy to judge when the thickest part was finished cooking. Around another 10 minutes.

I removed it from the pan and let it rest a few minutes before slicing. Since it has no bones, I could slice it any way I wanted which was kind of interesting.

The chicken is amazingly flavorful, tender and juicy considering the lack of any brining or other special preparation and my random stabs at cooking times (not to mention my random stab version of butchery). The skin is wonderfully crisp and tasty. The only minus is maybe that it's rather greasy, but it's all the natural chicken fat so you can't complain too much. This turned out so very well and, although the deboning process was a bit complex, it was an engaging complexity so I didn't really mind. I think this just became my new favorite method of cooking chicken.

I wonder if it would be a good idea to remove the legs and wings. They kind of get in the way and keep the skin on the outer bits of the body from crisping, but they also prop up the thinner parts of the chicken away from the heat. That's probably important to keep them from overcooking while the breast is finishing cooking. It might be worth the experiment to compare the results.

An added bonus of this method of cooking the chicken is that you can wilt greens in the pan afterward and they soak up all the juices and crisp up at the edges. Mighty tasty. I didn't cook the mizuna quite long enough and it ended up a little chewy, but not too bad. The flavor of the greens only contributes a little to the final result given how flavorful the pan juices it's couriering are. I wouldn't try this with spinach; that would be entirely overshadowed. Mizuna, at least gets to be a bit player. Kale, finely shredded, might be even better.

All of that goodness is kind of a shame because it takes the spotlight off of the turnip gratin which turned out fabulously in its own right.

I've got a new mandolin that does paper-thin slices easily (at least while it's still sharp) so prepping was a breeze. Here's the bottom layer--concentric overlapping circles of turnip (which is so much easier to do with properly sliced turnips, let me tell you) topped with a couple teaspoons of chicken broth, a couple Tablespoons of heavy cream, a sprinkle each of parsley, garlic and salt and a handful of shredded fontina. With the turnip slices so thin, I managed six layers from the CSA share of turnips--a bit under a pound I think--and six layers of cheese plus some grated Parmesan on top. 40 minutes at 375 degrees with foil on top and 20 without and here's the results.

Since I went light on the liquid, the cheese isn't oozing out. Instead it mortars together the layers of just slightly toothsome turnips. The cheese and turnip flavors blend and the parsley and garlic come through adding elements of complexity and elevating the dish. You've had turnip gratin; I don't have to tell you how good it can be and this turned out to be a very fine example.

Finally, we've got the roselle. I cleaned and roughly chopped them and then stewed them in a little chicken stock. I added a little salt, but no sugar. I should have added a little sugar too. Instead of the traditional peanuts, I added some toasted pine nuts for texture.

The roselle is brightly tart and floral. Probably a bit too tart, but still quite palatable. It cuts right through the heavy fatty elements on the plate just the way it's supposed to. The pine nuts give a bit of textural contrast, but their flavor is drowned out. Not bad, but this needs a little more work.

That off note aside, this was a great meal. I regret a bit that nobody else is going to get to appreciate it. On the other hand, it's so good I really don't want to share.

Now then, what's for desert?

Wednesday, November 4, 2009

Mushroom, mango and brie fondue

Last week was the new faculty reception at my library. Turnout's been lousy since the faculty realized we've dialed the catering back to wine and cheese. On one hand, that's pretty lousy since it's one of the few chances we get to pimp library services to a skeptical and indifferent audience. On the other hand, hey, free cheese.

Specifically, I liberated a big wheel of mediocre brie. I've been whittling away at it by eating it with crackers and in sandwiches with jamón ibérico and basil, but I wanted to do something more interesting with it. Not a lot of choices out there. You can bake it, of course, but the wheel was in two pieces so it would be an awkward process. Giada de Laurentis has a recipe for a brie, chocolate and basil sandwich that gets some mixed reviews. I was more interested in the pairings of brie with tart apple. I figured I could substitute in mango and get some interesting results. I was thinking of a mango, brie and bacon risotto, but I also had my eye on a brie fondue recipe and I don't think I've ever had fondue. So I thought I'd give it a try. Adapted from this recipe.)

Ingredients:
1 Tablespoon butter
2 shallots, finely chopped
1 clove garlic, finely chopped
1 handful dried cremini mushrooms, rehydrated and finely chopped (the original recipe called for an implausibly large amount of porcinins which were sold out in the two places I looked. I used what I had and, to boost the umami, added...)
a few slices of jamón ibérico, finely chopped (although jamón serrano or prosciutto would have done fine)
1/2 somewhat underripe sweet-tart mango, coarsely chopped
1/4 cup fruity but not overly sweet white wine
3/4 pound rindless brie (maybe 4/5 pound with rind), cubed
2-3 ounces goat cheese (I used Humboldt Fog, an ash-aged cheese whose fresh, slightly funky flavor nicely rounded out the brie.)
2/3 cup light cream
salt and pepper
parsley, chopped

1. Melt the butter in a large saucepan over medium heat. When it stops fizzing add the shallots, garlic and ham. Sweat until the shallots are softened.

2. Stir mushrooms and mango into the mixture in the pan. Add wine and cook briefly to blend the flavors and soften mushroom and/or mango if they need it.

3. Add the cheeses and stir until they start to melt. Add the cream and continue stirring until the cheese melts into a thick sauce.

4. Remove from heat and check seasoning. I found it needed a bit of salt and pepper. Garnish generously with parsley and serve before it clots with bread for dipping. (The original recipe also suggested serving with broccoli. I didn't think it would work so well with the adjusted flavors. I did try grape tomatoes, but I didn't care for the combination.)


Not bad at all. Mostly cheesy of course, but the other flavors bring some real complexity. There are earthy notes from the mushrooms; sweet and tart from the mango emphasized by similar notes in the wine; some herbal counterpoint from the parsley. The flavors intensify as the fondue thickens so it's a balance between ideal texture and flavor that shifts as you eat which adds a bit of interest.

I just did a search and found a recipe with paired a brie fondue with a mango chutney. Not quite the same, but close enough that I don't feel entirely original. Darn.

Thursday, July 30, 2009

Bacon cheddar chive scones

Are savory scones unusual? I don't recall ever encountering such a thing before but now that I've done a search, I see lots of different recipes for cheese scones. There are even a handful of distinct recipes for bacon cheddar scones, most with either scallions or chives. The particular one I made originally called for scallions, but the chives in my herb garden have been growing well so I wanted to use them. This recipe is from the Atlantic's new food section of their website. They've had some pretty interesting recipes there recently and I find Grant Achatz's column about introducing experimental new dishes at his restaurant quite fascinating. It's worth taking a look.

But getting back to the recipe, this is the first time I've ever made scones. From all the awful scones I've had, I had always assumed they were very difficult to make, but these came out beautifully first try.

Bacon Cheddar Scones
Makes 12 small scones

8 ounces sliced high quality peppery smoked bacon [If your bacon isn't peppered, add some pepper]
2½ cups all-purpose flour
4 teaspoons baking powder
½ teaspoon fine sea salt [I have no fine salt in the house so I ground up coarse sea salt in a mortar)
¾ cup high quality [European-style or organic] unsalted butter, cut into ½-inch pieces, cold
2 large eggs, beaten, cold
½ cup plus 2 tablespoons heavy cream, cold
4 ounces cheddar, aged at least one year, crumbled and cold
3 scallions, chopped

1. Fry the bacon over medium heat until crisp. Drain, chop, and place in refrigerator to cool.

2. Preheat oven to 375°F.

3. Sift the flour, baking powder, and salt into a large mixing bowl. Cut in the butter with a knife or pastry cutter until the mixture forms ½-inch pieces. [I just used my fingers and the texture I got at the end was more sandy than anything I'd call "pieces". Could someone who understands baking better than I do please explain the significance of the difference?]

4. Add the eggs, ½ cup of the cream, and cheddar. Mix by hand [well, by whisk held in your hand] until just combined. Fold in the scallions [or chives] and cooled bacon. [This I did with my hands.]

5. Transfer the dough to a well-floured board. Form two 7-inch rounds. Cut each into 6 wedges.

6. Transfer the wedges to a baking sheet lined with parchment. Brush with the remaining cream and bake for 20 to 25 minutes, [I went all the way to 30 minutes, but baking in my oven often goes long.] until the scones are golden brown on the top and bottom (you'll have to lift them off the baking sheet a bit to check underneath).

7. Allow to cool and firm up for about 10 minutes before removing from sheet. Serve the same day [or, I'm hoping, freezing is OK. I haven't defrosted any to check how they're holding up yet.]


The author, Ari Weinzweig, suggests serving these with butter or bacon fat or mayonaise with tomato and arugula. I liked Chef Allan's Mango Tears chutney as an accompaniment.


These are crisp on the outside, soft and not-quite-crumbly not-quite-flaky on the inside. They're smokey, savory and sharp with a subtle herbal note keeping the richness from overwhelming. The best bits were where a piece of cheese was exposed and melted and browned over the surface. If you make these, sprinkle a little finely shredded cheese over top. Really quite lovely and a fine thing to have around as a snack. I think I'll try a sweet scone next as those would be pretty nice to have around as well.

Sunday, May 3, 2009

Dim Sum Sunday - Creamy macaroni and cheese

A little while back I was invited to join the Karmic Kitchen's Dim Sum Sunday food blog event:

"Is your Sunday dinner delectable? Daring? Succulent? Shareable? If it's any or all of those things, or even something completely different, we'd like to invite you to participate in "Dim Sum Sunday" - a weekly food meme. Each week, a theme will be given. The participants will use the theme (from the literal to the avant-garde) when creating their Sunday suppers the following week. Then, just take a picture or two of the meal, and tell us all about it. Does it have to be home cooking? Not necessarily - you can go out, eat in, or even go to a friends house...as long as your post reflects the theme in original (you don't have to be a professional photographer) pictures of your dinner, and personal stories (and recipes and how-tos if you choose...)!"

I declined at the time as I was working the Sunday late shift on the reference desk and wasn't having a Sunday dinner. I still am, but I've belated realized that the Sunday dinner doesn't have to be literal; I just need to post it up on Sunday. This dish was actually my Friday dinner. The theme this week: comfort food.

Mentioning the reference desk there is actually relevant as I've decided to misuse my librarianly abilities for personal gain. I have access to databases filled with over a century of newspaper backfiles and while, yes, man walks on moon, man also cooks mac and cheese and writes articles about the recipe.

Actually, it's woman, not man, in this case and the article is just from 2006 so it's probably on-line somewhere. But it's from an article with some interesting things to say about the philosophy of mac and cheese with some recipes that are proper macaroni and cheese not macaroni in a cheese-flavored white sauce. This is an exceptionally interesting one that uses ingredients and techniques I haven't seen before:

Creamy Macaroni and Cheese
Time: 1 hour 15 minutes

2 tablespoons butter
1 cup cottage cheese (not lowfat)
2 cups milk (not skim)
1 teaspoon dry mustard
Pinch cayenne
Pinch freshly grated nutmeg
1/2 teaspoon salt
1/4 teaspoon freshly ground black pepper
1 pound sharp or extra-sharp cheddar cheese, grated [I used half sharp cheddar and half colby]
1/2 pound elbow pasta, uncooked.

1. Heat oven to 375 degrees and position an oven rack in upper third of oven. Use 1 tablespoon butter to butter a 9-inch round or square baking pan.

2. In a blender, purée cottage cheese, milk, mustard, cayenne, nutmeg and salt and pepper together. Reserve 1/4 cup grated cheese for topping. In a large bowl, combine remaining grated cheese, milk mixture and uncooked pasta. Pour into prepared pan, cover tightly with foil and bake 30 minutes.

3. Uncover pan, stir gently,

[and stir in anything that you want mixed into the dish. I wanted to keep things simple so I sautéed some onion, pepper and good quality, but neutrally-flavored ham (for something like this you want the ham to taste like ham, not smoke or maple syrup) in a little butter and a whole lot of truffle oil. The little black specks you can see in the pan are bits of truffle. I've heard of truffled mac and cheese plenty of times, but I've never tried it and now seemed as good a time as ever.]

sprinkle with reserved cheese and dot with remaining tablespoon butter. Bake, uncovered, 30 minutes more, until browned. Let cool at least 15 minutes before serving. Serve with a green salad and white wine.

Yield: 6 to 8 servings."

And here it is:


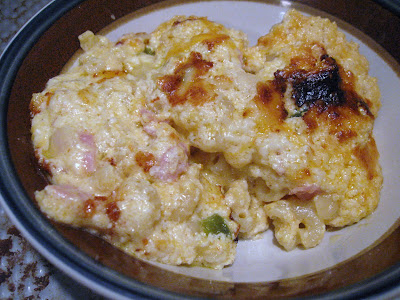
It looks pretty darn good, but that's definitely not what I'd call creamy. The cheese is clotted up pretty solid, really. I went back to the article to see if there was a description of the completed dish to compare with my results:
"One of the most surprising recipes I tried called for uncooked pasta. Full of doubt, I mixed raw elbow noodles with a sludge of cottage cheese, milk and grated cheese. The result was stunning: the noodles obediently absorbed the liquid as they cooked, encasing themselves in fluffy cheese and a crust of deep rich brown."
and on the origin of the dish:
"Daphne Mahoney, the Jamaican-born owner of Daphne's Caribbean Express in Manhattan's East Village, makes a wonderfully dense version of macaroni and cheese that combines American cheese with extra-sharp cheddar. Macaroni pie is hugely popular in the Caribbean, especially on islands like Jamaica and Barbados that once received regular stocks of cheddar from other members of the British commonwealth: Canada, Australia and New Zealand."
and more generally:
"'Starting at about the turn of the 20th century, there was a huge fashion for white sauce in America -- chafing-dish stuff like chicken Ă  la king, or creamed onions,' [cookbook author John Thorne] said last week. 'They were cheap and seemed elegant, and their legacy is that people choose 'creamy' over everything else. But I maintain that macaroni and cheese should be primarily cheesy.'"

"Creamy" as a negative. "Macaroni pie". "Encasing themselves in fluffy cheese". I think this recipe turned out exactly as it was supposed to; it was just mislabeled. And once past that cognitive dissonance I could enjoy the dish for what it was. Putting the macaroni in uncooked resulted in them coming out firm and chewy, but not al dente. And far from the limp and soft overcooked macaroni you often get when using pre-cooked pasta in a baked mac and cheese. The cheese is solid, but soft and light. Almost like a soufle, really. That's from the cottage cheese. Plenty of good cheese flavor, but deeper and richer than straight chedar and/or colby. And that's the truffles doing. The ham, onion and pepper are just fiddly bits adding a little interest.

I don't make mac and cheese very often so I don't have a standard recipe, but I can see coming back to this one to try variations.

Tuesday, April 28, 2009

CSA week 19 - Pizzoccheri

Pizzoccheri is both the name of this dish and the buckwheat noodles that make it so unusual and interesting. I've only ever seen buckwheat noodles before as Japanese soba noodles. These come from Valtellina in northern Italy. This casserole seems to be the only thing that gets done with them.

There are quite a few versions of this recipe on the web. I picked one that made a reasonably small amount for my first try, but beyond that convenience and some small variation in the ratios, they're all pretty much the same.

I could have substituted in soba and saved myself a bit of trouble, but I decided to make the pizzoccheri noodles from scratch. I need the practice.
I used:
1 cup buckwheat flour
3/4 cup semolina flour
2 large eggs [some recipes just use water]
a pinch of salt,

mixed them all together in the usual way, kneaded for a good ten minutes to compensate for the lack of gluten in the buckwheat, let it rest and then clogged up my pasta machine with the soft, sticky, friable, unworkable dough. That clearly wasn't going to work so I rolled it out by hand as best I could and then cut out broad, short noodles.

I let them dry a little as I brought a pot of water up to a boil.

Meanwhile, I fried 2 ounces of chopped pancetta in a small pan. This is an unusual addition to a simple peasant dish, but since I'm not actually a peasant I figured I could splurge a little. Once they were crisp, I fished them out and set them aside. Then I added a modest 3 Tablespoons of butter to the pan [I saw recipes that used a whole stick], melted that down, added a smashed clove of garlic and 4 julienned sage leaves and simmered on low for a couple minutes to infuse the flavors. No browning.

By this time, the water had come to a boil so I added the noodles. Because they were so thick, they took a good 15 minutes to cook through. I fished them out and kept them warm. Then I added six ounces of shredded cabbage [some recipes use chard] and a large potato, thinly sliced and boiled them for ten minutes until they were tender. A lot of recipes start with the vegetables, cook a little while and then add the noodles to the pot, but I had no idea how long my noodles were going to take so this way seemed best.

And finally, I shredded 4 ounces of fontina cheese and 2 ounces of Parmesan. Again, many recipes use a lot more.

Once everything was cooked, I got out a big bowl, put some noodles in the bottom, added a layer of vegetables then a layer of cheese and repeated until I had three full layers. The pancetta goes on top and then the sage butter. A few recipes added a couple cups of bread crumbs before the butter and then baked the whole thing like a lasagna, but I kept it simple; the hot ingredients were plenty to melt the fontina to bring the dish together.


And the result is...not all I had hoped, honestly. Thinner noodles would have helped; Right now there's not much textural contrast between the noodles and the potatoes. And both are on the bland side. Pair those with boiled cabbage and mild cheese and you've got a big hearty bowl of kind of boring. It's not really bad, it just clearly could be better. Double the sage, quadruple the garlic, add some hot pepper flakes, sauté the cabbage to condense the flavor (instead of boiling it away. There's a lot of flavor in the boiling water that should be in the dish.), crisp up the potatoes, switch out the fontina for something with a bit more punch and then I think you've got something. Or maybe just more salt in the pasta water and heap up the cheese and butter. I think I was too conservative and missed the point of the dish.

I've been doing a bit more reading and thinking about buckwheat pancakes I've had. People are saying, and I'm thinking, that buckwheat by itself doesn't taste so good. The flavor you're looking for is the combination of buckwheat and butter. I've got a couple servings of leftovers and I'm adding a sizable chunk of butter to both before they go into the freezer. Also, a sprinkling of pine nuts for a bit of texture. I think that should do the trick.

Sunday, April 5, 2009

CSA week 18 - Quinoa-crusted quiche

It's been a while since I've made a quiche. I spent some time last Fall experimenting with crumb crusts trying to come up with something with a good texture that didn't require most of a stick of butter to make. I finally settled on using cracker crumbs mixed with finely grated cheese and blind baked like a pie crust.

So when I finished making beet-top, spring-onion, grape-tomato pizza last night with plenty of each left over (not to mention half a ball of fresh mozzarella), and thought of quiche as a way to use up some more, I wanted to do something a bit different with the crust.

Frequent commenter Kat has made polenta crusts that she's talked about on her blog so I thought I'd try quinoa to see how that might work.

I started by cooking up a half cup of quinoa, mixing it with a quarter cup of panko bread crumbs, salt and a spice blend and letting it cool. Once it was workable, I pressed it into a 9-inch pie pan. It was a little crumblier than I wanted, although it was sticking together, so I decided to pre-bake it. I grated a good layer of pecorino toscano over top before putting it into a 350 degree oven for 10 minutes. The results were interesting. The cheese melted to form a sort of shellac over the quinoa. I think mixing it in would have worked well, but this protective coating should keep the crust intact.

Meanwhile, for the filling, I fried up a couple thick slices of bacon until crisp, set those aside and sautéed a handful each of beet- and spring onion-tops along with a good bit of parsley. Once those were just about done I added a handful of grape tomatoes to cook just a little bit. I just quartered the tomatoes instead of slicing them as I wanted to have them be distinct chunks in the quiche and not just a general tomatoey flavor thinning out the custard. And finally, I chopped up a thick slice of mozzarella into half-inch cubes, crumbled the bacon and mixed it all together for the final filling.

I decided to experiment with the custard a bit too as I had half a cup of leftover Greek yogurt I wanted to use. I mixed that with a cup of milk, a quarter cup or so of grated cheddar cheese and four eggs for the custard. That turned out to be just a little too much so I wasn't able to get the pan into the oven without spillage, but I didn't lose a whole lot.

I baked it at 375 degrees for 45 minutes and then ate leftover pizza while it cooled because the whole thing took a lot longer than I expected and was getting really hungry.

After 15 minutes of cooking, here it is.


Near the center, quiche and quinoa stayed separate and the quinoa stayed crumbly so it's not much of a crust there. But closer to the edges, and particularly up on the sides, the custard soaked down. It's delicate, but it holds together and I think it'll be firmer once it's cold. The flavors blend nicely too. The soaking in means there's less custard on top so the filling ratio is higher than I was hoping for and it's hard to judge whether the yogurt has any real influence on the flavor. So I'm inconclusive on that part of the experiment. I was worried about the random mix of cheeses, but they're all mild. The bacon smooths over any faults and the quinoa matches well with the eggs and smokiness so, even if there are faults in some specific areas, I'm going to call this overall a success.