Showing posts with label Americana. Show all posts

Monday, February 21, 2011

CSA week ten - Hilda Minter’s spicy escarole

I don't normally do the cut and paste for recipes, but this one was written up quite professionally--more professionally than the version I worked off of--and I don't see how I could do better. Plus it's got a story that adds a lot of character. This is from One Big Table by Molly O’Neill. As always, my comments are in square brackets.

Hilda Minter’s Spicy Escarole

Birmingham, Alabama

In 1988, Hilda Minter’s husband, Joe Minter, a retired construction worker, received a message from God directing him to create a sculpture park depicting the African American spiritual experience in their backyard in the Woodland Park neighborhood of Birmingham. Their property abuts a historic African American cemetery, and the notion of painting the verse from John 3:16 on the tailgate of a pickup truck or His Word Is Real on a defunct movie theater marquee gave her pause. When her husband paid homage to the American workingman by welding giant rusty wrenches to a cross, Mrs. Minter made her favorite spicy escarole. When Mr. Minter was heralded as a visionary genius, she made bigger pots of the escarole for the busloads who began to make pilgrimages to his sculpture park. “We were put here to make things and give them away,” said Mrs. Minter, a retired nurse’s aid. “People don’t expect escarole to be so sweet and spicy. That’s why I like it; it make me think and I like to watch what it does to people too.”

Ingredients:
3 tablespoons bacon grease or olive oil
1⁄4 pound thickly sliced spicy pressed sausage such as pepperoni, chorizo or soppressata, cut into 1⁄4-inch dice [I used some sausage-of-the-week from Whole Foods that I forgot to label. I thought it was Indian and was prepared to adjust the spices to suit, but I couldn't identify it when I tried a piece so I left things as is. It was fresh, not dried as called for here; the version of this recipe I used just said the very vague "chorizo" so I didn't know what was called for.]
2 garlic cloves, minced
1⁄2 teaspoon crushed red pepper
4 heads of escarole (2 1⁄2 pounds), dark outer leaves removed, inner leaves coarsely chopped
2 cups diced stewed tomatoes, fresh or high quality canned [I used fire-roasted crushed tomatoes]
1 tablespoon minced fresh oregano
1 to 2 teaspoons salt
Black pepper to taste
Cider vinegar or lemon juice to taste

1. Heat 2 tablespoons of the bacon grease or olive oil in a large soup pot over high heat. Add the spicy sausage and garlic and cook over high heat, stirring constantly, until the garlic is golden, about 2 minutes. Add the red pepper and stir.

2. Add the escarole in batches and cook. Add the tomatoes and oregano; season with salt and pepper and bring to a boil. Cook over low heat until the escarole is tender, 10 to 15 minutes. Remove from heat, cover, and allow to sit for 10 minutes.

3. Season with additional salt, pepper, vinegar or lemon juice to taste and serve with cornbread or beans or both. [Or neither.]

Serves 4 to 6

The ten minutes of sitting turns the escarole from tender to a bit limp, but that helps it carry the sauce so that's fine. I do think the recipe might be a bit better using collards, though.

The cider vinegar transforms the sauce from a spicy tomato sauce (which I liked fine) into a sweet, spicy and sour combination that works surprisingly well with the flavor of the escarole. Without the vinegar the flavors work on their own; with it, it's tasty but unbalanced. It needs some ribs or pulled pork to give it some weight. The beans, the recipe calls for, would work just fine too, actually. Still, all in all, not a bad dish and a rare good use for escarole.

Thursday, February 10, 2011

CSA week nine - Utica greens

The greens in question here are escarole a.k.a. curly endive a.k.a. the stuff from the CSA share this week.

The Utica in question is a town in upstate New York. I'm always pleasantly surprised to find a regional cuisine that I wasn't familiar with. Yes, this is basically Italian-American, but it evolved its own way upstate to create a few dishes you won't find outside the region. There's this, salt potatoes, riggies, snappys (which I knew as Harry's white hots when I visited family in Rochester) and a few others. There's an interesting list here.

This is one of those recipes where every kitchen has its own variation. Only a few of those are up on the Web. I based mine on one by Janet Chanatry of Chanatry's SuperMarket in Utica.

Ingredients:
1 1-pound head of escarole, cleaned and chopped into large pieces
2 Tablespoons olive oil
at least 1 ounce prosciutto, sliced thin and chopped
copious garlic, finely chopped
2 long Italian hot peppers, seeded and sliced thin [I couldn't find the peppers I wanted so I used Anaheims]
1/3 cup hot pickled Italian peppers, sliced thin [I couldn't find what I wanted here either so I picked peppers out of the various mixes at the Fresh Market olive bar.]
1 cup chicken stock
1 cup or more breadcrumbs
1/3 cup pecorino romano, finely grated
1 cup chicken broth
salt and pepper

0. Preheat oven on broil.

1. Bring a large pot of water to a boil. Add escarole and less salt than if you were making pasta but still a good bit. Simmer 4-6 minutes until the escarole is tender and wilted. Remove to a bowl, add cold water until the greens are cool enough to handle. Squeeze out the water and unwad the resulting wads from your squeezing.

2. Heat the olive oil in a large pan over medium heat. Add garlic and proscuitto and cook for 2-3 minutes until prosciutto is frizzled and garlic aromatic. Add both sorts of peppers and cook another 2-3 minutes until the raw peppers soften a little but still have some bite to them.

3. Turn off the heat and add escarole and stock to pan. Mix in breadcrumbs and cheese gradually. The goal is to soak up all the stock so be generous with the crumbs. [Chanatry's original recipe called for only 1/2 cup breadcrumbs but I used lots more. She must have meant store-bought dust-dry crumbs. My homemade crumbs absorb a lot less liquid per cup.]

4. When the mixture is no longer soupy, check to see if you used a pan that can survive going under the broiler. If not, move everything to a baking dish. If you used a cast iron pan then you can leave it where it is. Season the mixture to taste, sprinkle some more breadcrumbs on top and drizzle or spray with a little more olive oil. Broil for a few minutes until well browned.

Serve hot. The Delmonico's menu pairs it with steak. I saw another appealing suggestion of using it to top a chicken cutlet sandwich. Basically, it's both vegetable and starch so pair it with a chunk of meat.

With the prosciutto, garlic and peppers, of course this tastes pretty darn good. The question is: how much do the greens contribute to the goodness? Escarole isn't the world's most hearty or flavorful vegetable so it has a hard time standing up to the other flavors in the dish, but it's in there. It's a kinda-spinachy-letucey baseline (not a bass-line, though. No real low notes in this dish. That's why it's a side dish for meat.) the other flavors work off of. It's also the physical bulk of the dish which is important. It contributes to the dish, but it doesn't really contribute to the goodness. I want to try it again after it's fully clotted and the flavors have had time to blend a little. I think it might come together a bit better on reheating.

Friday, October 23, 2009

Simmered southern-fried chicken gizzards

This is a follow up to my previous chicken gizzard post. That, somehow, has become the top result on Google for people searching for information about buttermilk and chicken gizzards. On behalf of those information seekers (and my own curiosity), I wanted to directly compare the other popular method of prepping gizzards for frying: a twenty minute simmer.

Beyond that change, I did the same egg wash and used the same spiced flour which, it seems, has been sitting in my refrigerator untouched for the last two months. That shouldn't be a problem, should it? I'll edit the post and let you know if I get sick later today.


Here's the result:

The biggest difference, obviously, is that these gizzards are already cooked before they go into the oil. The simmered gizzards are noticeably more tender, but they're also less juicy than the buttermilk-brined gizzards. That's both from the cooking and the soaking so it's a pretty significant differential. It seems to me that if you want perfectly tender chicken, you shouldn't be cooking organ meats so I'm weighing the moistness more heavily. Advantage: buttermilk.

A second difference is in the texture of the breading. Compare the two pictures (here's the other) and you can see that the buttermilk-brined gizzards are significantly more knobbly-crunchy. It's the difference between KFC regular and extra crispy so a matter of personal preference. No advantage.

A third difference is in the flavor. I'm not sure I can fairly judge here as I salted the simmering water and that combined with the heavily salted flour coating over-salted the final results. Looking past that, the simmered gizzards are missing a dimension of tanginess from the buttermilk that I enjoyed and the gaminess has been minimized. I miss the added complexity. Also, the dryness of the simmered gizzards (probably even without the extra salt, I think) compelled me to use a sauce to compensate. I prefer having the option to dip or not to dip. Advantage: buttermilk.

A fourth difference is how long the recipes took. I made these for lunch on impulse and I was eating less than 40 minutes later. The buttermilk gizzards soaked for 48 hours. Advantage: simmering.

It comes down to convenience versus depth of flavor and texture. Isn't that always the way? I did happily finish my bowlful of simmered gizzards and I can't help noticing that I'm having lunch today and not two days from now so I can't be entirely negative here. But my foodie impulses can't be denied and I have to come down on the buttermilk-brine side if you can spare the time.

Sunday, May 3, 2009

Dim Sum Sunday - Creamy macaroni and cheese

A little while back I was invited to join the Karmic Kitchen's Dim Sum Sunday food blog event:

"Is your Sunday dinner delectable? Daring? Succulent? Shareable? If it's any or all of those things, or even something completely different, we'd like to invite you to participate in "Dim Sum Sunday" - a weekly food meme. Each week, a theme will be given. The participants will use the theme (from the literal to the avant-garde) when creating their Sunday suppers the following week. Then, just take a picture or two of the meal, and tell us all about it. Does it have to be home cooking? Not necessarily - you can go out, eat in, or even go to a friends house...as long as your post reflects the theme in original (you don't have to be a professional photographer) pictures of your dinner, and personal stories (and recipes and how-tos if you choose...)!"

I declined at the time as I was working the Sunday late shift on the reference desk and wasn't having a Sunday dinner. I still am, but I've belated realized that the Sunday dinner doesn't have to be literal; I just need to post it up on Sunday. This dish was actually my Friday dinner. The theme this week: comfort food.

Mentioning the reference desk there is actually relevant as I've decided to misuse my librarianly abilities for personal gain. I have access to databases filled with over a century of newspaper backfiles and while, yes, man walks on moon, man also cooks mac and cheese and writes articles about the recipe.

Actually, it's woman, not man, in this case and the article is just from 2006 so it's probably on-line somewhere. But it's from an article with some interesting things to say about the philosophy of mac and cheese with some recipes that are proper macaroni and cheese not macaroni in a cheese-flavored white sauce. This is an exceptionally interesting one that uses ingredients and techniques I haven't seen before:

Creamy Macaroni and Cheese
Time: 1 hour 15 minutes

2 tablespoons butter
1 cup cottage cheese (not lowfat)
2 cups milk (not skim)
1 teaspoon dry mustard
Pinch cayenne
Pinch freshly grated nutmeg
1/2 teaspoon salt
1/4 teaspoon freshly ground black pepper
1 pound sharp or extra-sharp cheddar cheese, grated [I used half sharp cheddar and half colby]
1/2 pound elbow pasta, uncooked.

1. Heat oven to 375 degrees and position an oven rack in upper third of oven. Use 1 tablespoon butter to butter a 9-inch round or square baking pan.

2. In a blender, purée cottage cheese, milk, mustard, cayenne, nutmeg and salt and pepper together. Reserve 1/4 cup grated cheese for topping. In a large bowl, combine remaining grated cheese, milk mixture and uncooked pasta. Pour into prepared pan, cover tightly with foil and bake 30 minutes.

3. Uncover pan, stir gently,

[and stir in anything that you want mixed into the dish. I wanted to keep things simple so I sautéed some onion, pepper and good quality, but neutrally-flavored ham (for something like this you want the ham to taste like ham, not smoke or maple syrup) in a little butter and a whole lot of truffle oil. The little black specks you can see in the pan are bits of truffle. I've heard of truffled mac and cheese plenty of times, but I've never tried it and now seemed as good a time as ever.]

sprinkle with reserved cheese and dot with remaining tablespoon butter. Bake, uncovered, 30 minutes more, until browned. Let cool at least 15 minutes before serving. Serve with a green salad and white wine.

Yield: 6 to 8 servings."

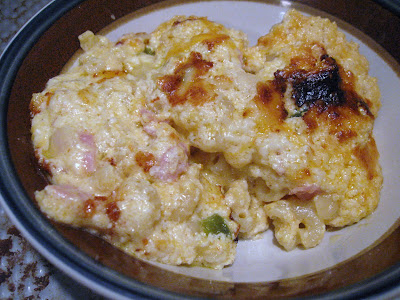
And here it is:


It looks pretty darn good, but that's definitely not what I'd call creamy. The cheese is clotted up pretty solid, really. I went back to the article to see if there was a description of the completed dish to compare with my results:
"One of the most surprising recipes I tried called for uncooked pasta. Full of doubt, I mixed raw elbow noodles with a sludge of cottage cheese, milk and grated cheese. The result was stunning: the noodles obediently absorbed the liquid as they cooked, encasing themselves in fluffy cheese and a crust of deep rich brown."
and on the origin of the dish:
"Daphne Mahoney, the Jamaican-born owner of Daphne's Caribbean Express in Manhattan's East Village, makes a wonderfully dense version of macaroni and cheese that combines American cheese with extra-sharp cheddar. Macaroni pie is hugely popular in the Caribbean, especially on islands like Jamaica and Barbados that once received regular stocks of cheddar from other members of the British commonwealth: Canada, Australia and New Zealand."
and more generally:
"'Starting at about the turn of the 20th century, there was a huge fashion for white sauce in America -- chafing-dish stuff like chicken à la king, or creamed onions,' [cookbook author John Thorne] said last week. 'They were cheap and seemed elegant, and their legacy is that people choose 'creamy' over everything else. But I maintain that macaroni and cheese should be primarily cheesy.'"

"Creamy" as a negative. "Macaroni pie". "Encasing themselves in fluffy cheese". I think this recipe turned out exactly as it was supposed to; it was just mislabeled. And once past that cognitive dissonance I could enjoy the dish for what it was. Putting the macaroni in uncooked resulted in them coming out firm and chewy, but not al dente. And far from the limp and soft overcooked macaroni you often get when using pre-cooked pasta in a baked mac and cheese. The cheese is solid, but soft and light. Almost like a soufle, really. That's from the cottage cheese. Plenty of good cheese flavor, but deeper and richer than straight chedar and/or colby. And that's the truffles doing. The ham, onion and pepper are just fiddly bits adding a little interest.

I don't make mac and cheese very often so I don't have a standard recipe, but I can see coming back to this one to try variations.

Wednesday, March 18, 2009

CSA week 15 - Swiss chard meatloaf

Meatloaf was on special in the cafeteria today but I didn't like the looks of it (and I'm suspicious of "Jamaican-style" meatloaf although now that I've looked it up I find that a) it's a real thing and b) it uses coconut milk, pineapple and scallions which doesn't sound half bad). On the other hand, meatloaf would be a fine way to use up some more of the chard, so I stopped and picked up some meat on the way home and set to work.

I figure meatloaf is a recipe designed to use leftover scraps of meat and vegetables, but unlike other recipes of that ilk--fried rice, omelets and such--everyone argues about the perfect meatloaf recipe. I don't get that. Clearly, if there is such a thing it's however your mother made it but you still get cookbooks full of variations. What I wanted were general guidelines to improvise within. The closest I found were on the How to Cook Like Your Grandmother blog.

Start with a cup and a half or so of finely chopped starch--I used half bread crumbs and half oatmeal


Add around a cup of somewhat less finely chopped vegetables, generally raw--for the chard I decided to cook them a little to soften. I used just stems and quite a high heat to get a char on them for a little more flavor. I had hoped to use up more chard but I also wanted to include onion, mushrooms and some of last week's green pepper so I still have a whole lot of chard left. I may just blanch and freeze it as I really don't want to deal with it any more. (I used it in some tacos on Sunday too so this is the fourth dish including it this week.)


Then two eggs, 1/4 cup of dairy of one sort or another--I just used plain milk--and plenty of salt, pepper, spices and sauces--I used Worcestershire and a vinegar-less pepper sauce plus a teaspoon of a smokey paprika based spice mix.


All that gets mixed before adding two pounds of ground meat--I used half beef chuck and half pork. Mixing the rest beforehand helps avoid overworking the meat.

Lightly pack the mixture into a loaf pan and upend it into a baking dish or high-walled baking sheet. Room for runoff is important, particularly if you like the dried out end bits.

That goes into a 350 degree oven until the inside reaches 140 degrees. Or something like that. There's lots of disagreement on temperatures. This quite low final temperature makes sense to me since there's going to be a lot of residual heat and carryover cooking in something like this. And undercooked is easier to fix than overcooked. Unfortunately, I haven't got a probe thermometer so I'm going to have to poke in my baking thermometer after a while and hope I don't let it go to long. I'm guessing 45 minutes at least. ... More like an hour, it turns out. And there was no carryover heating or any runoff for that matter so I'm putting it back in the oven until it gets to at least 150. ... And another 20 minutes gets it to 180. Swell. No runoff, though, so all that moisture is still inside. Maybe the overcooking isn't too bad.


Here it is after resting. Lame presentation, but I finished my mizuna and grape tomato salad a good half hour before this was ready to serve. I was hoping to use pan drippings to make gravy, which would have looked nice drizzled over top, but no pan drippings. It's not really dry so no big deal. You can see that I didn't mix it as well as I should have, but I like I said earlier I didn't want to overwork the meat. The texture seems fine anyway: a bit crumbly, a bit meaty, a bit mushy. Meatloafy. It doesn't seem overcooked at all. I shouldn't be surprised that the recipe is so forgiving. That's the nature of these throw-together dishes. , The texture could use a little variation. The firmer and slightly crunchy edges are nice but I find I want a little sauce just for interest even if the meatloaf isn't so dry it needs it.


The flavor is classic meatloaf and a pretty good example of the form. I think maybe you can tell that I used oatmeal and good quality homemade bread crumbs; there seems to be a bit of depth to the starchy flavors. I'm a little disappointed not to have an identifiable chard note; I should have left out the pepper and doubled the chard. There's some slight variation from the meat-marbling so that's kind of interesting. It is missing sweetness; that's what I get for being lazy and not glazing it. But that's easily fixed with any number of sauces so maybe I'm better off with the choice of flavors to pair each slice with.

Right, so your takeaway here is: if you're looking for a way to use up leftover chard stems, meatloaf is a viable choice. OK, time to make the ice cream.

Tuesday, December 9, 2008

CSA week two - Roasted butternut squash, sage and brown butter risotto

This recipe was inspired by a pasta with butternut squash and brown butter recipe from A Good Appetite--a resource you definitely should check out for ideas for using non-Miami-specific CSA items. Kat has been cooking and posting her Minneapolis CSA all summer long so there's big backlog of interesting recipes to try out.

I decided to switch from a pasta to a risotto just to keep things interesting and roasted the squash to boost the flavors a bit. Those two impulses worked against each other actually so you may as well just pan fry the squash if you want to make this dish.

I also cut the recipe down to one big serving since risotto is no good unless it's fresh off the stove. It'll serve two if you have a salad with it I think.

I also did some research on tips to improve risotto that I'm including in the procedure since they seemed to work out.

Ingredients:
1 Tablespoon unsalted butter
1 cup butternut squash, peeled seeded and cut into 1/2- to 3/4-inch cubes
1 1/2 cups chicken broth, or vegetable broth (that's just under one can conveniently)
1 Tablespoon olive oil
1/4 cup shallot, chopped
1/2 Tablespoon fresh sage, finely chopped
1/2 cup arborio rice
1/2 cup dry white wine
1/2 Tablespoon Italian parsley, chopped
2 Tablespoons goat cheese, crumbled
Salt and pepper and fresh grated nutmeg to taste

0. Preheat oven to 400 degrees.

1. Toss the butternut squash cubes with a little olive oil and salt and roast in a single layer in a 400 degree oven for 15 minutes or until just barely turning tender and brown. [That may be under 15 minutes for you. My pan doesn't quite fit in my oven so my oven door was ajar which I think slowed the cooking down. You want the butternut squash half-cooked so you can add it to the risotto later which kind of defeats the purpose of roasting because all the good stuff happens in the second half of cooking which you're not doing.]

2. Heat the olive oil in a medium pot over medium high heat until shimmery. Add the shallot and sage and cook until the shallot is translucent and slightly browned. Remove leaving as much of the oil as you can.

3. Add more oil if necessary and add rice. Cook for seven to ten minutes, stirring frequently. The rice will turn translucent pretty quickly. Cook it until it turns opaque again and starts smelling nutty. [This bit is controversial. Many recipes say just to cook for two or three minutes to get to the translucent stage. The longer cooking time gave me a fluffier result, but the texture is kind of a puffed-rice sort of fluffy so I don't know if that's an ideal result. On the other hand, when I only cook the rice for a few minutes I find that it usually ends up a little crunchy in the middle which is no improvement.]

4. Heat up your wine in the microwave or on the stove. Once that's warm, heat up the stock too. Keep that hot as you go along.

5. When you're happy with the rice add the wine and turn down the heat to medium low. Cook, stirring often (which is not as often as frequently), until the wine is completely evaporated.

6. Add the shallot and sage back into the pan along with a couple ladles of stock. Cook, stirring not quite so often unless you really want to, until the stock is nearly evaporated. You might want to turn down the heat too.

7. Add more stock and cook some more. When the rice is about half done and the stock about half gone stir in the squash. This might also be a good time to add some salt and pepper.


8. Meanwhile, in a small pan, melt the butter over medium heat and cook until it is nicely browned.


9. Keep adding stock and cooking until the rice is where you want it or you run out of stock. And decide how wet you'd prefer your final results. When everything is pretty close to the way you want it, take the pot off the heat, stir in the brown butter, goat cheese (I used goat cheese with a mixed pepper coating for a bit of extra interest), parsley and some more sage wouldn't be a bad idea. Cover and let rest for three minutes. Uncover, check for seasoning and add the nutmeg. Don't neglect the nutmeg, it's surprisingly important in making the other flavors pop.

And if you did everything right they should be popping all over the place. You probably already know that butternut squash, brown butter and sage are a great flavor combination so I'll just say that a nicely creamy risotto is a fine delivery mechanism for those flavors. Oh, I forgot to add some of the leftover crab! I just did a quick taste test with the last bite of risotto and crab is just fabulous with the squash and sage. What wasted potential! OK, I've got another squash left. Maybe a squash/sage/brown butter/crab quiche?

Thursday, November 27, 2008

CSA week one - my Thanksgiving meal

I'm not visiting family this year so I thought I'd make a little thematically appropriate dinner for myself. Mainly, I wanted to try making a green bean casserole. As I mentioned in a previous post I've never had it before but I've known about it for decades and I've been curious what the big deal was. I used the Good Eats recipe; it says "Best Ever" right there in the name and the many reviewers agree so I was sold. Maybe I should have used canned ingredients to get the authentic experience, though.

I didn't make any major changes to the recipe beyond halving it, changing to an 8" cast iron to accommodate, and fixing the thoughtless oversight of not including any bacon.

Here's my slightly modified version:

Ingredients

For the topping:

  • 1 medium onion, thinly sliced
  • 1/8 cup all-purpose flour
  • 1 tablespoon panko bread crumbs
  • 1/2 teaspoon kosher salt
  • Nonstick cooking spray

For beans and sauce:

  • 1 tablespoons plus 1/2 teaspoon kosher salt, divided
  • 1/2 pound fresh green beans, rinsed, trimmed and halved
  • 1/2 tablespoon unsalted butter
  • 6 ounces mushrooms, trimmed and cut into 1/2-inch pieces
  • 2 thick-cut slices of smoked bacon
  • 1/4 teaspoon freshly ground black pepper
  • 2 cloves garlic, minced
  • 1/8 teaspoon freshly ground nutmeg
  • 1 tablespoon all-purpose flour
  • 1/2 cup chicken broth
  • 1/2 cup half-and-half

Directions

Preheat the oven to 475 degrees F.

Combine the onions, flour, panko and salt in a large mixing bowl and toss to combine. Coat a sheet pan with nonstick cooking spray and evenly spread the onions on the pan. Place the pan on the middle rack of the oven and bake until golden brown, approximately 30 minutes. Toss the onions 2 to 3 times during cooking. Once done, remove from the oven and set aside until ready to use. Turn the oven down to 400 degrees F.

[This is not nearly as easy as Alton Brown makes it sound (and again the reviewers agree). My onions stuck badly, despite a well oiled pan, so tossing didn't work so well and I lost maybe a third of the onions to burning and much of the rest didn't get the contact with the pan they needed to crisp up. I should have used my non-stick cookie sheet instead of a glass baking dish.]

While the onions are cooking, prepare the beans. Bring a gallon of water and 2 tablespoons of salt to a boil in an 8-quart saucepan. Add the beans and blanch for 5 minutes. Drain in a colander and immediately plunge the beans into a large bowl of ice water to stop the cooking. Drain and set aside.

Melt the butter in an 8-inch cast iron skillet set over medium-high heat. Add the mushrooms, bacon, 1 teaspoon salt and pepper and cook, stirring occasionally, until the mushrooms begin to give up some of their liquid, approximately 4 to 5 minutes. Add the garlic and nutmeg and continue to cook for another 1 to 2 minutes. Sprinkle the flour over the mixture and stir to combine. Cook for 1 minute. Add the broth and simmer for 1 minute. Decrease the heat to medium-low and add the half-and-half. Cook until the mixture thickens, stirring occasionally, approximately 6 to 8 minutes.

[I should have crisped the bacon first, removed it from the pan, cooked the mushrooms and added the bacon back in with the green beans. As it was, the bacon, while adding good flavor, was kind of flabby. I forget to adjust for the thick cut of the bacon I've been buying recently.]

Remove from the heat and stir in 1/4 of the onions and all of the green beans. Top with the remaining onions. Place into the oven and bake until bubbly, approximately 15 minutes. Remove and serve immediately.

[And you'd better serve immediately because it's good for five minutes while it's bubbling hot and then it rapidly fades in quality. When it's just warm, the textures get kind of icky. Personally, I would have liked a shorter blanch on the green beans so they'd stay a little crisp, but maybe that's just because my onions weren't. I think both the flavors and textures were best out of the refrigerator the next day. Although neither were really any great shakes; it's beans, onions and mushrooms in a cream sauce. The smokiness of the bacon was a nice addition to that, I think ,but still this is probably a dish enjoyed more out of tradition than for it's own sake.]

Anyway, that's the side dish; I still need some poultry for a proper Thanksgiving. Cornish game hen is a popular choice for those dining solo on this day, but I think it looks rather sad on a little roasting dish in the toaster oven. In an aside at the end of a how-to-cook-your-Turkey TV special I saw Alton Brown cook one in a panini press (probably standing in for a George Forman Grill which is likely far more common in American homes). I haven't got one, but I thought I might be able to cook it the same way I cook grilled cheese sandwiches without one.

Step one is to spatchcock the bird. From what I read on-line that's the same as butterflying, but I suspect there's some subtle distinction in arrangement of the limbs afterwards that I'm missing. I've decided I prefer the word 'spatchcock' so that's what I'm saying from now on. That's simply cutting out the backbone, slicing the meat away from the keelbone, flipping the bird over and flattening it out. That's generally followed by seasoning and oiling both sides. In this case I used the Gullah baked chicken seasoning blend I bought when I passed through the Carolinas last year which gives a good straightforward southern cooking flavor to a bird.

Step two is to heat two cast iron pans over high heat for five minutes or so. I don't know why my camera couldn't capture the cherry red of the back burner you can see there. It would be nice to have burners that could get white hot, though.


Once the pans were piping hot I lightly oiled the large one, turned down the heat to medium high, laid out the hen skin-side up, put the small pan on top (with it's hot bottom against the hen), put my heavy cast iron pot lid on top and squished it down. It took a bit under 20 minutes to cook through and since the small pan cooled I flipped the bird a couple times.


The results are rather better than I expected from a novelty cooking method: crispy browned skin and flavorful not-too-dry (although not noticably juicy either. Maybe I should have brined it.) meat.


And that's my Thanksgiving meal. If I had thought of it, I would have gotten a can of cranberry sauce too. To be honest, I prefer the canned to the fresh. Instead I had a couple chunks of membrillo--the Spanish quince paste that's traditionally paired with manchego cheese. The combination didn't make sense to me at first but it's grown on me over time. I suppose cranberry sauce with turkey makes just as little obvious sense. Membrillo is chewier and not as tart as canned cranberry sauce, but it substituted fine. I considered roasting some turnips and then mashing them up, but I decided to save them for stock which I'll post about tomorrow.

Saturday, November 1, 2008

Corn toasties - variation two

There was nothing wrong with my first batch of corn toasties back in August. Well, nothing major, anyway. My slightly savory variation on the Cooks.com original as presented on Kat's blog was fine enough, but I found that what turned out to be my favorite aspect--the sweet crispy browned bits you got when toasting them--wasn't best served by my changes.

So I've gone back to the original and this time I'm playing around with texture hoping to make it both lighter and crunchier. To the first end, I'm increasing the baking powder from 1 1/2 teaspoons to a full 2. The rule of thumb is one teaspoon of baking powder to lift one cup of flour and one cup of liquid so this recipe can handle the extra. Also, the acidity of the honey I added first time may have interfered with the powder's chemical reaction reducing lift so going back to straight sugar should help as well.

I also adjusted the mixing to more fully follow the muffin method to avoid toughening it up with gluten.

As for the crunchiness, well it got a bit complicated. Here's the full recipe:

Ingredients
1 stick unsalted butter, melted
1/2 cup white sugar
2 Tablespoons brown sugar
2 eggs
1 teaspoon vanilla
2 teaspoons baking powder
1/2 cup corn meal
1/4 cup polenta
2 Tablespoons grits
3/4 cups bread flour (only because I don't have any all purpose around)
1/2 cup whole wheat pastry flour
1 teaspoon kosher salt
1 cup whole milk

0. Bring everything to room temperature. Preheat oven to 350 degrees.

1. Mix butter and sugars.

2. Mix eggs with vanilla, but only just to incorporate

3. Mix together butter and egg mixtures

4. Mix together baking powder, salt and all the starches

5. Pour wet mixture over dry mixture. Fold together just until everything is moistened.

6. Add milk, stirring until just barely mixed.


7. Pour into 10" x 15" jellyroll pan, spreading to the edges. Let sit for 10 minutes so the gritty bits can absorb some moisture.


8. Bake at 350 degrees for 25-30 minutes, until the edges are brown and pulling away from the pan. Turn pan once.


9. Let rest in pan for ten minutes. Cut into serving-size pieces and lever out with a spatula.


The toasties are lightly textured, but still substantial enough for a pop up toaster. There's plenty of interesting texture to chew on in each bite which keeps the flavor from fading too quickly. The entire top has been slightly candied so it's a bit crisp and there is a sweetness gradient down through each piece, ranging from corn breakfast muffin on top to hoecake on the bottom. They're probably too sweet to pair well with savory dishes, but it's not a simple sweetness. There's a richness and depth of flavor from the brown sugar and whole wheat flour there too. Very nice. I'll be using this version as my base if I experiment further. Adding wild blueberries or cranberries would certainly work well.