Showing posts with label beef. Show all posts

Sunday, March 20, 2011

Dandelion and spring onion french dip

Now for the more interesting thing to do with dandelions and caramelized onions that I promised. But before going into the sandwich itself, let's talk caramelization. I've used the word before, but I've really just meant browning the onions or whatever. Real caramelization is something else entirely. It's kind of like how both grilling and slow smoking go by the name barbecue. Here's how I went about doing the real thing.

First I sliced up the spring onions, cleaned them well, and put them into my giant cast iron pot with just a little salt and a little oil. The angle's not good, but it's about 2/3 of the way full.

After 45 minutes covered at medium heat they're fairly well reduced and there's a good bit of liquid accumulated. At this point I removed the lid to let the liquid boil off.

About an hour later, the liquid's just about gone and the onions are starting to collapse. There's been a bit of browning [It's more attractive with white onions.], and the pot is starting to sizzle a little at this point. I turned the down to medium-low and started stirring more frequently, about every 10 minutes instead of every 20.

A half hour later, the onions have cooked down even more, have browned appreciably and are melting into kind of an onion jam. Cooking longer would be better, but there's real danger of burning so I pulled them out at this point. The flavor is kind of like browned onions, but sweeter with a lingering mellow complex savoriness. Really lovely.

Now that I've got my onions, on to building my sandwich.

I started by stemming and blanching my dandelions. Then I put a cup of beef broth in a pan, cooked it down a little to concentrate the flavor, added a dollop of caramelized onion and then the dandelion.

While that simmered, I laid a few slices of roast beef on top to warm through and cook just a little. After the beef was warmed up, I grated some sharp cheddar cheese on top. And finally, I assembled the sandwich with all those components plus some tomato.


The dandelion is carrying a lot of beef broth so the bread got properly wet just after I took this picture. I had a little cup for dipping too, but I didn't really need it.

You've got the beef's savoriness against the sweet onion, sharp cheddar, slightly bitter greens and the acid of the tomato--just a lovely combination of flavors. Would browned onions have worked as well? Not really. That would be good too, but it would be more a standard cheese steak flavor profile. This is something different; the caramelization brings out more of a pot roast aspect to the beef so there are different elements coming to the fore. I should make it both ways and compare and contrast, really.

Wednesday, February 23, 2011

Fergus Henderson's roast bone marrow and parsley salad redux

It's been three years since I made this recipe to disappointing results and it's taken me this long to try it again. It's highly acclaimed, so I knew it was my fault it turned out poorly, but it took seeing a demo showing exactly what I did wrong to push me to actually getting more marrow bones and giving it another shot. Having a big bunch of CSA parsley on hand didn't hurt. I'm still on week ten's share if anyone's keeping track. Also, that original post is, somehow, still getting hits despite being one of a dozen blog posts about this recipe. I feel kind of obliged to update for those readers.

Here's the recipe again with a few notes on my preparation:
Roast Bone Marrow and Parsley Salad
from The Whole Beast: Nose to Tail Eating, by Fergus Henderson

- serves four

twelve 3-inch pieces of veal marrowbone [I used two 6-inch beef bones. I had the option to have them cut in half, but I didn't check the recipe first.]
a healthy bunch of flat-leaf parsley, leaves picked from the stems
2 shallots, peeled and very thinly sliced
1 modest handful of capers (extra-fine if possible)

Dressing:
juice of 1 lemon
extra-virgin olive oil
a pinch of sea salt and freshly ground pepper
a good supply of toast
coarse salt

Put the marrowbone pieces in an ovenproof frying pan and place in a hot 450 degree (F) oven. The roasting process should take about 20 minutes depending on the thickness of the bone. You are looking for the marrow to be loose and giving, but not melted away, which it will do if left too long (traditionally the ends would be covered to prevent any seepage, but I like the coloring and crispness at the ends). [I went a few minutes too long as the crustiness that developed at the uncovered ends disguised the looseness I was looking for. Probably best for beginners like me to cover.]

Lightly chop your parsley, just enough to discipline it, mix it with the shallots and capers, and at the last moment, dress the salad.

Here is a dish that should not be completely seasoned before leaving the kitchen, rendering a last-minute seasoning unnecessary by the actual eater; this, especially in the case of coarse sea salt, gives texture and uplift at the moment of eating. My approach is to scrape the marrow from the bone onto the toast and season with coarse sea salt. [Lacking a marrow spoon, I found a pair of chopsticks worked well to dig the marrow out. I found it easiest to scrape a bone out fully and then spoon a measure of marrow onto each piece of toast. Also, that allowed the toast to soak in a pool of rendered marrow for a little extra unctuousness.] Then a pinch of parsley salad on top of this and eat. Of course once you have your pile of bones, salad, toast, and salt it is diner’s choice. [I used Hawaiian black sea salt because it was what I had at the level of coarseness I was looking for. It does look nice too, though, don't you think?


As I said up top, I had a much improved experience this time around. Along with the sheer fattiness, the marrow delivered a good bit of meaty flavor. Think of biting into a well-cooked steak and getting that great burst of just-melting fat full of savory flavor. It's kind of like that without the meat part. So, yeah, worth making once in a while.

Thursday, January 27, 2011

CSA week six - optimized stuffed peppers

It's been a few years since I've stuffed a pepper. I think the mediocre results dissuaded me from the effort. Beyond the two peppers in week five's share, what inspired me to pick the idea back up again was an article on chow.com that claimed to have the secret to better peppers: a whole lot of salt. That sounded sensible to me so I thought I'd give it a try.

Ingredients:
1/2 cup uncooked rice, cooked [careful if you have a rice cooker. The cup measure that comes with mine is six ounces so I had to use 2/3 the resulting cooked rice]
4 bell peppers, tops removed, cored and de-ribbed, and a bit sliced off the bottom if they won't stand up straight
2 Tablespoons fat of one sort or another
1 medium onion, diced
plenty of garlic, minced
1 pound meat, grind to a coarse hamburger texture [You do grind your own, right? You definitely should]
Worcestershire, soy or Maggi sauce or some other umami-rich seasoning
tomato in one form or another
2 eggs
cheese, grated
salt and pepper

0. Preheat oven to 350 degrees.

1. While the rice is cooking, boil a pot of water large enough to submerge at least one pepper. Add salt as if you were cooking pasta and simmer peppers until they start to soften, around 3 minutes. Drain and cool. [I used the water I rinsed my rice in. Waste not, want not.]

2. Heat a medium pan over medium heat. Add your fat of choice and heat. When your fat is ready add the onion and cook until softened and slightly browned. [Add any other vegetables you want to include around now and reduce the amount of meat accordingly.] Add garlic, cook briefly until fragrant. Add meat [I used beef] and cook until barely no-longer-pink. Season heavily with salt and pepper but add only enough Worcestershire (or whatever) to bring out the meatiness, not so much that you can identify it. Remove to a large bowl.

3. Mix rice into the meat mixture.

[At this point I split the filling into two bowls so I could go in two different culinary directions.]

4. Add your tomato of choice and season to match. [To one bowl I added half a can of roasted diced tomato, basil and oregano. To the other, about the same amount of salsa, chili powder, cumin and chipotle flakes.]

5. Add the eggs and mix well. [The original recipe called for just one egg, but I was disappointed in the final texture so I think you should use more.]

6. Salt the peppers well, inside and out, and stand them up in a baking dish. Stuff them with your filling, packing it in well. [I either had smallish peppers (I did) or I went overboard with the tomato (probably also true), as I had a fair bit of extra filling. No reason you couldn't save it and stuff something else later.]

7. Top peppers with grated cheese. I used mozzarella for the Italian-seasoned peppers and pepper Jack for the Mexican.

8. Bake for 30-40 minutes until cheese is bubbly and browned and the peppers have wrinkled up a bit.

And here's the result:


It definitely looks better than my previous stuffed pepper attempts, although I'm a bit disappointed that the filling doesn't stick together. An extra egg or two, as I advise above, would help with that. As would using bread crumbs instead of rice and/or mixing some cheese into the filling. The flavor combinations turned out quite well, if a little overboard on the salt.

The real question is, is the pepper itself improved. It's been nearly three years since I last had a stuffed pepper so I have no idea, to be honest. However, reading over those old posts, I don't sound entirely happy with the results and this time around, I think I am. The pepper is firm and flavorful but doesn't overwhelm the flavors of the fillings. I can definitely recommend it. I do wish I had done one without salting to compare and contrast, though.

Saturday, May 29, 2010

Southwestern pulled brisket sandwiches with Mesa Grill potato salad

This post combines both of my rather modest goals for the summer: cooking new things in my slow cooker (new to me, anyway) and using the produce from the Buying Club in summery ways.

My previous summers in Miami I pretty much ignored the climate and made whatever looked interesting, but I guess I'm just in a different mood this year. Running the oven in a 90 degree kitchen just doesn't sound appealing. So I'm keeping an eye out for dishes both served cold and requiring less cooking. Certainly I'll be making exceptions, but I do want to shift the majority in that direction.

I found both of these recipes on the Food Network's website. The Mesa Grill recipe is Bobby Flay's obviously. The brisket is from a 2004 episode of a show called Making It Easy that I don't think I've ever encountered. I'm no expert in either slow cooker cooking or Southwestern cuisine so I didn't make any significant changes in either recipe. I hope you don't mind a bit of cutting and pasting from the original sources as they both had quite a few ingredients and I don't see any particular reason to rewrite a scrupulously followed recipe.

Pulled brisket ingredients:
3 pounds beef brisket
Kosher salt
Freshly ground black pepper
2 tablespoons vegetable oil
5 cloves garlic, peeled and smashed
1 Spanish onion, halved and thinly sliced
1 tablespoon chili powder
2 teaspoons ground coriander
2 teaspoons ground cumin
1/4 cup apple cider vinegar
1 1/2 cups water
1 (14 1/2-ounce) can whole peeled tomatoes, with their juices
2 whole canned chipotle chiles en adobo
2 bay leaves
3 tablespoons molasses
Soft sandwich buns
Pickled jalapeños [sweet pickles are just as good. The results aren't really all that Southwestern]
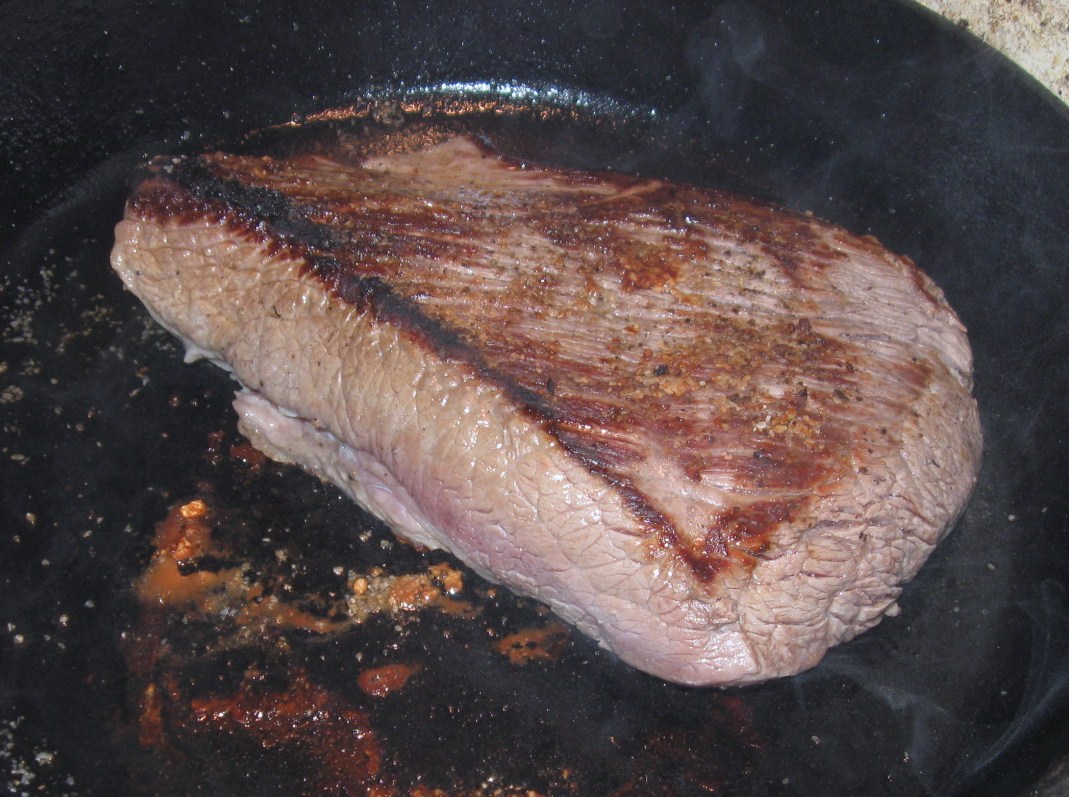
1. Season the beef generously with salt and pepper, to taste. Heat a large, heavy skillet over medium-high heat. Add the oil and heat just until beginning to smoke. Add the meat and cook, turning once, until browned on both sides, about 10 minutes total. Transfer the meat to the slow cooker; leave the skillet on the heat.

2. Add garlic, onion, chili powder, coriander, and cumin to drippings in the skillet and stir until fragrant, about 1 minute. Add vinegar and boil until it's almost gone, scraping the bottom of the pan with a wooden spoon. Stir in water and pour the mixture over the brisket. Crush the tomatoes through your fingers into the slow cooker; add the tomato juices, chipotles, bay leaves, and molasses. Cover the cooker, set it on LOW, and cook the brisket until it pulls apart easily with a fork, about 8 hours.

3. [The original recipe calls for just pulling the meat apart in the cooker and serving, but I wanted a thicker sauce which requires a few more steps.] Remove meat and bay leaves from the slow cooker. Turn off the slow cooker or remove the cooking vessel from the heater or pour out the sauce into a large bowl. Discard the bay leaves and let the brisket and sauce cool a bit.

4. When it's cool enough to handle, pour the sauce into a food processor or blender and blend smooth. Return to slow cooker if it has a High setting that's pretty high or pour into a pot on the stovetop. [I tried the former first but switched to the latter.] Cook the sauce down until it's thick enough to splatter when it bubbles.

5. Meanwhile, pull the brisket apart with forks and/or tongs. When the sauce is to your ideal thickness, mix it with the meat.

Serve on buns or in tortillas with the pickled jalapeños on top. Over egg noodles or rice wouldn't be bad either.


Ingredients for Mesa Grill potato salad:
[I halved these amounts. If I had known how poorly potato salad freezes, I would have quartered them. Instead, I've been eating potato salad way too many meals in a row. It's good but I've got my limits.]
1 1/2 cups prepared mayonnaise
1/4 cup Dijon mustard
2 tablespoons fresh lime juice
2 tablespoons chipotle pepper puree [or one chipotle en adobo chopped fine]
1 large ripe tomato, seeded and diced
1/4 cup chopped cilantro leaves
3 scallions, chopped, white and green parts
1 medium red onion, thinly sliced
1/2 teaspoon cayenne
4 cloves garlic, finely chopped
Salt and freshly ground black pepper
16 new potatoes, about 3 to 4 pounds

1. Heat a large pot of water. Cut potatoes into large, similarly-sized pieces. When water comes to a boil, add potatoes and a generous amount of salt. Lower heat to medium-low. Simmer until potatoes are tender. Remove to cutting board, let cool until you can handle them and slice into 1/2-inch thick slices.

2. Combine all the ingredients, except the potatoes, in a medium bowl and season with salt and pepper, to taste. Mix in potatoes. Check seasoning and serve warm.


I cooked the sauce down more after this first sandwich but this picture isn't too far off from the final version. The sauce tasted a bit muddy at first, but the flavors clarified after a night in the refrigerator with more of the spices unique character coming through instead of just a general heat. The small amount of vinegar in the sauce isn't enough to balance on its own; the pickles (of whatever sort) are important to cut through the rich meaty flavors. And I'm pleased that there is some meaty flavor left in the meat. Often it's all leached out after 8-9 hours of cooking.

As for the potato salad, I can't recall ever having better. Just the lack of chunks of raw celery is a huge plus. Beyond that, large tender slices of potato are an improvement over chunks. There's a freshness from the scallion and cilantro that balances against the creaminess, slight tartness and gentle heat. Nicely complex and a lovely pairing with the the brisket. The only possible issue is that the sauce to potato ratio is pretty high so it might be better to put the potatoes in a large bowl and add the sauce to taste.

Saturday, May 8, 2010

Thai beef and betel salad

Well past time to use my betel. It's two weeks old at this point and a little faded. A little late on the blog post too; sorry about that. Mussels were on sale at Whole Foods and you've got to bump them to the front of the queue.

This recipe is a take off of a betel leaf salad recipe I found on ImportFood.com with some elements from the ubiquitous ground-beef-wrapped-in-betel-leaves recipe added in, plus some adjustments to compensate for the tiny amount of betel I've got and some adjustments that just seemed like a good idea at the time. Pretty standard origin for me, really.

Ingredients:
1/2 cup betel leaves, shredded
1/2 cup carrot, shredded
1 small handful cilantro, well stemmed and roughly chopped
1-2 sprigs mint, chiffinaded (is chiffinade a verb?)
1 medium-hot chili, seeded and thinly sliced

1/4 pound tender beef, sliced into strips and cut into sensible lengths
marinated in fish sauce and lime juice with a little sugar and a little cilantro

2 Tablespoons roasted unsalted peanuts
1 Tablespoon dried shrimp
ground together or crushed in a mortar and pestle

2 teaspoons tamarind pulp dissolved in 5 teaspoons water
juice of 1/2 lime
1 Tablespoon palm sugar or any sugar with some molasses left in
1 Tablespoon light soy sauce

salt, sriracha

1. If your betel leaves, like mine, are a bit soggy from moisture expressed during storage, lightly toast them to dry them out. Only a few minutes or they'll start to crisp up. Hmm...betel chips; I've got to make a note of that.

2. Mix the betel leaves, carrot, cilantro, mint and chili in a large bowl.

3. Heat a cast iron pan over high heat, add a little oil and heat some more. Drain the marinade from the beef. Add the beef to the pan and cook, stirring but not stir frying, until cooked though and maybe a little browned. Remove to a bowl. Feel free to add them to the vegetables, actually.

4. Strain the tamarind mixture into a small bowl. You'll have to force it through the mesh and scrape it off the bottom of the sieve most likely. Add the lime juice, sugar and soy sauce. Don't measure, just mix them to your taste.

6. Mix together the beef, peanuts and shrimp with the vegetables. Add the dressing bit by bit just until the vegetables are coated. I used about half, myself. Add salt if necessary and maybe a little more lime or sugar until the flavors are balanced.


OK, let's give it a try. This is my first time using raw betel, and I've seen a fair number of complaints about its strong medicinal flavor, so I'm not sure how this is going to turn out.

Oh, this is very nice indeed.
The betel is the foreground flavor, but it's not overbearing. The sweetness of the carrots, emphasized by the tamarind, and the tangy tartness of the dressing blend with it for an pleasantly interesting whole. And there's just a bit of aroma from the herbs floating above the bolder flavors.

It could use a little more heat--I shouldn't have seeded the jalapeño I used--so I added just a little sriracha. That helps and adds just a touch of burn in the aftertaste which I like. Brought up the acid a little too which isn't a bad thing.

Each bite has a slightly different character; I particularly like it when the beef-betel-peanut combinatination of flavors comes out.

Texturally, it's mostly the crunch of the carrot and the chew of the beef. The herbs have wilted a little but there's still a little leafiness in there.

I think it helped that my betel's flavor was faded. If I were working with perfectly fresh leaves, I think I'd boost the carrot and add some shredded daikon to thin it out. That would help making this more than two small or one large serving, too. The original recipe I based this on actually has double the betel to carrot ratio. I can't see that working, at least for my palate. I'm curious to try a properly authentically prepared Thai dish using betel leaves. I think Robert from Possum Trot is the only one growing piper betel locally. I know he's unlikely to be reading this; anyone else know if he's supplying any local restaurants?

Wednesday, March 24, 2010

CSA week 16 - Beef (and some pork) barley soup

This isn't much of a recipe, but it's all I've made so it's what I've got to post about. The only thing that's really noteworthy here, if anything, is that I made the stock from scratch first.

This morning, I loaded up my slow cooker with a medium turnip, a couple carrots, a stalk and a half of celery, half an onion and a couple cloves of garlic, all roughly chopped; thyme, rosemary, salt and pepper; a meaty beef shank well browned on both sides and enough water to get everything floating (nine cups which really was too much) and set the slow cooker to low and headed off to work.

When I got home I discovered that the vegetables were still surprisingly firm and the meat wasn't falling apart the way it should have been. Also, the broth was pretty bland. So I turned the cooker up to high and gave it an hour. That seemed to help a lot. I fished out the now cooked-out vegetables and the shank.

The vegetable are for the compost heap (or would be if I had one. Can I just bury them near my plants?) and the beef went into the refrigerator to firm up. Ideally, I'd like to let the soup cool and skim the fat at this point, but dinner time is approaching and I don't feel like starting from scratch at this point. So instead, I chopped up fresh turnips, carrots, celery and onions and fresh stew meat (The chunks of beef in the freezer turned out to be pork, but close enough.) to add to the pot along with some sliced mushrooms and half a cup of barley. I also dumped in some soy and Worchestershire sauce and a Tablespoon or so of Spice House's Milwaukee Avenue spice blend. I figure anything that's supposed to be good on steaks and chops should work here too. And another hour of simmering.


That should do it. I broke up and returned the beef to the pot and dished out a bowl to refrigerate down from tongue-scorching temperatures so I could check the seasoning. Hmm...in desperate need of salt and a bit greasy (although I'd have to add richness some other way if it wasn't), but otherwise quite good. The broth is clearly not just generic beef broth; the vegetables and herbs have added a lot of depth to it. And it's great to have vegetables that are both firm to the bite and actually deliver significant amounts of distinctive flavor.

So, was that useful at all? Even vaguely interesting?

I'll have something moderately better in a day or two and then I'm off to Columbus to visit my sister and I'm not blogging the Seder dinner. I might find my way to Jeni Britton's ice cream shop, but I'm guessing I'm really the only one who'd be interested in that.

I still need someone to take next week's share off my hands. Just post a comment and it's yours.

Monday, January 4, 2010

CSA week five - Mushroom bread pudding

This is only marginally a CSA recipe; I used the oyster mushrooms, but lots of other mushrooms too. This was, as I said on Saturday, more about using up half a loaf of staling bread and too many eggs, a task at which it succeeded quite well. As usual, I looked at a bunch of different recipes and cobbled together my own version of the dish. Many recipes suggested using this as a side dish to steak, but, as my own innovation, I decided to incorporate the beef into the dish proper.

Ingredients:
1 1/2 Tablespoons butter
1 Tablespoon olive oil
1 small onion, finely diced
1 pound of assorted mushrooms
I used:
3 1/2 ounces oyster mushrooms, chopped
8 ounces cremini mushrooms, sliced
4 1/2 reconstituted assorted dried mushrooms including criminis, porcinis, cloud ears, shiitake, chanterelle and oyster mushrooms, chopped. Save a little of the soaking water.
1/4 pound sirloin tip, sliced against the grain into strips and cut into 2-inch lengths
1 handful parsley, chopped

6 cups semi-stale bread, cut into 1 1/2-inch cubes
The bread I had on hand was a 5-minute-a-day recipe with good amounts of whole wheat and rye. It had a dense spongy texture good for sandwiches, but not really ideal for this application. For the record, I wasn't entirely thrilled with the bread and I'm going back to normal no-shortcuts baking.

6 extra large eggs
2 cups cream
1 cup milk
1/2 cup finely shredded Parmesan cheese plus a little more
salt
pepper
hot sauce
Worcestershire sauce

0. Preheat oven to 350 degrees and lightly salt the sirloin tip.

1. Heat butter and olive oil in a medium cast iron (or non-stick) pan over medium-high heat. When the butter finishes sizzling add the onion and cook until softened and translucent, around 5 minutes. Push to one side and add a quarter of the mushrooms and a pinch of salt. Cook until softened, golden (and a little browned) and any expressed liquid has evaporated, around 5 minutes. Don't stir too much. Push to the side with the onion and add the next quarter of the mushrooms. Continue until all the mushrooms and cooked. Empty the mushroom/onion mixture into a bowl leaving a little fat in the pan if possible.

2. Meanwhile, cube the bread if you haven't already and put them in a large bowl. In a smaller bowl, whisk together the eggs, cream, milk, cheese and seasonings.

3. Add a little more olive oil to the pan if necessary and add the sirloin. Cook for a few minutes, continuing to restrain yourself from fussing with the pan so the meat can sit still and brown. When the meat is browned add it to the bowl with the mushrooms. Also add the parsley and stir well. Deglaze the pan with a quarter cup of the mushroom soaking liquid and add that to egg mixture.

4. Butter or oil an 8x11-inch baking dish. Add the mushroom mixture to the bread cubes and stir well. [I found my bare hands to be the best tool for this.] Dump the mixture into the baking dish and spread out evenly. Pour the egg mixture over top and let sit at least 10 minutes to soak. [If you're using dense bread like I did, over night would be better. Lighter bread needs less time, but you could soak a brioche or french bread overnight to let a lighter bread fall apart to create a more pudding-like texture which is not a bad option.]

5. Top with the extra Parmesan and bake at 350 degrees for an hour until a knife inserted into the center comes out almost clean. Let cool a bit before cutting.


You might have gotten the impression that I wasn't entirely happy with how the bread I used turned out. It's not actually bad, it's just distinct and the wide range of textures--crisp, tender, creamy, chewy--it gives the dish is actually a pleasant effect. I would like a more integrated flavor, though. As it is, it's very much a steak and mushroom omelet with a side of toast. Now there's certainly nothing wrong with that (although I wonder where the richness of all that cream went), but I feel like it could have been better. Barring using a different bread, I probably should have processed it down into coarse bread crumbs and let it soak longer. That's a tweak for next time; This turned out pretty tasty as is.

Friday, December 18, 2009

CSA week three - Beef with betel leaf and lemongrass stir fry

My turn to tell how I dealt with this week's CSA mystery ingredient. I found a pretty simple Vietnamese-style stir fry that used the betel leaves as a substantial part of the dish--as a vegetable, not just a flavoring. Unfortunately, that meant that after I scaled everything else down to fit the five leaves I had, I only had enough for one modest serving. Here's my modified version:

Beef tossed with wild betel leaf and lemongrass
Original version created by Luke Nguyen

Ingredients:
100 g lean beef sirloin, thinly sliced
5 betel leaves, roughly sliced
1/2 lemon grass stalk (white part only), finely diced (peel off dry outer shell)
1 small clove garlic, finely diced
most of 1 hot chili, finely diced
1 Tablespoon vegetable oil
1 teaspoons fish sauce
1 teaspoon soy sauce
2/3 teaspoon sugar
a little cilantro, chopped for garnish
the rest of the chili, finely sliced for garnish

0. Mix fish sauce, soy sauce and sugar in a small bowl.

1. Heat a medium pan to over high heat to smoking hot, add oil and lemon grass, cook briefly until fragrant. Add garlic and chili. Stir fry until they become fragrant too, then add beef.

Stir fry two minutes, until beef is cooked through and starting to brown. Add seasoning mixture and betel leaf. Stir fry 1 minute more, until betel leaf is wilted.

2. Remove to a plate, garnish and serve with rice.


I know some others had difficulty with the flavor of the betel leaves, but I liked them. Maybe it's the difference between having them raw or cooked. The cooked betel leaf flavor is quite distinctive and hard to describe. It's a bit spicy, a bit smoky, a bit medical. It's one of those odd distinctive flavors like curry leaves and kaffir lime leaves that have no easy paralell for comparison in Western cuisine. I can see it being a bit rough on it's own, but I wouldn't want to eat straight curry leaves or kaffir lime leaves either. They're meant to be mixed with other flavors. Here, moderated by the sugar and complimented by the lemongrass, the closest comparison I can find is root beer--the real stuff, not the artifically flavored version you can commonly get. I quite liked how it paired with the beef; it would probably work well with pork, too, I think.

The dish as a whole needs a little tweaking, though. Two minutes on high heat is too much for thinly sliced sirloin and the soy sauce ended up a caramelizing when I dumped it into the hot pan. If I had been making a full-sized recipe in a wok, that would have worked better. But, overall, it was pretty tasty and it did show the betel leaves to good advantage.

Friday, December 11, 2009

CSA week two - potsticker redux

When I set out looking for recipes, I wanted to find a pork and garlic chive recipe distinct from all the other sorts of Chinese dumplings. Not only didn't I find one, I can't even find a name for them distinct from the rest. Pork and chive seems to be the basic default from which those variations stem.

Given that discovery, there wasn't anything stopping me from winging it. Not that there ever really is, but if there is a traditional recipe for what I'm making, I feel obliged to at least try it. Since there is only a continuum of options, I just looked at what I had around and tossed some ingredients together.

Ingredients:
1/4 cup pork
1/4 cup beef
1 bunch garlic chives, finely chopped (~1/2 cup)
1 inch ginger finely grated (with a microplane is ideal)
6 small dried shiitake mushrooms, rehydrated
2-3 ounces firm tofu
1 Tablespoon rice wine
1 Tablespoon soy sauce
1 drizzle sesame oil
salt and white pepper to taste
no garlic
no scallion
no cabbage (so the chives are really the star of the show)

1. Grind beef and pork, until it doesn't quite form a paste.

2. Grind together mushrooms and tofu. The broken down tofu had an unexpectly sticky texture which let me do without the egg I was going to add as a binder.

3. Add everything else and mix well together. Chill for a whle to make it easier to work with.

I had a little trouble filling my wrappers. They've been in and out of the freezer a few times now and the edges are getting dried out and difficult to make stick together. I ended up bundling some of the dumplings up in burrito-style wraps just to get them to hold together. I had more trouble just with my lack of facility with the dumpling filling-process. I underfilled the dumplings and didn't get all the air out, so these aren't very elegant.


But, pretty or otherwise, the cooked up just fine. Surprisingly, despite the wrapping problem, the batch I made were all sealed air tight so they blew up like balloons during cooking and then collapsed back down.

The filling's a little dry, so maybe the egg would have been a good idea after all. Or maybe a little more of the rice wine and soy sauce as a boost in those flavors wouldn't hurt. Then again, I'm not using a dipping sauce which solve both those problems.

The beef isn't bad, but the combination of beef and chives brings thoughts of beef stew topped with chive dumplings or steak and baked potato--neither of which are helping me enjoy these dumplings. But that's my brain's fault, not the dumplings'. I tried something different and something different is what I got. There are some plusses here even if beef may not have been the best choice. The tofu binder is pretty interesting and the chive flavor is coming through nicely.

Wednesday, December 9, 2009

CSA week two - Zucchini and bulgar keftedes

This is the recipe I mentioned on Saturday, but I misremembered my geography. These are Greek meetballs, not Spanish. More specifically, this are a variation on a recipe by chef Jim Botsacos of Molynos in New York based on Macedonian and Thracian versions. Although, to tell the truth, because I couldn't get kefalotyri cheese or ouzo (I chose the grocery to shop at poorly) and because I cut down on the mint (I've had a bad experience with overly-minty meatballs before) [link], these aren't all that Greek at all.

The recipe I'm vulgarizing I found at the Atlantic's food channel.

It goes something like this:

2 Tablespoons olive oil
1 pound zucchini and/or squash, grated
1 cup onions, finely chopped
1 chopped hot pepper, or red pepper flakes to taste
1 cup bulgur wheat
2/3 cup milk
1 pound ground sirloin
2 eggs
3 cloves garlic, minced
1/4 cup fresh mint, finely chopped
1/3 cup fresh flat-leaf parsley, finely chopped
2 Tablespoons dry white wine
1 Pecorino Romano cheese, finely grated
2 teaspoons kosher salt or to taste
flour for dredging
oil for deep frying

1. In a large cast iron pan, heat the olive oil over medium heat. Add zucchini and sauté for 10 minutes, until they become meltingly soft. You don't want browning, but you do want the zucchini to lose a good bit of moisture. That means you should use a 10-inch pan so the zucchini is piled up and steams somewhat instead of a real proper sauté.

Add the onions and peppers and cook, stirring frequently, 2 minutes longer until onions become translucent. Remove from heat and stir in the bulgar wheat. When the pan seems cool enough that the milk isn't going to sizzle away, stir in that too. Let stand for 15 minutes until the bulgar softens.

2. Meanwhile, in a large bowl, mix the ground sirloin, eggs, garlic, mint, parsley and wine. When the zucchini mixture is ready, mix it in too. Mix in the cheese and salt. Cover and refrigerate for at least 1 hour. [The recipe says up to 8 hours. I don't know what happens after that.]

3. Cook a small amount of the mixture in a pan or microwave to check for seasoning. Adjust if necessary.

4. Heat frying oil in whatever you like to deep fry in (I use my flat-bottomed wok a.k.a. migas pan). Measure a heaping Tablespoon of the mixture (I found a coffee scoop worked well), flatten into a thick patty and dredge in flour. Shake off excess flour and fry in batches for 10 minutes, flipping halfway through if your oil is shallow. You're aiming for a deep browning, but not a thick crust. Transfer to paper towels to drain.

Makes around 50.

Serve hot or room temperature, preferably with a yogurt sauce or a Greek salad. Or just pop them into your mouth while you're cooking as soon as they're cool enough to handle.


These are pretty darn tasty. It's got that sort of meat loaf nature of meat, vegetable and starch that have all absorbed each others flavors. It's weird that you can't even pick out the mint or the beef, which actually tastes a bit more like lamb. Other than a little chewiness from some of the bulgar, the textures have melded together too. This would be a great way to sneak zucchini into someone's diet.