Showing posts with label chicken. Show all posts

Tuesday, March 29, 2011

Sukhamvit Soi Five fried chicken

This is a modified version of a recipe I found about a year ago in theatlantic.com's brief-lived food section. It's still in the archive, but it's hard to find and only one other blogger seems to have written it up. The article accompanying the recipe is by Jarrett Wrisley who attributes it to Mr. Pee, a Bancock street vendor whom he met selling chicken outside the Foodland Supermarket on Sukhamvit Soi Five in 2001.

My only change was to use a whole bunch of cilantro instead of 10 cilantro stems and 4 large cilantro roots. I presume that made the marinade greener, but as I've never encountered a cilantro root, I don't know if there's any other differences.

Ingredients:
1 head cilantro including stems, chopped
14 (count'em) cloves garlic, peeled and crushed
1 Tablespoon black peppercorns
1/2 teaspoon red pepper flakes
2 teaspoons salt
2 Tablespoons fish sauce
2/3 cup chicken stock
3/4 cup plus 2 Tablespoons rice flour
1 chicken, butchered into serving pieces

1. Blend the cilantro, garlic, peppercorns, pepper flakes, salt and fish sauce until smooth. Add a little chicken stock to get everything moving around in the food processor. Remove to a large bowl, and stir in the rest of the stock. Add the rice flour gradually until a smooth loose batter forms. Add a little water if it gets too thick.

2. Add the chicken, coat well and refrigerate overnight.

3. Bring chicken up to room temperature. [I laid the chicken out on a tray to speed the process along.] The batter will have thickened up to a paste so make sure it's spread on the chicken evenly. Or, at least try to do a better job of it than I did.

4. Heat oil to 350 and fry around 5 minutes on each side until the center of the meet reaches 160 degrees. It should be more of a copper than a golden brown. [I had trouble cooking the chicken through before the crust burnt with my later batches so watch your oil temperature.]

Let cool a few minutes and serve with sriracha.


The raw batter is spicy and harsh so it's surprising that the cooked crust is more prominently salty. And the spicy notes are more in the Colonel's 11 secret herbs and spices vein than anything notably Bancockian. That's a little disappointing, but it's very tasty for what it is. The meat is flavorful and juicy. The crust is crackly crisp while being well adhered to the meat and inextricably merged with the skin. Gorgeous stuff and very easy. The sriracha isn't necessary, unlike for a lot of mediocre Thai food, but it adds the missing heat and a touch of acid that pops the chicken's flavor nicely so give it or your favorite other hot sauce a try.

Wednesday, February 16, 2011

CSA week ten - Jirou chao qincai

That's chicken and celery stir fry in English.

This recipe comes from Beijing chef Deng Haiyan via the Saveur website (and an article in the paper magazine at some point I presume). It's a pretty basic and straightforward Chinese recipe adjusted to accommodate the American kitchen and further mangled by my own contributions.

Ingredients:
2 chicken thighs (or breasts), deskinned, deboned and sliced thin (freezing briefly helps a lot here)
1 egg white
2 teaspoons cornstarch
1/2-inch piece of ginger, finely chopped
1 leek, halved, cleaned and julienned
5 ribs celery, cut into 1/4-inch slices
1 1/2 Tablespoon soy sauce
a little more seasoning of your choice. I used 1 Tablespoon chui chow chili oil
3 Tablespoons canola or other high smokepoint oil

1. Mix the chicken, egg white and cornstarch. Let sit 10 minutes. [Doesn't that look tasty?]

2. Meanwhile, while chopping the celery, wince at the fibrous toughness of the stalks, remember why everyone hates celery, say "screw this" and harvest a whole bunch of celery leaves instead.

3. Heat a flat-bottomed wok over high heat until smoking. Heat a while longer. Add 2 Tablespoons oil. Swirl it about then add the chicken along with the egg white mixture. Stir fry until the chicken becomes opaque, approximately 2 minutes. Remove to a plate. [It doesn't look any better cooked, does it?]

4. Add the remaining 1 Tablespoon oil to the wok. Swirl it about then add the ginger and leek. Cook briefly until you can smell the leek as well as the ginger, approximately 30 seconds. Add the celery. Cook until it wilts down and you think, maybe, you can smell celery too, approximately 2 minutes.

5. Return the chicken and add the soy sauce and, as the reviews of this recipe all agreed that it was a little bland, some extra seasoning. If not chili oil, oyster sauce might be nice. Stir fry until the chicken is cooked through, approximately 2 minutes more.

Serve with white rice.


There are two interesting aspects here.

First, the method of cooking the meat in an egg white coating, called velveting, which reputedly keeps the chicken succulent and soaks up flavor. I can't speak for the succulence since I used chicken thighs instead of the originally called for chicken breasts. Thighs don't need the help. It did pick up the flavor from the vegetables and seasonings nicely without covering up the flavor of the chicken, though, so that's a success.

Second, and more importantly for our purposes, does the celery taste both good and like celery? (Some would say that's a contradiction, but let's give it a chance.) One immediate problem; The celery leaves are kale-tough. I didn't expect that so they're still pretty chewy in the finished dish. On the other hand, they release a lot of celery flavor as you chew them so there's a lot of variation of flavor in different bites which I'm going to count as a plus. As for that flavor, I'm going to say, yes, I do like it. The aromatic sharp herbal flavor of the celery floats above the rich savory heat of the soy, chicken and chili oil quite pleasantly. Unless, that is, you get a whole wad of celery to chew through. That's rather too strong and too harsh. Otherwise, I actually like its pairing with the other flavors quite a bit. So, on the whole, yes, this works and I can recommend it this dish.

I'm not sure how I could have kept the leaves from matting up as they wilted, not while keeping this a stir fry. I'll bet if I add another non-leafy ingredient at the same time as the leaves--bamboo shoots maybe--that would have helped. If you try this recipe, try that.

Tuesday, January 25, 2011

CSA week seven - roast chicken and cherry tomatoes

When I looked around for recipes (excluding salads) using cherry tomatoes, most all I found agreed that roasting them was the way to go. That was the extent of many recipes, but this one, which I found at Epicurious but appears to have originated in Bon Appétit, goes a little bit further to good result. Still very easy and straightforward, though. It seems rather forgiving of variation so I've vagued it up a bit.

Ingredients:
2 chicken breasts with ribs or large chicken thighs
several garlic gloves, crushed and minced or pressed
1 handful of fresh herbs [I used marjoram and basil]
generous crushed red pepper
several Tablespoons olive oil
12 ounces cherry tomatoes, stemmed and washed [I supplemented the 8 ounces from the CSA with some small local heirloom tomatoes from the farmer's market.]

0. Preheat oven to 450 degrees.

1. Season the chicken, heat a cast iron pan and brown the skin side of the chicken in a little oil. Remove, skin-side up, to an 8"x11" baking pan.

2. Mix the garlic, herbs, red pepper and a few pinches of salt with the olive oil in a large bowl. Add tomatoes and toss.


3. Pour the tomato mixture over the chicken so that the tomatoes array themselves into a single layer around them, the chicken is coated in oil and some bits of garlic and herbs remain on top of the skin.

4. Bake until chicken reaches 160 degrees, about 30-35 minutes. Remove from oven and let sit for a few minutes for internal temperature to reach 165. Crush the tomatoes a little if they haven't collapsed.

Top with a little more fresh herbs and serve with crusty bread or some other starch to soak up the sauce.

I didn't brine or prep the chicken in any way so the meat is your usual underwhelming experience that is chicken, but there are a couple of real highlights here. First, the skin with the caramelized edges and crispy bits of baked on garlic is darn good eating. Second, the sauce, made of garlic and herb infused oil, chicken drippings and roast tomato is pretty fabulous too.

I probably could have used a larger pan and roasted some sliced potatoes too. Or turnips maybe. I'll see what I've got on hand next time we get cherry tomatoes.

Thursday, December 30, 2010

Adobong Manok sa Gata

With the CSA on hold, I have time to make something more meat-centric that's been on my to-do list for quite a while: chicken adobo. This is classic Filipino recipe related to, but distinct from, the pork adobo I made and posted about last year.

Like that recipe, every Filipino mother has her own version but they don't vary a whole lot. Most just simmer the chicken in the sauce and call it done, flabby skin and all, but I really liked the ones that removed the meat and cooked it up crisp. A grill would likely be ideal, but I'm going to use my broiler (I'm writing as the chicken marinates, another unusual step). The most unusual aspect of this recipe is the inclusion of coconut milk. Almost nobody does that, but it seems like a good idea. I think that's what the "sa gata" means in the recipe name, but Babelfish finds the term confusing so I'm not sure.

I did a little research and found that the recipes on the web that include coconut milk can all be traced back to Memories of Philippine Kitchens, a cookbook by Amy Besa and Romy Dorotan. Coconut milk is, according to the book (according to a blogger who read the book, anyway) traditional in the Bicol region of the Philippines. I'm going to assume this is a regional variation.

I made a few changes away from the version in Memories based on some other recipes I found interesting.

Ingredients:
1 3 1/2 pound chicken, cut into serving pieces, liver and heart included and fat trimmed
1/4 cup light soy sauce
1/4 cup dark soy sauce
1/2 cup white vinegar [If you've got proper Filipino soy sauce and vinegar, definitely use that instead as this is just an approximation]
3/4 cup coconut milk
4 cloves garlic, crushed
1 sizable shallot, minced
2 bay leaves
generous ground black pepper [or double that whole peppercorns if you want to avoid black specks in your sauce]

1. Mix up everything but the chicken in a large bowl. Add the chicken and marinate in the refrigerator for 3 hours to overnight.

2. Move everything to a large pot (I marinated in my slow cooker pot and cooked it in there instead of the stovetop) and simmer the chicken over medium heat until mostly done, probably around 20 minutes. [Some recipes let the pot cool and refrigerate overnight before finishing the dish. It couldn't hurt if you've got the time.]

3. Remove and drain the chicken. Broil 4 inches away from the heat, skin-side up, turning the pieces with skin on both sides, until crisp and a bit charred. Mine went for 6 minutes but I left them in the pot a little long so take the chicken out sooner and go for 10.

4. Strain the sauce into a pot and reduce a bit. Add more coconut milk to taste.

Serve with white rice, sauce on the side.


Hmm...not bad at all. The chicken weathered the broiler without drying out. It's juicy and has picked up a bit of flavor from the sauce but not enough to overwhelm the mild flavor of the meat. The skin has some crisp bits, but could have stood a little more broiling. Still good through.

The sauce has pleasant levels of salty and tart, moderated by the slightly sweet richness of the coconut milk. A bit of herb comes through from the bay too, but not enough to really assert itself. It's a bit of an odd combination and I wonder if I was supposed to use Indian bay, which goes a bit better with soy sauce to my mind. I should check on that.

I reduced the sauce a bit more to intensify the flavors after I had dinner and then added a little more of the thick bit of the coconut milk--condensed coconut oil mainly--which mounted the sauce nicely like adding butter to French sauce. I think next time, I might not cook with the coconut milk, just add it at the end. I'm curious what sort of difference it might make.

One last thing, one recipe I saw called for a small chicken plus four chicken livers. I wasn't sure what that was about until I tried the liver I cooked and discovered that it was really great. The flavor is a great match for the sauce, better than just plain chicken by a bit. If you could crisp it up in the oven I'd make this with just livers.

Sunday, November 28, 2010

CSA week one - Monlar oo thoke

I know I said I wanted to do something boring with the daikon, but I did a bit of searching for recipes anyway and I found three pretty interesting options so I hope we see more daikon in the shares. I decided to go with this salad first because it's Burmese and I don't think I've ever had Burmese food before. I found this particular recipe in the Burmese collection at recipes.wikia.com but digging a bit deeper reveals that it's from the cookbook The Food of Asia. The only credits on the book say "text by Kong Foong Ling" and I don't know if "text" includes the recipes or just the commentary. I'm going to assume this is traditional.

The recipe calls for a large daikon, but I think the one I got in my share was more of a medium so I cut the other ingredients down by a third.

Ingredients:
2 Tablespoons rice vinegar
2/3 Tablespoon sugar
2/3 teaspoon salt
1 medium daikon, thinly sliced
1 medium shallot, thinly sliced [the original recipe calls for a small onion, but I think shallot is much nicer for raw applications.]
peanut oil for frying
6 cloves garlic, thinly sliced
1 1/2 Tablespoons peanuts
2/3 Tablespoon sesame seeds
2/3 teaspoon fish sauce
1 1/2 Tablespoons cilantro, chopped

1. Mix the vinegar, sugar and salt in a medium bowl until dissolved. Add daikon, toss to coat and chill for 15 minutes.

2. Soak shallot in cold water for 5 minutes. Drain. [I don't know what this step accomplishes that a rinse wouldn't, but it wasn't any bother so I went along with it.]

3. Meanwhile, heat oil over medium heat in a small pan until shimmery. Add garlic and fry until golden brown. [This doesn't take long so have your draining set up ready, keep a close eye and remove the garlic quickly once it hits the right stage. I was distracted, burnt my garlic and had to resort to the pre-packaged sort.]

4. Drain the oil from the pan and add the peanuts. Toast until they brown and start to smell toasty. Throw in the sesame seeds briefly. Shortly after the seeds start popping remove them and the peanuts to a food processor and grind until fairly fine. [Again keep a close eye or you'll end up making peanut/sesame butter that'll be pretty tasty but won't be of any use for this recipe.]

5. Remove the daikon from the brine and drain well. In a large bowl, mix the daikon and onion. Add garlic, peanuts and sesame seeds, then the fish sauce and cilantro. Toss well and serve with a Burmese curry.


To accomplish that last step, I made a simple Burmese chicken curry I found at asianonlinerecipes.com.

Ingredients:
1 large onion, roughly chopped
3 cloves garlic, squished
about an equal amount of ginger, chopped [the original recipe called for 5 centimeters of ginger. I don't really know how to interpret a linear measurement for something as irregularly shaped as ginger so I fell back on my default of using the same amount as I used of garlic.]

1 Tablespoon peanut oil
1/4 teaspoon belacan (Burmese shrimp paste) [There are a lot of types of shrimp paste and I only keep Chinese and Filipino on hand. Since belacan is fermented, Chinese is closer so I used that.]
2 chicken thighs, skinned, boned and cut into 1-2-inch pieces [Now that I look at it, this recipe doesn't call for cutting up the chicken thighs. Probably better not to, but I would remove the skin, I think.]
1/2 teaspoon salt
1 cup coconut milk
1/2 teaspoon chili powder
1/2 teaspoon tumeric

1. Add onion, garlic and ginger to a food processor (with a little water if necessary) and process until smooth.

2. Heat oil over medium high heat in a medium saucepan until shimmery. Add onion mixture and shrimp paste. Cook 5 minutes until starting to brown.

3. Add chicken, turn heat down to medium and cook a few minutes until the chicken loses its pinkness and the onion starts seriously browning.

4. Add salt, coconut milk and spices. Bring to a boil, reduce heat to low, cover and simmer 30 minutes. Stir and scrape the bottom on the pan occasionally.

5. Remove the cover and cook for 15 minutes or so to reduce the sauce by around half.

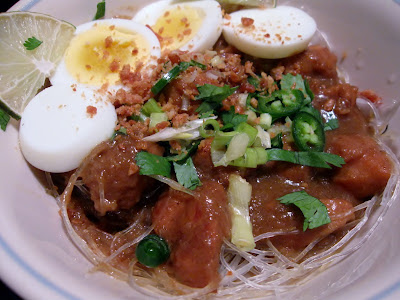
Serve over vermicelli noodles.

I found the curry's flavor a bit dull so I added traditional Burmese condiments: cilantro, scallion, fresh chili pepper, fried garlic and hard boiled egg.


After its quick pickle, there's little left of the daikon's original mild bite, but it's not entirely lost. It balances against the sweetness of the sugar and the toastiness of the garlic, peanuts and sesame seeds. The salad is a lovely fresh and bright crispness against the heavy richness of the curry.

As this is the first Burmese curry I've made, and as I used the wrong shrimp paste, it's hard for me to judge, but, even heavily condimentated I find it rather flat (to the point where it needs a salad to contrast against, but maybe that's on purpose). The seasoning was rather simple, so maybe I'm missing a bunch of flavors from hard-to-find ingredients that were left out of the recipe. I'll have to do some investigation to learn more about Burmese cuisine. I did like the way the onion/coconut sauce browned as it cooked down. It's an effect I quite like in Indonesian curries I've made and there it's been quite flavorful. Maybe that's down to the galangal and kimiri nuts that usually go into that sort of dish.

Anyway, the salad was nice. It should go well with Thai or Vietnamese dishes too.

Wednesday, May 12, 2010

CSA leftovers - The last of the winter produce

Both the black sapote in pantry and the tomatoes in my garden are insisting on rotting instead of ripening so I haven't made the dishes I was hoping to have made by now. And that leaves me without the interesting posts that would have results.

Instead, since it seems I feel compelled to post something, here's a couple of less interesting dishes I've made recently. These feature the leftover turnips and beets from the last few weeks of the CSA. I thought they'd last longer in the refrigerator, but they started getting squishy pretty quickly. Maybe it was because of the leaky water jug that boosted the humidity. Whatever the reason, using them promptly seemed prudent.

First, we've got roasted chicken with turnips. Roasting chicken with root vegetables is pretty standard, but here, following a Bittman recipe, I surrounded the chicken with fairly thinly sliced turnips about halfway through cooking and then, after this photo was taken, finished them up under high heat while the chicken was resting. No picture of the finished dish as it turned out unpresentably beige. It's because I finally found a chicken under three pounds to roast. It's good that I finally had a sensible amount of meat, but bad that it cooked through before anything had a chance to brown up crispy. Still, unlike the other times I've cooked chicken with chunks of potatoes or carrots or whatever, the thinly sliced turnips cooked through and picked up a lot of good flavor from their swim in the drippings. A bigger pan and a longer cooking time is all they really would need to be something special.

Second up is pickled beets. There are lots of variations on pickled beet recipes out there suggesting a lot of different techniques. There were a couple elements that seem important to me: a)roast the beets instead of boiling them. This concentrates the flavor and leaves the vegetable cells ready to soak up the pickling brine instead of saturated with unflavored water, and b)keep the seasoning simple to let the flavor of the beets come through. I used white and white wine vinegar and a tarragon herb blend along with a fair amount of sugar and just a little salt. I had salted the beets before roasting already, mainly to just draw out the moisture. I also layered the beets with sliced onion and threw in a couple eggs since, apparently, that's what you do when you're pickling beets. It's early days yet, but signs are pointing towards tasty.

How are you folks adjusting to South Florida's summer produce drought?

Tuesday, March 16, 2010

Carolina chicken collard greens stew

Unlike a lot of recipes I make, there aren't a lot of variations of this one on the web. There's just one and it's only on two pages. According to those pages, it was created by Candace McMenamin of Lexington, South Carolina. I just googled her; she's doesn't have a webpage of her own, but she shows up in a whole lot of cookoff finalist and winner lists. Here's an article with an interview with her if you're interested.

I didn't make any changes (other than halving the amount) when making her recipe so I don't feel right making any changes in writing it up either. I'm only borderline comfortable in reposting it here. Here's her recipe as she presents it:

CAROLINA CHICKEN COLLARD GREENS STEW

"This is one of my family's favorite recipes. Collard greens are plentiful here in the South, and I developed this recipe to showcase them in a stew. Some folks say they don't like the taste of collards, but I believe that is because they have not had them fixed correctly. Trust me, anyone who tries this stew with a chunk of homemade corn bread will be begging for the recipe."
Candace McMenamin, Lexington, South Carolina
Serves 4

Ingredients
• 3 cups chicken broth
• 1 pound boneless, skinless chicken thighs
• 1 medium onion, diced
• 1 garlic clove, minced
• 1 celery stalk, sliced
• 1 medium carrot, sliced
• 1 large potato, diced
• 1 tablespoon chopped thyme or 1/2 teaspoon dried thyme
• 1 tablespoon chopped basil or 1/2 teaspoon dried basil
• 1 tablespoon chopped oregano or 1/2 teaspoon dried oregano
• 1 tablespoon sugar
• 2 tablespoons white vinegar
• 4 cups loosely packed chopped collard greens
• 1 teaspoon salt
• 1/2 teaspoon black pepper
• 4 crisply cooked bacon slices
• 1/2 cup chopped pecans, toasted


Directions
1. Heat the chicken broth and 3 cups water in a large Dutch oven over medium-high heat. Bring the mixture to a boil. Add the chicken thighs. Reduce the heat and simmer, covered, until thoroughly cooked, about 15 minutes. Remove the chicken to a plate with a slotted spoon; keep warm.

2. Add the onion, garlic, celery, carrot, potato, thyme, basil, and oregano to the broth. Stir and bring to a boil. Reduce the heat and simmer, covered, until the potatoes are tender, about 10 minutes.

3. Stir in the sugar, vinegar, collard greens, salt, and pepper. Return to a boil, reduce die heat, and simmer, covered, for 10 minutes.

4. Shred the chicken into 1-inch strips and add to the stew; mix well. Simmer over medium heat until the chicken is thoroughly heated, about 2 minutes.

5. Ladle the stew into 4 shallow soup bowls. Crumble 1 bacon slice over each serving. Sprinkle pecans over the top. Serve immediately.

And as long as I'm giving credit, the cornbread I made was from a recipe by professional food writer Cyndi Allison. Here's here FoodBuzz profile.

Is this the right etiquette for this sort of situation? I really don't know.


Anyway, it's a darn good stew. The collards are just barely tender--the thicker bits not quite. The flavor hasn't been boiled out as it would be in a mess of greens; the broth tastes more of the herbs and aromatics while the collards are fresh and bright with their own contrasting flavor.

Funny that there's so little chicken flavor. It's just outclassed by all these great vegetables. I don't think I'd leave it out, though. It's an important background flavor element and an important part of the texture. You could easily halve it, though.

I'm also surprised at how good the pecans are as a component, lending not just toastiness, but their own distinct buttery nutty flavor, to the mix. I've never considered them as a garnish on a savory dish before. And, of course, you can't go wrong with bacon.

The cornbread is straightforward with good corn flavor and just a touch of sweetness. It's moist enough that you can eat a piece on its own, but dry enough to soak up the soup. A nice accompaniment.

Wednesday, January 20, 2010

CSA week six - Szechuan clementine chicken

Nothing novel or exotic here, just a more authentic alternative to the recipe in the newsletter for the same dish. There are a few variations on this particular recipe on-line and I think I've worked my way back to the original at fiery-foods.com. At least that appears to be where it first appeared on the web, but I think it likely had a former life on paper somewhere. I made an alteration in the directions to bring it even closer to the traditional method so this is a new variation on the theme.

Ingredients:
Marinade:
1/2 tablespoon cornstarch
1 Tablespoon dry rice wine
1/2 pound boneless chicken thighs, cut into 1/2 inch pieces

Sauce:
1/2 Tablespoon minced ginger
1/2 Tablespoon minced garlic
1 green onion, minced
1/2 teaspoon ground Sichuan peppercorns
1 Tablespoon dry rice wine
2 Tablespoons soy sauce
1 Tablespoon hot bean sauce
2 teaspoons sugar
1/2 teaspoon sesame oil

Stir-Fry:
1 Tablespoons peanut oil
5 small dried hot red chiles
2 Tablespoons clementine peel, torn into 1 inch pieces

1. Cut up your chicken and toss with the wine and cornstarch. Let marinate 30 minutes.

2. Combine the sauce ingredients.

3. Heat a wok to smoking, add the oil and then the chiles and peel. Stir fry briefly until they darken and become aromatic. Add chicken and marinade. Stir fry 1 minute until chicken is cooked through. Add sauce. Stir fry 30 seconds until sauce is thickened and bubbling.

Remove the chiles and peel before serving with a big bowl of white rice.


This is almost right, but the flavor has nasty bitter notes from burt orange oil. I should have added the peel with the sauce instead of blackening it with the peppers. Oddly that's one thing the newsletter recipe kept traditional so it's going to suffer from the same problem. ... There may actually be a problem with these clementines too. I've just tried the fruit and they've got the same bitter edge to them. Ech.

I added a little more sugar to the dish to compensate for the bitterness; It doesn't fix the problem, so I don't think I'm going to be keeping the leftovers, but I can just about look past the bitterness. The other flavors are, I think, just about right. I really want to try this recipe again with peel from extra-sweet oranges added late in the recipe (and maybe with a few more chilies). I think it'll be dead on traditional Szechuan and really tasty.

Wednesday, January 6, 2010

CSA week five - Roast chicken and beets

This is pretty simple, but it's one more iteration in my roast chicken series and I wanted to get it down on the record. Last time I roasted a chicken (the Hamersley's Bistro recipe before the Moroccan and boneless fried chickens), I smeared it with an herb paste that didn't do a great job in flavoring it and mostly just fell off. This time I stuffed the paste under the skin--actually I simplified it down to a parsley and thyme butter--and seasoned the outside Zuni Café style with a seasoned salt and let it sit in the refrigerator overnight.

Both the Hamersley and the Zuni recipe keep the chicken unbutchered but I decided to butterfly it. I'm also roasting the beets and, since I'm not wrapping them in foil as a lot of recipes call for (since I want the chicken drippings to add a bit of flavor to them), I wanted to spread the chicken out over top to shield them from the direct heat. I stuffed a few lemon slices in between too.

I used the America's Test Kitchen roasting method: forty minutes at 500 degrees, turning the pan halfway through. That finished the chicken just right, but the beets needed another ten minutes to get to the soft texture I was looking for.

I'm pleased with the chicken. It's a touch less succulent than the best results I've gotten before, but it is flavored nicely throughout which previously recipes that only seasoned over the skin didn't manage. The skin isn't quite as nice as the previous best either, but I think second night resting in the refrigerator before roasting would help with that. The black pepper in the outer seasoning did burn a little so I think I'll avoid that in the future and maybe use the slightly lower temperature of the Zuni method.

I still like the boneless pan frying method best, but it's good to have the oven hot on a cold night like tonight.

The beets turned out well too, but the chicken basting didn't help really. The best flavor was the pure sweet beet on the inside and the slightly crispy caramelized stumps where the tops were cut off. Maybe I should have peeled them. Are you supposed to peel beets before you roast them? I think that would let flavors penetrate better.

Sunday, December 13, 2009

CSA week three - Thai basil eggplant

There are lots of recipes on the web for Thai dishes using basil and eggplant. Mostly they're just: fry eggplant, add soy sauce and basil, serve over rice. That not only isn't going to satisfy me, I wouldn't get a blog post out of it. So I started with the most complicated recipe I could find (which, as a bonus, uses the bell pepper) and messed with it.

Ingredients:
1 medium-sized European eggplant, sliced into 1"-square cross-section strips
1 1/2 suntan bell peppers (or one red and one green), sliced into short broad strips
1 medium onion, chopped into pieces roughly the same size as the pepper pieces
hot peppers to taste, finely chopped
all the garlic left in the house, finely chopped (up to 3 Tablespoons, but I only managed 1)
1 generous handful Thai basic, roughly chopped

3 Tablespoons Thai fish sauce
1 Tablespoon soy sauce
1 Tablespoon brown sugar
1 chicken thigh, deboned, deskinned and cut into bite-sized pieces (meat is optional, but I'm compensating for less eggplant than the 3 Chinese eggplants the original recipe called for. If you want to stay vegetarian bar the fish sauce, tofu would be fine or just reduce the amount of onions and peppers.)
1/2-3/4 cup warm water

2 teaspoons corn starch
2 Tablespoons warm water

Instructions:
1. Mix fish sauce, soy sauce and brown sugar. Add the chicken and put it in the refrigerator to marinate. Mix the cornstarch and 2 Tablespoons water.

2. Heat a wok over high heat until it's smoking hot. Add a Tablespoon of cooking oil, the eggplant and a pinch of salt. Fry, stirring frequently for 5 minutes, until the eggplant is softened and, in spots, browned. Remove eggplant to a large bowl.

3. Heat another 1 Tablespoon of oil. Add onions and bell peppers and cook for 5 minutes, until both are softened and a little browned and the onions turn translucent. Remove to the bowl with the eggplant.

3. Heat a third Tablespoon of oil. Add the garlic, hot pepper and fry briefly. Add the chicken (drained of the marinade) and cook until the chicken loses its pinkness. Add the vegetables and mix thoroughly. Add the marinade, and a judicious amount of the warm water. Wait until the water starts boiling and add the basil then cook for at least one minute. When everything looks about right to you, add the cornstarch and take off the heat. Stir until the sauce turns glossy and thickens.

Serve over rice, noodles or a salad.

Hmm...not bad, but not fabulous. The texture of the vegetables is just right--soft but with a little firmness left to the bite. But the sauce isn't quite as flavorful as I'd like. A bit more fish sauce, a squeeze of lime and a whole lot of sriracha wakes it up, but the balance is off. Stock instead of water would help, but I think I just don't have enough flavorings for this much vegetation. Maybe my ratios were off.How big are medium-sized Chinese eggplants anyway?

Saturday, November 28, 2009

CSA week one - My Thanksgiving dinner

I'm alone again this year and when that happens I generally feel compelled to create some approximation of a traditional holiday meal: poultry prepared whole, a starch and a vegetable or two.

This year I made a flattened pan-fried chicken, wilted mizuna, a turnip gratin and stewed roselle.

That first was from a recipe I saw on a local cooking show I saw while visiting my mother earlier this month. It's the specialty of a restaurant either in Philadelphia or Wilmington whose name I paid insufficient attention to catch. The show skipped over some details so I really only picked up a three-part technique:
1. Remove all of the chicken's bones, leaving the skin in one piece.
2. Fry it skin side down until the skin is browned and crispy.
3. Flip it to finish.

It might have struck you that step one is the tricky bit. You're not wrong about that. One further detail I did see in the show was to cut out the chicken's backbone and then squish the bird flat as if starting to butterfly it, but after that I was on my own.

I cut the backbone a bit too narrowly, so I started with the bits remaining and sliced towards the center, under the rib cages, until I hit the clavicle to get each side off in one big piece. That went pretty smoothly and didn't slash up the meat too much. I had to dig deeper to get out the thigh bones and the keelbone and basically shredded up the chest area to get the wishbone out. Some of that required more digging around with my fingers than careful slicing with my boning knife. But here it is with the main body deboned. Not too bad. I thought chilling the chicken to firm up the meat would help, but it actually got easier to work as the bird warmed up.

Deboning the legs and wings was a little tougher. I ended up slowly turning the legs inside out, pulling out the bone, scraping the meat off and snipping the tendons as I went along and then peeling the skin off the very end. Finally I poked my finger into the skin like an inverted rubber glove to turn it back right side out. The first joint of the wing worked similarly, but the second and third joints were hopeless so I just chopped them off and stuck them in the stockpile. (it's a pile of bones for making stock. Stockpile. Ha.)

And there you go. One boneless chicken. I generously seasoned both sides with salt and pepper, heated up a couple teaspoons of olive oil in a 12-inch cast iron pan and dropped it in, skin side down. I started with the heat at medium-high for 15 minutes and then turned up the heat to get the skin browning. I could tell by smell when it was ready to turn. After the flip, I could see into the center of the breast meat through the slices I had pulled the wishbone out of so it was easy to judge when the thickest part was finished cooking. Around another 10 minutes.

I removed it from the pan and let it rest a few minutes before slicing. Since it has no bones, I could slice it any way I wanted which was kind of interesting.

The chicken is amazingly flavorful, tender and juicy considering the lack of any brining or other special preparation and my random stabs at cooking times (not to mention my random stab version of butchery). The skin is wonderfully crisp and tasty. The only minus is maybe that it's rather greasy, but it's all the natural chicken fat so you can't complain too much. This turned out so very well and, although the deboning process was a bit complex, it was an engaging complexity so I didn't really mind. I think this just became my new favorite method of cooking chicken.

I wonder if it would be a good idea to remove the legs and wings. They kind of get in the way and keep the skin on the outer bits of the body from crisping, but they also prop up the thinner parts of the chicken away from the heat. That's probably important to keep them from overcooking while the breast is finishing cooking. It might be worth the experiment to compare the results.

An added bonus of this method of cooking the chicken is that you can wilt greens in the pan afterward and they soak up all the juices and crisp up at the edges. Mighty tasty. I didn't cook the mizuna quite long enough and it ended up a little chewy, but not too bad. The flavor of the greens only contributes a little to the final result given how flavorful the pan juices it's couriering are. I wouldn't try this with spinach; that would be entirely overshadowed. Mizuna, at least gets to be a bit player. Kale, finely shredded, might be even better.

All of that goodness is kind of a shame because it takes the spotlight off of the turnip gratin which turned out fabulously in its own right.

I've got a new mandolin that does paper-thin slices easily (at least while it's still sharp) so prepping was a breeze. Here's the bottom layer--concentric overlapping circles of turnip (which is so much easier to do with properly sliced turnips, let me tell you) topped with a couple teaspoons of chicken broth, a couple Tablespoons of heavy cream, a sprinkle each of parsley, garlic and salt and a handful of shredded fontina. With the turnip slices so thin, I managed six layers from the CSA share of turnips--a bit under a pound I think--and six layers of cheese plus some grated Parmesan on top. 40 minutes at 375 degrees with foil on top and 20 without and here's the results.

Since I went light on the liquid, the cheese isn't oozing out. Instead it mortars together the layers of just slightly toothsome turnips. The cheese and turnip flavors blend and the parsley and garlic come through adding elements of complexity and elevating the dish. You've had turnip gratin; I don't have to tell you how good it can be and this turned out to be a very fine example.

Finally, we've got the roselle. I cleaned and roughly chopped them and then stewed them in a little chicken stock. I added a little salt, but no sugar. I should have added a little sugar too. Instead of the traditional peanuts, I added some toasted pine nuts for texture.

The roselle is brightly tart and floral. Probably a bit too tart, but still quite palatable. It cuts right through the heavy fatty elements on the plate just the way it's supposed to. The pine nuts give a bit of textural contrast, but their flavor is drowned out. Not bad, but this needs a little more work.

That off note aside, this was a great meal. I regret a bit that nobody else is going to get to appreciate it. On the other hand, it's so good I really don't want to share.

Now then, what's for desert?

Saturday, November 7, 2009

Moroccan fried chicken

I usually prefer to use the original-language name in the title, and the cookbook, The World's Best Fried Chicken Recipes (if they say so themselves), calls this recipe "M'Hammer" which is a pretty cool name. But it's not a term that Google turns up much for and most of the recipes its attached to are for grilled, not fried, meats. Then again, Google only turns up one Moroccan fried chicken recipe and it doesn't have any Arabic name attached so who knows? Other than just about everyone living in Morocco that is.

All that aside (and since all that was just an excuse to use the term "M'Hammer" despite its doubtful applicability, aside is where it belongs), this recipe has a really interesting technique--a reversed fricassee--that I've never seen before and was curious to try.

Ingredients:
1 small chicken, under three pounds if you can find one
2 medium onions, thinly sliced
copious chicken broth (at least four cups if you're using canned. You can get by with less if you're using homemade that you condensed down for storage like I did.)
salt and pepper (preferably white)
1/4 teaspoon crumbled saffron threads
3 large sprigs parsley or cilantro
zest of 2 preserved lemons, chopped (did you know to use only the zest? I didn't until now.)
juice of 1 lemon
2 Tablespoons cilantro or parsley, chopped (I like to use both for north African recipes so I used sprigs of parsley and finished with chopped cilantro.)
4 Tablespoons butter
1 cup olive oil

0. Clean the chicken and pat dry. Season generously with salt and pepper.

1. Pick out a stew pot or dutch oven that will comfortably fit the chicken, but isn't much bigger than necessary for that. Layer the bottom of the pot with half of the sliced onion. Put the chicken on top, either side up. Add broth and/or salted water until the chicken is covered at least three quarters of the way up. The broth will get cooked down later so you can dilute it a bit now, but not so much that it tastes thin and weak. (It's up to you, but I think it's OK to taste the broth even with a raw chicken sitting in there. There's no way you found an industrial chicken under 3 pounds so had to have bought a boutique organic pastured bird that's unlikely to carry anything nasty. And even if it does, the nastiness hasn't had time to seep out into the broth. And even if it has, is one sip going to kill you?) Top the chicken with the rest of the onion and add saffron, parsley sprigs and preserved lemon to the pot.

2. Turn the heat to medium-high and bring the broth to a boil. This will be frustratingly slow, but don't rush it. If you turn the heat up, it'll wait until you get bored and wander out of the kitchen and then go into a full rolling boil all over the stove top. Instead, as soon as it starts to boil, loosely cover the pot, reduce the heat to low and slowly simmer until the chicken is very tender, about 45 minutes.

3. Move the chicken carefully to a draining rack over a platter or tray to catch the drippings. Remove the parsley sprigs (and, if you forgot the saffron earlier like I did, add it now). Move the broth off of your primary burner (and possibly into a smaller pot) and bring to a higher boil to start it cooking down. Adjust heat so that you end up with a reduced, thick sauce in about 20 minutes. Consider mashing up the onions a bit if they haven't fallen apart on their own. Add the drippings to the sauce and pat the chicken dry.

4. Place a medium cast iron or heavy-based non-stick pan or dutch oven on your primary burner. Add the butter and olive oil and turn heat to high to melt the butter and raise the temperature to near smoking. Carefully add the chicken to the oil and fry for a few minutes on each side until it is golden brown and delicious. Try to break the skin as little as possible or the oil will get in and dry the meat out. The skin's pretty delicate by now so I wasn't entirely successful. Once it's browned on all four (six?) sides, remove chicken from pan and drain again. Check the sauce for consistency and, if you're happy with it, turn off the heat and stir in the lemon juice and chopped cilantro. Cool the chicken for five minutes, carve into serving pieces and serve with (but not covered by) the sauce on a bed of couscous with maybe a vegetable of some sort.


In retrospect, I don't know if "fried chicken" is the right term for this dish. If I came at it without knowing that label beforehand, I think I might called it crisped stewed chicken. The frying is just a finishing touch. A pretty good finishing touch, sure, but not essential to the dish. I do like the idea; if I were to go back and do the chicken in curdled milk recipe again I'd fry the chicken afterward instead of before cooking it in the milk. On the other hand, that chicken picked up a lot more flavor from the cooking medium than this one did. Granted there was a lot more there to be picked up, but the cooking may have opened up the meat to outside influences. Certainly this chicken picked up a lot of flavor from the sauce during a night of soaking in the refrigerator.

As for that sauce, the onion, preserved lemon, parsley and cilantro is a normal combination of Moroccan flavors (at least for the American kitchen approximation)--boldly tart, savory and herbal. If you like that sort of thing then that's the sort of thing you like. I'm pretty happy with it myself. I'm just a little disappointed that the chicken was bland in comparison. I really don't like it when the meat in a dish becomes just something to put the sauce on. That chicken gave its life for my dinner; it seems the least I can do is to try to bring out its best.