Showing posts with label bell pepper. Show all posts

Thursday, January 27, 2011

CSA week six - optimized stuffed peppers

It's been a few years since I've stuffed a pepper. I think the mediocre results dissuaded me from the effort. Beyond the two peppers in week five's share, what inspired me to pick the idea back up again was an article on chow.com that claimed to have the secret to better peppers: a whole lot of salt. That sounded sensible to me so I thought I'd give it a try.

Ingredients:
1/2 cup uncooked rice, cooked [careful if you have a rice cooker. The cup measure that comes with mine is six ounces so I had to use 2/3 the resulting cooked rice]
4 bell peppers, tops removed, cored and de-ribbed, and a bit sliced off the bottom if they won't stand up straight
2 Tablespoons fat of one sort or another
1 medium onion, diced
plenty of garlic, minced
1 pound meat, grind to a coarse hamburger texture [You do grind your own, right? You definitely should]
Worcestershire, soy or Maggi sauce or some other umami-rich seasoning
tomato in one form or another
2 eggs
cheese, grated
salt and pepper

0. Preheat oven to 350 degrees.

1. While the rice is cooking, boil a pot of water large enough to submerge at least one pepper. Add salt as if you were cooking pasta and simmer peppers until they start to soften, around 3 minutes. Drain and cool. [I used the water I rinsed my rice in. Waste not, want not.]

2. Heat a medium pan over medium heat. Add your fat of choice and heat. When your fat is ready add the onion and cook until softened and slightly browned. [Add any other vegetables you want to include around now and reduce the amount of meat accordingly.] Add garlic, cook briefly until fragrant. Add meat [I used beef] and cook until barely no-longer-pink. Season heavily with salt and pepper but add only enough Worcestershire (or whatever) to bring out the meatiness, not so much that you can identify it. Remove to a large bowl.

3. Mix rice into the meat mixture.

[At this point I split the filling into two bowls so I could go in two different culinary directions.]

4. Add your tomato of choice and season to match. [To one bowl I added half a can of roasted diced tomato, basil and oregano. To the other, about the same amount of salsa, chili powder, cumin and chipotle flakes.]

5. Add the eggs and mix well. [The original recipe called for just one egg, but I was disappointed in the final texture so I think you should use more.]

6. Salt 
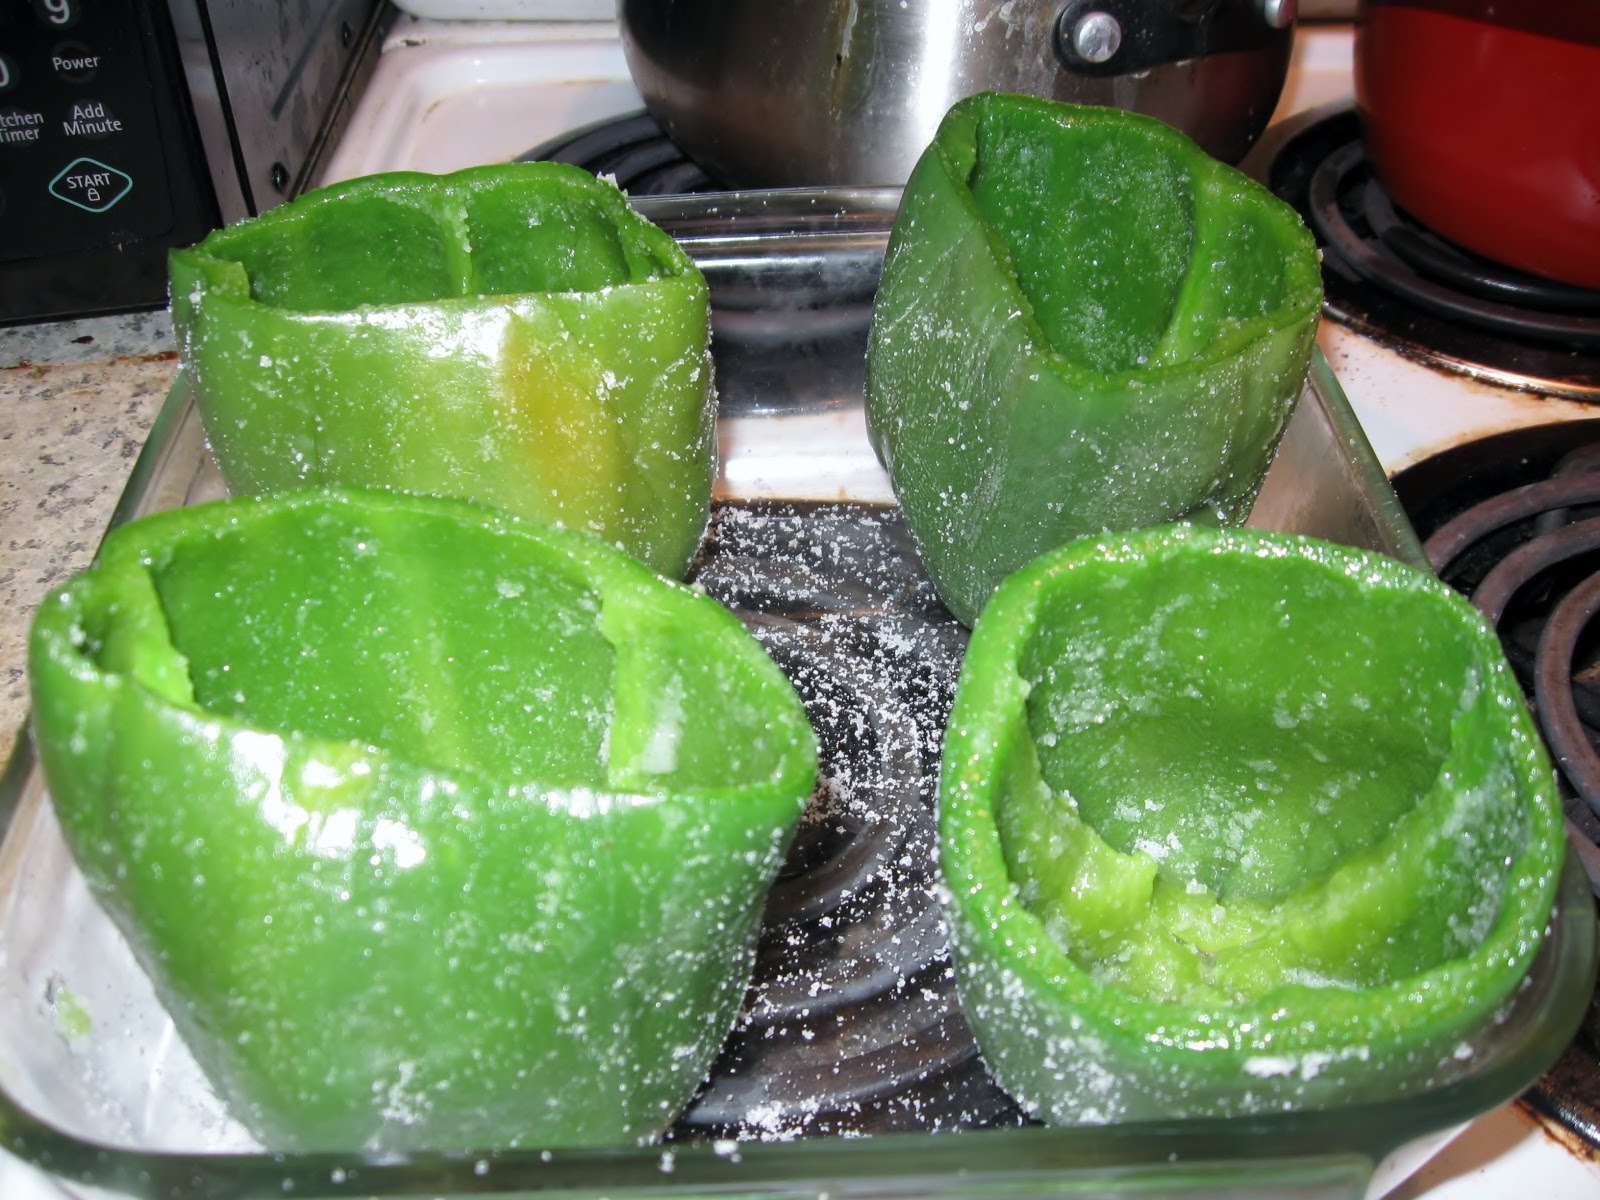
the peppers well, inside and out, and stand them up in a baking dish. Stuff them with your filling, packing it in well. [I either had smallish peppers (I did) or I went overboard with the tomato (probably also true), as I had a fair bit of extra filling. No reason you couldn't save it and stuff something else later.]

7. Top peppers with grated cheese. I used mozzarella for the Italian-seasoned peppers and pepper Jack for the Mexican.

8. Bake for 30-40 minutes until cheese is bubbly and browned and the peppers have wrinkled up a bit.

And here's the result:


It definitely looks better than my previous stuffed pepper attempts, although I'm a bit disappointed that the filling doesn't stick together. An extra egg or two, as I advise above, would help with that. As would using bread crumbs instead of rice and/or mixing some cheese into the filling. The flavor combinations turned out quite well, if a little overboard on the salt.

The real question is, is the pepper itself improved. It's been nearly three years since I last had a stuffed pepper so I have no idea, to be honest. However, reading over those old posts, I don't sound entirely happy with the results and this time around, I think I am. The pepper is firm and flavorful but doesn't overwhelm the flavors of the fillings. I can definitely recommend it. I do wish I had done one without salting to compare and contrast, though.

Sunday, December 13, 2009

CSA week three - Thai basil eggplant

There are lots of recipes on the web for Thai dishes using basil and eggplant. Mostly they're just: fry eggplant, add soy sauce and basil, serve over rice. That not only isn't going to satisfy me, I wouldn't get a blog post out of it. So I started with the most complicated recipe I could find (which, as a bonus, uses the bell pepper) and messed with it.

Ingredients:
1 medium-sized European eggplant, sliced into 1"-square cross-section strips
1 1/2 suntan bell peppers (or one red and one green), sliced into short broad strips
1 medium onion, chopped into pieces roughly the same size as the pepper pieces
hot peppers to taste, finely chopped
all the garlic left in the house, finely chopped (up to 3 Tablespoons, but I only managed 1)
1 generous handful Thai basic, roughly chopped

3 Tablespoons Thai fish sauce
1 Tablespoon soy sauce
1 Tablespoon brown sugar
1 chicken thigh, deboned, deskinned and cut into bite-sized pieces (meat is optional, but I'm compensating for less eggplant than the 3 Chinese eggplants the original recipe called for. If you want to stay vegetarian bar the fish sauce, tofu would be fine or just reduce the amount of onions and peppers.)
1/2-3/4 cup warm water

2 teaspoons corn starch
2 Tablespoons warm water

Instructions:
1. Mix fish sauce, soy sauce and brown sugar. Add the chicken and put it in the refrigerator to marinate. Mix the cornstarch and 2 Tablespoons water.

2. Heat a wok over high heat until it's smoking hot. Add a Tablespoon of cooking oil, the eggplant and a pinch of salt. Fry, stirring frequently for 5 minutes, until the eggplant is softened and, in spots, browned. Remove eggplant to a large bowl.

3. Heat another 1 Tablespoon of oil. Add onions and bell peppers and cook for 5 minutes, until both are softened and a little browned and the onions turn translucent. Remove to the bowl with the eggplant.

3. Heat a third Tablespoon of oil. Add the garlic, hot pepper and fry briefly. Add the chicken (drained of the marinade) and cook until the chicken loses its pinkness. Add the vegetables and mix thoroughly. Add the marinade, and a judicious amount of the warm water. Wait until the water starts boiling and add the basil then cook for at least one minute. When everything looks about right to you, add the cornstarch and take off the heat. Stir until the sauce turns glossy and thickens.

Serve over rice, noodles or a salad.

Hmm...not bad, but not fabulous. The texture of the vegetables is just right--soft but with a little firmness left to the bite. But the sauce isn't quite as flavorful as I'd like. A bit more fish sauce, a squeeze of lime and a whole lot of sriracha wakes it up, but the balance is off. Stock instead of water would help, but I think I just don't have enough flavorings for this much vegetation. Maybe my ratios were off.How big are medium-sized Chinese eggplants anyway?

Monday, February 2, 2009

CSA week nine - Chicken tagine with olives and preserved lemons

and also large bunches of parsley and cilantro.

This is a recipe from North African Cooking by Hilaire Walden. It's not the one I mentioned on Saturday, but this one uses more parsley and cilantro than that one plus some other interesting flavors so I thought I'd give it a try. I've modified it a bit and probably screwed it up since I couldn't get the right sorts of olives or preserved lemons. Well, that's the way of things; I'll just have to hope for the best.

Ingredients:
2-3 Tablespoons olive oil
1 red onion, finely chopped
3 garlic cloves
3/4 teaspoons ground ginger
1 1/2 teaspoons ground cinnamon
1 large pinch saffron threads, crushed
salt and pepper

1 chicken weighing about 3 1/2 pounds (Mine was a bit bigger so I was generous on all the spices and used a large onion.)
3 cups chicken broth or water

1/2 cup greeny-brown Moroccan olives, rinsed or kalamata olives, roughly chopped
1 large bunch of cilantro, finely chopped (I used about half my share. There's large and then there's large.)
1 large bunch of parsley, finely chopped
1 preserved lemon in salt (The lemons I found were pickled, but so are the olives so I figure I'm probably OK. They were also kind of small so I used two.), chopped

0. Preheat oven to 400 degrees.

1. Heat the olive oil over medium heat in a dutch oven just big enough to fit the chicken. Add onions and fry until golden brown.

2. Meanwhile, crush garlic in a mortar with a pinch of salt. Work in the ginger, cinnamon, saffron and a bit of pepper. Add to onions and cook until fragrant. Remove to a bowl.

3. Let the spice mix cool a bit and then mash it up into a smoother paste.
Or just run it through the food processor. Spread it all over the chicken including in the body cavity.

4. Put chicken in the dutch oven (which you're glad you used because you didn't lose all the flavor from the spice mix you couldn't entirely scrape out) and add broth. Bring to a simmer and cover.

The original recipe goes on to simmer on the stovetop for 1 1/4 hours, but instead I put it into the oven for omni-directional heat. 350 works for stews but wanted to keep the sauce simmering here so I want a little higher temperature. Technically that means this is a braise not a tagine, I think. The recipe called for flipping the chicken a few times which still seemed like a good idea so I went ahead and did that.

I'm not sure about the timing since I started at 350, changed my mind, tried 375 and then 400. I just cooked until my probe thermometer got a reading of 165 degrees. I've been having trouble getting reliable readings so the chicken ended up a bit overcooked, but the sauce kept it from drying out so it wasn't a disaster.

5. When the thermometer reaches 160 degrees add the chopped olives, lemon, cilantro and parsley, turn the oven down to 350 degrees and cook for 15 minutes more.

6. When the chicken is done, remove it to a cutting board to cool and put the sauce on the stove to cook down if it looks like it needs it. Taste the sauce and adjust the seasoning now. When the chicken is cool enough to work with, portion it out and serve with the sauce. If you can figure how to skim the chicken fat from the sauce, you probably should.


I also had a side dish: Fried peppers with capers and garlic

Ingredients:
2 Tablespoons olive oil
3/4 pound red peppers, cut into strips
2 garlic cloves, sliced
1/2 Tablespoon salt-packed capers (don't substitute the pickled capers; the flavors are quite different)
1 Tablespoon white wine vinegar (go ahead and substitute plain white vinegar)
salt and pepper

1. Heat the oil on high heat in a cast iron pan until nearly smoking. Add the peppers. Fry, stirring frequently but not constantly, until they've charred around the edges.

2. Add the capers and garlic. Cook until they sizzle and the garlic starts to brown.

3. Stir in the vinegar which will evaporate too fast to do any real damage to the seasoning on your cast iron pan. Still, you'll want to clean the pan promptly after dinner.

4. Serve hot as a side dish or cold as a salad.


And I made couscous too.

I'm fairly happy with how the tagine turned out. There's a lot of good flavor in the sauce, but you can tell the right olives and lemon would match with the herbs and spices a bit better. As usual when I neglect to brine the chicken is flavorful on the outside but the actual meat is kind of bland. Even this free-range, organic blah-blah-blah chicken doesn't have a whole lot of flavor. Not compared to olives and preserved lemons, anyway. I suppose the overcooking was no help here either. But still, not bad and the sauce is quite nice with the couscous.

The peppers are sweet, salty and tangy. Very different from the chicken and a nice accompaniment. The recipe doesn't actually specify sweet bell peppers so I wonder how it would be using a pepper with a little heat.

Now I could really go for some baclava for dessert.

Thursday, July 31, 2008

Eggplant casserole with shrimp and country ham

Regular readers of my blog will know that I'm a fan of Mark Bittman's minimalist style of cooking. He's got a food blog for the New York Times, Bitten that I've recently begun reading. A couple days ago he was talking about his acquisition of a big chunk of high quality domestic prosciutto and how he was making use of it. One example was sautéing it with garlic, onion and peppers, adding a past-it's-prime eggplant and then cooking it down into a tasty mush. As I've got a past-it's-prime eggplant languishing in my vegetable drawer I took note.

However, I'm fresh out of prosciutto. What I do have is a pack of country ham chips. Fresh Market has just started carrying country ham in a few different forms. As a suburban boy from Delaware I haven't a clue what to do with it so I picked up chips as the lowest buy in for my experimentation.

Country ham changes my flavor profile substantially so the Italian flavors Bittman had in mind weren't going to work. While I was looking around to see how others have used ham and eggplant I came across this recipe that also includes shrimp and stale bread. I've got plenty of both of those at the moment so I was leaning towards that recipe. However I didn't really want to run the oven today so I ended up making something somewhere in the middle.

I started by chopping up and soaking the remaining quarter of the loaf of bread I baked last Sunday. I put in a good bit of rye flour so it was pretty hearty and had a nice rustic flavor.

Next I put a dutch oven on medium heat with a couple teaspoons of butter, an equal amount of olive oil, and a half dozen crushed garlic cloves. Once they got soft, but not browned, I added a small onion and a small bell pepper, both chopped, about a quarter pound of the country ham, a bay leaf, a teaspoon of thyme, a teaspoon of creole spice mix (paprika, garlic powder and cayenne primarily), a couple pinches of salt and a couple dashes more of cayenne.

Once the vegetables had softened and the spices and herbs were aromatic I added the eggplant, coarsely chopped, the bread and a half cup of chicken broth. I probably should have held off on the bread and broth to give the eggplant a chance to cook down a bit first. But I didn't, so all in they went. A stir and a bit more salt and on goes the cover. I cooked it for twenty minutes, stirring every five minutes and adding a bit more water. The bread broke down pretty quickly, the eggplant a little more slowly, but both were a thick mush at the end.

Meanwhile, I had a quarter pound of shrimp in a salt and sugar brine. The brine was strong enough to do the shrimp some good, but not so strong that I couldn't safely slosh some in to the casserole to add flavor and thin it out.

After the twenty minutes were up I chopped up the shrimp along with a large scallion and a handful of parsley. I added those to the pot, gave them a couple minutes to cook through and that was it.

I'll freely admit, the end result isn't the most texturally presentable dish around but I really like how the flavors play off each other. The bread has taken up flavors and now tastes like a particularly good bread stuffing. Each bite is a bit different; the bread/eggplant mush is first flavor in each bite, but it doesn't overwhelm whatever combination of firmer-eggplant, ham and shrimp you happen to have on the fork. Those three components do work well against each other and I think I made a good choice of herbs and spices to tie it all together.

A shame about the texture though. Maybe cooking it in an uncovered casserole dish would have let it firm up more. Certainly, browned breadcrumbs on the top wouldn't be a bad thing. I've put a couple extra servings into the freezer for later; when I take one out, if I remember, I'll reheat it an oven and add breadcrumbs to see how it goes.

Tuesday, July 29, 2008

Beefsteak fajitas with fresh tomato salsa

I mentioned a little while back that I had picked up some skirt steak for the first time. It has a reputation as nature's Steak-Um--flavorful, quick to cook, flat--but it was an impulse buy and I didn't have any particular recipes in mind. A bit of later research turned up that this is the traditional cut for fajitas and since I've got a fajita recipe I like (from Jim Fobel's book Big Flavors) easy enough for a summer kitchen that sounded like a plan.

What I particularly like about Fobel's recipe is how he marinates the meat. On the bottom of a flat container lay out thin slices of tomato, onion, jalapeno and garlic and some chopped cilantro. (Leave in the stems; cilantro and parsley stems are just as flavorful as the leaves. In fact you can use all stems here and save the leaves for other applications.) Down goes the meat and then another layer of vegetables on top. For the second layer I used my pickled jalapenos and added a little salt to release juices. Seal it up and refrigerate overnight. It infuses the beef with some nice flavors and tenderizes it a bit. I've also done this with chicken breasts pounded flat which works well, too.

The salsa is just:
1 large juice tomato, 1/2-inch dice
1/8 cup chopped cilantro
1 whole scallion, minced
1/2 jalapeno, fresh or pickled, minced
1 Tablespoon extra-virgin olive oil
1/8 teaspoon salt
1/8 teaspoon pepper

Mix and let sit on the counter for an hour for the flavors to meld.

Fobel actually serves this as whole steaks dressed with the salsa but I always slice it up for fajitas. If you're going to do it as beefsteak ranchero, Fobel suggests matching it with corn tortillas, pinto beans, corn-on-the-cob and grilled scallions. If you're going with fajitas, you'll need flour tortillas and grilled onions and peppers.

Since I don't have a grill, I toss the onions and peppers in a high-smoke-point oil and a bit of salt and then throw them into a piping hot cast-iron skillet. Let them sit long enough to start to scorch, stir them up and let them sit again. Maybe a third time, maybe not, depending on if they've gotten tender yet.

But before you do that, take the beef out of the marinade, pick off all the bits of cilantro and onion that stuck on and pat it dry. Cut it up into bite-sized pieces (on your special beef cutting board of course). Thin slices against the grain is best but I went with a chunkier option. That was a mistake as the results were a little chewy. Sprinkle on a little salt as there wasn't any in the marinade and you're ready to add them to the cast iron pan when the vegetables are done. Less than a minute per side should do the trick but the exact timing depends on how thick your pieces are.

Serve in flour tortillas with the onions and peppers and a spoonful of salsa. A dollop of guacamole's not a bad idea either if you've got some handy. And that's a pretty tasty fajita right there. The best bit is how the juices from the beef and the liquid from the salsa mix into a flavorful sauce that coats each bite and leaks out of the bottom of the tortilla over your hand. That second part's not so good, but the first part makes up for it.

One issue I do have with this recipe is the waste of all those vegetables in the marinade. They're a little mushy from the night in the refrigerator but there ought to be some use for them. I decided to run them through the blender and then boiled the mix on the stove-top for a couple minutes as there is some raw beef bits still in there. The result isn't the most pleasant color but it's got lovely flavors of onion, pepper and cilantro in a tomato base. It could live to marinate another day or it could work as a dip for chips. It's a nice contrast with the more tomato-forward flavor of the fresh salsa. I'll have to see how it tastes after it's been chilled before I figure out what I want to do with it.

Turns out when it's cold it loses all its zip. So, along with the leftover fajita bits and some pickled carrots, both roughly chopped, some white beans that have been sitting in the fridge, pepper jack cheese and rest of the (no-longer so) fresh salsa, it's topping some nachos. Not bad, but Garden of Eatin' organic corn chips sure go soggy quick. I should have trusted to the agrobusiness complex to engineer a better chip. If there's anything they know, it's designing corn products.

Monday, July 7, 2008

Pantry-clearing chili

Long long ago I bought a chunk of tasajo--Cuban-style dried beef--intending to use it for a dish of oil down. I had no luck finding the breadfruit I needed for the recipe and I'm sick of looking at it so I researched alternate uses. Other than just snacking on it, as it is beef jerky essentially, most applications are stews, either simple or with a long list of what I assume are vegetables that I've never heard of.

The seasoning on those stews are the standard minimalistic Cuban set, but I"ve been thinking about chili since my southwestern hominy stew got out of control and turned into something not quite close enough to chili to satisfy (although it's fine if you're not holding it to that standard). I've still got some black beans and chilies left from that, plus a sack full of CSA onions starting to go past their prime. Add a can of tomatoes, the right spices and maybe some corn meal to thicken and that's chili. It's not the traditional bowl of red, but by using dried beef it's closer to cowboy chili than most recipes come. I've never tried that before so I was curious how it would go.

The first step is an overnight soak for the tasajo, the beans and the peppers (in individual bowls). That yellow on the beef is colored beef fat, part of the preservation process. I scraped off a good bit so the water could get through.

The peppers seemed to be done soaking in the morning so I poured their liquid onto the beans and put them in the fridge for later. The other two soaked until I got home from work.

At this point the tasajo was nicely rehydrated and hard to distinguish from an oversalted, slightly overcooked piece of fresh beef. I scraped off some more of the fat and chopped it up into pieces and inch or two on the side. I figured they'd either hold together at that bite-sized size or fall apart into strands as they cooked. I also added a pound of fresh beef (the "for stew" scraps you get at the supermarket). To make sure it would have a different texture than either of the dried beef possibilities I ran it through the food processor. During an episode of Good Eats on ground beef Alton Brown recommended ten pulses for burgers and seven for chili. When he actually did a chili episode he just cut the beef into cubes, but I wanted to try this. The results are a bit uneven, but I figured the big pieces would fall apart once the connective tissue melted during cooking.

I also chopped up two and a half onions (one red, the rest yellow), a few cloves of garlic, and a couple fresh small hot chilies.

And now to cook. I preheated the over to 300 degrees and heated some oil (and some of that yellow beef fat. Why waste it?) in a dutch oven. First order of business was to brown the ground beef in a few batches. Then I tossed in the dried beef just to melt off the rest of the fat. Both those out, I added a bit more oil and tossed in chili powder, cumin, ground chilies and some Mexican oregano. Once they got fragrant I added the vegetables, turned down the heat, and gave them a bit of a sweat until they softened. Once they were ready I returned the beef, added a 14 ounce can of chopped tomatoes in juice and my rehydrated peppers and into the oven it went for two hours.

The black beans I decided to cook separately for a couple reasons. First, you want to salt a stew early, but if you salt beans they take forever to get soft. Second, you need to simmer beans to cook them, but you want to keep a stew under a boil to keep the meat tender. So I cooked the beans on the countertop in the bean and chili soaking liquid with a bay leaf and some bits of hot Mexican carrots, onion and jalapenos I pickled last month. They never got hot enough to be great on their own, but they make a good ingredient. The beans took about an hour to cook and I added them to the stew when it had 45 minutes left to go.

At the same time I added a few handfuls of corn meal to thicken the dish. I didn't have any masa so I ran some polenta through the food processor (before I did the beef) to try to get a finer grind. It didn't really work.

Forty-five minutes later and the dish was done. The tasajo didn't fall apart so it's in chewy chunks. It's pretty much the dried-out texture you get if you actually boil a stew for a couple hours. Not jerky-esque at all. It's still a bit saltier than fresh beef, but palatably so. Hardly worth the bother unless it's the only meat you can get your hands on after you've at sea for a month.

I really like the texture of the fresh beef, though. It didn't fall apart like fully ground beef would in a stew so there's something there to chew on, but it's tender enough that you don't have to really work at it. I think that's the takeaway from this experiment: seven pulses in the food processor. I'll have to see how it works in a beef bourguignon when the weather cools off a bit.

I used too much polenta so the chili clotted right up. I'm trying to think of it as cornbread pre-crumbled in for your convenience. I had to thin it out with some chicken stock which I'm hoping the polenta doesn't suck up too.

As for the the flavors, it's pretty much kid's chili. Kind of sweet, from the corn and peppers I think, and only a little heat in the aftertaste. A bit of lime, a shot or two of hot sauce and a few garnishes perks it up, though. Not bad, but nothing special. I've been too timid with the peppers lately; next time I'm going to take my chances and toss a bunch in.

Friday, July 4, 2008

Fried chicken with basil leaves

After coming back from my trip I was disappointed at how poorly my curry leaves fared. I stored some in a sealed plastic bag with a strip of paper towel to absorb any stray moisture and some in one of those perforated greens storing bags. The batch in the sealed bag had begun to rot. I think they would have done fine for a couple weeks, but it's now around four weeks since I got them in my summer CSA a la carte. The second batch was well on its way to drying out, but the leaves had lost all of their aroma and without that they're hardly worth calling curry leaves.

I'll admit that this is something I should have checked somewhat earlier than halfway through preparing a recipe called Fried Chicken with Curry Leaves. However, I had a back-up plan. I've been needing to prune the basil in my garden (Last year I didn't and my basil plant grew like I was under attack by Plantman but died just as quickly.) so I can move this recipe from Malaysian to Thai. Luckily I had already switched out the soy sauce in the marinade for fish sauce so I was on my way. I don't actually know what variety of basil I've got, but it doesn't have the peppery bite of real Thai basil so I'll have to toss in some peppers to compensate.

So here's how it went:

Ingredients:
oil for deep frying
2 chicken thighs, boned, skinned and cut into largish bite-sized pieces
1 large handful basil leaves
1 small onion, chopped into largish bite-sized pieces
1 small green pepper, chopped into largish bite-sized pieces
1 bird's eye or similar hot pepper, sliced (and seeded if you're a wimp)
Marinade:
1 teaspoon fish sauce
1/2 teaspoon salt
1/2 teaspoon white pepper (black pepper is fine, but I got tired of grinding. I need a new more efficient pepper mill.)
1/2 teaspoon sesame oil
1 Tablespoon corn starch
Glaze:
1/2 Tablespoon oyster sauce, I used Chinese-style which worked fine although I've just learned that Thai-style is different
1 Tablespoon fish sauce
1 Tablespoon sugar
80 ml chicken broth
20 ml rice wine
1/4 teaspoon red pepper flakes
juice of 1/4 lime

Directions:
1. Combine marinade ingredients, add chicken, marinate in refrigerator for one hour.
2. Heat oil for deep frying in a wok. Add chicken in batches without draining. Deep fry until golden brown. Don't worry about under-cooking as they'll be going back into the pan for a significant amount of time.
3. Drain all but 2 Tablespoons of oil (or heat 2 Tablespoons of oil in a wok at high heat if you used an actual deep fryer).
4. Add onion, peppers and small handful of basil leaves. Stir fry until onion and pepper begin to soften and become translucent.
5. Add chicken and glaze. Stir fry until almost, but not quite dry.
6. Add remaining basil leaves, toss and immediately remove from pan and serve over rice.

No offense to ponikuta whose original recipe this is based off of, but this turned out much better than when I followed her recipe to the letter. The switch from curry to basil leaves was, I think, a lateral one, but boosting the amount made the results much more aromatic. Adding the onion and pepper gave a better solids to glaze ratio so the sauce didn't over-reduce as it did on my first try. Instead of those overly salty and simple results, the flavors this time are a lovely blend of the savory chicken boosted by the oyster and fish sauces and the sweet of the lime and sugar with the basil wafting up behind and the pepper burning beneath. This would actually be a fine not-quite-vegetarian dish as the sauce brings out and supports the flavors of the onions and peppers. You could deep fry tofu and it would work really well, but don't use those frozen pre-fried tofu puffs. They'd absorb too much of the glaze and it wouldn't reduce right.

It's when I unexpectedly get these sorts of spectacular results that I regret that I'm only cooking for myself. Well, that's why I have this blog; If I can't feed you, at least I can record and pass on the recipe. Please make this; I promise you won't regret it.

Wednesday, June 4, 2008

Southwestern black bean hominy stew

My original plan was to make a traditional pozole--a stew of just hominy, peppers and pork--but things got a bit out of hand.

Well, backing up a bit, the origin of this dish is the tiny ethnic food isle in the local Whole Foods. They've got a rack of various southwestern peppers and herbs packaged by a company called Los Chileros out of New Mexico. They also sell dried hominy. I had no idea there was such a thing. Hominy is made by soaking dried corn in lye- or lime-water and I figured once it was soaked it was soaked and I had only ever seen it in cans. So I was intrigued and determined to try it out.

I also had on hand some dried black beans and some fresh corn on the cob that seemed like good additions. And, since I wanted something fire roasted in there and don't have ready access to fire, a can of fire roasted crushed tomatoes seemed like a good addition.

All that plus the pork--I think I accidentally made chili. It's nothing like a real bowl of red, mind you, but chili is such a degraded term these days I think this is somewhere under that broad umbrella.

Anyway, it went like this (keeping in mind that I didn't actually measure anything at the time):

ingredients:
1 cup dried black beans
1 cup dried hominy
1 Tablespoon olive oil
2 cups finely chopped onion (I used red and white as I had those available)
1 cup finely chopped green bell pepper (only because I had no fresh hot peppers handy)
1 Tablespoon Mexican oregano
1 Tablespoon epazote (epazote supposedly reduces gas, but best to use the beano anyway)
1 Tablespoon ancho chili powder
1 Tablespoon ground cumin (whole cumin would have been nice but I seem to be out)
2 dried casabel chiles
2 dried chipotle chiles
1 lb pork roast (not stew pork as that does best when the stew never reaches a boil, but you've got to boil to cook the beans and hominy), chopped in 1 inch cubes
kernels cut from 1 small ear of corn, including the milk if you've got any. Mine didn't.
14 ounces crushed fire roasted tomatoes
1 cup chicken broth
vinegar hot pepper sauce

garnishes:
lime
white onion, finely sliced
green cabbage, finely sliced
tortillas

1. Soak beans and hominy separately overnight

2. Heat oil in dutch oven on medium heat. Add any whole spices you're using, cook until aromatic, add onions and peppers, sweat onion and pepper until soft but not browned. Stir in oregano, epazote, chili powder and cumin and cook until aromatic.

3. Add hominy, black beans and enough hominy soaking water to cover by 1 inch. Crumble, crush or chop peppers and add to pot. Simmer on low heat until hominy and beans are just getting tender, around 1 1/2 hours.

4. Add corn, tomatoes, enough chicken broth to thin out the stew to your preference and salt to taste. Simmer for another 1/2 hour.

5. At some point during that half hour add the pork. Exactly when depends on your cut of meat and how large the pieces are. Use your judgment. I added mine with the corn and tomatoes and it ended up a bit overdone. Ten minutes would have been sufficient.

6. Taste and adjust seasoning. I found mine a bit muddy so I added a vinegar based hot sauce, specifically Urban Chefs hotlicious pepper sauce which is a micro-brand out of Columbus, Ohio. Tabasco or Cholula would do fine, but Urban Chefs has a fruitier character that I like a lot.

7. Serve garnished with onion, cabbage, strips of tortilla and a squeeze of lime.


The end result is pretty good. Looking at it you expect chili pretty much, but the strong corn element in the broth (and the fact that it's actually soupy) is pretty distinctive and interestingly tasty. I like the variety of textures in the chewy hominy, creamy beans, firmly tender corn, not too overdone pork and crisp garnishes. Tasting the dish today, I found the tomato a little forward and the chiles a bit mild and dissociated from the other flavors. These sorts of stews always taste better and usually spicier the second day after the flavors had time to meld. It's actually tasting better every time I try it as it cools. I'll add a note tomorrow when I have a final result.

OK, it's tomorrow. I'm a little disappointed. The flavors did meld nicely but the broth turned into a chili-style sauce and the flavors all mellowed a bit so the end result is kind of undistinguished. I was hoping for something with more pizazz. Still, a couple shots of hot sauce and it's perfectly palatable.

I might try a different mix of peppers next time; I picked what I used fairly randomly. It's easy to find out how hot each pepper is, but its the other flavors they have that are important and that's much harder to learn so you just have to try them and see. Wow, I just found myself respecting Bobby Flay for a moment there. What an odd sensation.

Monday, April 7, 2008

CSA week 19 - ratatouille de Provence

Heavens, are there a variety of ratatouille recipes out there. Most times when I do my pre-cooking research I find two or three recipes cut and pasted all over the web (without proper attribution I might add). Not with ratatouille. With the exception of the (really cool) version created for the eponymous movie, every recipe I saw was different.

The recipes fell into two general categories with mention of a third version that nobody makes any more. Classically, you cook up eggplant, squash, peppers and tomatoes in four different pots and then combine them once they're each done just right. I haven't the pots, burners or patience to do that. The standard version is to simmer the eggplant, squash and peppers all together, adding the tomatoes late. And then there's the roasted variant where you lay the four vegetables out on a baking dish and stick them in the oven. That last one was tempting, but I decided that it wasn't really a proper ratatouille and for my first try at the dish I wanted to not stray too far from the Platonic form.

But even within that general description no two recipes agreed on the ratio of the various vegetables, the cooking times or the details of the seasoning. In the end, I settled on two different particularly interesting recipes to work with. This one that added niçoise olives, Dijon mustard, red wine and herbes de Provence for a distinctly regional flavor, and this one for it's methodical, lab-tested procedure. I recommend checking out the Cooking for Engineers website in general when puzzling out a new dish. Along with Alton Brown's oeuvre and McGee's On Food and Cooking, it's a great resource for cutting through the kitchen lore to what you really need to do to make the recipe work. For instance, there was no salting and purging the eggplant as many recipes reflexively call for; doing that helps the eggplant stay firm which I didn't want and doesn't really do anything to cut bitterness which modern varieties of eggplant don't suffer from anyway (unless you buy the really old spongy ones which you should know better than to do).

I split the difference between the two recipes and came up with a trick of my own. I decided that the tomatoes from our share were too nice to cook so I used canned tomatoes and boosted the flavor with tomato paste. One other thing I learned that all the recipes agreed on was that there's no such thing as too much ratatouille so I used as much vegetation as could fit in my dutch oven. Most recipes use more eggplant than squash so I went with that and then used both bell peppers I had bought. The 14 oz can of tomatoes seems standard for the dishes that use canned I didn't use one of my 28 oz cans of fire-roasted tomatoes which is a shame as that would have added some nice extra flavor.

Here's what I ended up with:

1/4 cup EV olive oil
6 garlic cloves, sliced thin
1 medium onion, sliced thin
1 Tablespoon tomato paste
1 14 oz can chopped tomatoes in juice, with tomatoes and juice separated. Squeeze the tomatoes a bit to get 2/3 cup of juice total
1 large eggplant, 1 inch cubes
2 small or 1 large summer squash (about half the weight of the eggplant), 1 inch cubes
1 red bell pepper, 1 inch pieces
1 green bell pepper, 1 inch pieces
1/2 cup dry red wine (something Provencal preferably, of course)
1/2 cup pitted niçoise olives (which I had to pit myself I'd like to point out)
2 Tablespoons herbs de Provence (from Spice House)
2 Tablespoons Dijon mustard (Dijon isn't particularly near Provence. If you can find Provencal mustard, use that instead.)
fresh thyme, parsley and basil
salt and pepper to taste (more than you think you need, probably)


1. Heat olive oil on medium high heat in large pot or dutch oven. Add garlic before it's fully up to sizzling temperature to ensure it doesn't burn. When it becomes aromatic add the onion and fry until onion is softened and slightly browned, around 10 minutes.

2. Stir in tomato paste and cook briefly. Add tomato juice, scrape up any browned bits. Add eggplant, squash and peppers. Stir well and cook for 10 minutes stirring occasionally.

3. Add tomatoes, mustard, wine, olives, herbs, salt and pepper. Stir well and cook for 15 minutes stirring occasionally until most of the liquid has evaporated, the peppers are just done, the eggplant is starting to get a bit mushy and squash, tomatoes and onions have completely disintegrated. (A lot of recipes call for longer cooking times and a big bowl of mush. Do what you like. You might even start the peppers first so they don't end up so much firmer than the other vegetables.)

4. Adjust seasonings and serve.

There. It's pretty easy when you hide all the chopping in the ingredient list.

And the end result? It's eggplant, squash, tomatoes and peppers; if you like them, you'll like this. Actually, I don't overmuch, but the wine, olives and mustard do add some complexity and I'm finding (as I think many have) that ratatouille is compulsive eating (possibly because the lack of protein makes it not terribly satisfying). It's supposed to be better tomorrow, which makes good sense for a stew like this, good with eggs and good cold with hearty bread. I'll add an addendum when I give that a try.
...
OK, it's Wednesday now and I had some cold ratatouille for lunch. First off, the flavor was better at room temperature than refrigerator temperature to my mind. Second, the flavors continued to meld and change over time. Yesterday the mustard flavor was a bit too strong when the ratatouille was cold, but today it's retreated a bit into the flavor mix. There's just enough background flavors from the herbs and mustard to keep the vegetables subtly French. That was my main goal in including them in the first place as these particular vegetables could easily be in an Italian dish and that's not what I was aiming at. So, on the whole I'm pleased. Now I just need to see how well it survives freezing.