Those of you in South Florida might be interested to learn that the Food Network spin-off, the imaginatively named Cooking Chanel, will be replacing the Fine Living Network on Comcast channel 122 starting on Monday. I've been looking through their schedule and I see that Mario Batali's and Sara Moulton's shows are returning as are episodes of the original Iron Chef and Julia Child and Company which I think was her series from the late 70's.
Of the new stuff, there are a few shows that look interesting. There's Indian Cooking Made Easy; Personally, I'm never sure I'm doing it right when I venture into Indian cuisine. Everyday Exotic is starting with episodes on Papayas and Mangoes which aren't so exotic around here, but I'm curious on what they'll do with them. Foodography, which looks at the history of various foods is pretty similar to an idea wanted to do back when I worked in TV documentaries. It probably won't be quite the approach I'd have taken, though.
Worth a look if, like me, you're into this sort of stuff and miss it since Food Network has wandered off in other directions.
Sunday, May 30, 2010
Saturday, May 29, 2010
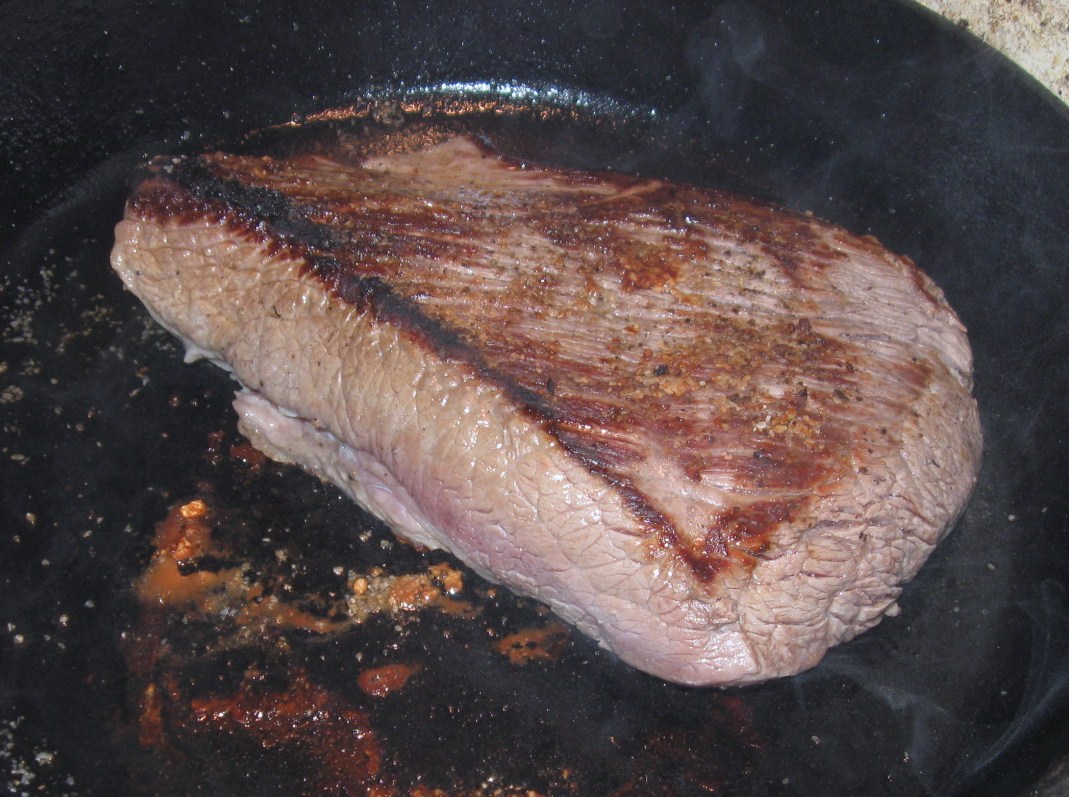
Southwestern pulled brisket sandwiches with Mesa Grill potato salad
This post combines both of my rather modest goals for the summer: cooking new things in my slow cooker (new to me, anyway) and using the produce from the Buying Club in summery ways.
My previous summers in Miami I pretty much ignored the climate and made whatever looked interesting, but I guess I'm just in a different mood this year. Running the oven in a 90 degree kitchen just doesn't sound appealing. So I'm keeping an eye out for dishes both served cold and requiring less cooking. Certainly I'll be making exceptions, but I do want to shift the majority in that direction.
I found both of these recipes on the Food Network's website. The Mesa Grill recipe is Bobby Flay's obviously. The brisket is from a 2004 episode of a show called Making It Easy that I don't think I've ever encountered. I'm no expert in either slow cooker cooking or Southwestern cuisine so I didn't make any significant changes in either recipe. I hope you don't mind a bit of cutting and pasting from the original sources as they both had quite a few ingredients and I don't see any particular reason to rewrite a scrupulously followed recipe.
Pulled brisket ingredients:
3 pounds beef brisket
Kosher salt
Freshly ground black pepper
2 tablespoons vegetable oil
5 cloves garlic, peeled and smashed
1 Spanish onion, halved and thinly sliced
1 tablespoon chili powder
2 teaspoons ground coriander
2 teaspoons ground cumin
1/4 cup apple cider vinegar
1 1/2 cups water
1 (14 1/2-ounce) can whole peeled tomatoes, with their juices
2 whole canned chipotle chiles en adobo
2 bay leaves
3 tablespoons molasses
Soft sandwich buns
Pickled jalapeños [sweet pickles are just as good. The results aren't really all that Southwestern]
1. Season the beef generously with salt and pepper, to taste. Heat a large, heavy skillet over medium-high heat. Add the oil and heat just until beginning to smoke. Add the meat and cook, turning once, until browned on both sides, about 10 minutes total. Transfer the meat to the slow cooker; leave the skillet on the heat.
2. Add garlic, onion, chili powder, coriander, and cumin to drippings in the skillet and stir until fragrant, about 1 minute. Add vinegar and boil until it's almost gone, scraping the bottom of the pan with a wooden spoon. Stir in water and pour the mixture over the brisket. Crush the tomatoes through your fingers into the slow cooker; add the tomato juices, chipotles, bay leaves, and molasses. Cover the cooker, set it on LOW, and cook the brisket until it pulls apart easily with a fork, about 8 hours.
3. [The original recipe calls for just pulling the meat apart in the cooker and serving, but I wanted a thicker sauce which requires a few more steps.] Remove meat and bay leaves from the slow cooker. Turn off the slow cooker or remove the cooking vessel from the heater or pour out the sauce into a large bowl. Discard the bay leaves and let the brisket and sauce cool a bit.
4. When it's cool enough to handle, pour the sauce into a food processor or blender and blend smooth. Return to slow cooker if it has a High setting that's pretty high or pour into a pot on the stovetop. [I tried the former first but switched to the latter.] Cook the sauce down until it's thick enough to splatter when it bubbles.
5. Meanwhile, pull the brisket apart with forks and/or tongs. When the sauce is to your ideal thickness, mix it with the meat.
Serve on buns or in tortillas with the pickled jalapeños on top. Over egg noodles or rice wouldn't be bad either.
Ingredients for Mesa Grill potato salad:
[I halved these amounts. If I had known how poorly potato salad freezes, I would have quartered them. Instead, I've been eating potato salad way too many meals in a row. It's good but I've got my limits.]
1 1/2 cups prepared mayonnaise
1/4 cup Dijon mustard
2 tablespoons fresh lime juice
2 tablespoons chipotle pepper puree [or one chipotle en adobo chopped fine]
1 large ripe tomato, seeded and diced
1/4 cup chopped cilantro leaves
3 scallions, chopped, white and green parts
1 medium red onion, thinly sliced
1/2 teaspoon cayenne
4 cloves garlic, finely chopped
Salt and freshly ground black pepper
16 new potatoes, about 3 to 4 pounds
1. Heat a large pot of water. Cut potatoes into large, similarly-sized pieces. When water comes to a boil, add potatoes and a generous amount of salt. Lower heat to medium-low. Simmer until potatoes are tender. Remove to cutting board, let cool until you can handle them and slice into 1/2-inch thick slices.
2. Combine all the ingredients, except the potatoes, in a medium bowl and season with salt and pepper, to taste. Mix in potatoes. Check seasoning and serve warm.

I cooked the sauce down more after this first sandwich but this picture isn't too far off from the final version. The sauce tasted a bit muddy at first, but the flavors clarified after a night in the refrigerator with more of the spices unique character coming through instead of just a general heat. The small amount of vinegar in the sauce isn't enough to balance on its own; the pickles (of whatever sort) are important to cut through the rich meaty flavors. And I'm pleased that there is some meaty flavor left in the meat. Often it's all leached out after 8-9 hours of cooking.
As for the potato salad, I can't recall ever having better. Just the lack of chunks of raw celery is a huge plus. Beyond that, large tender slices of potato are an improvement over chunks. There's a freshness from the scallion and cilantro that balances against the creaminess, slight tartness and gentle heat. Nicely complex and a lovely pairing with the the brisket. The only possible issue is that the sauce to potato ratio is pretty high so it might be better to put the potatoes in a large bowl and add the sauce to taste.
My previous summers in Miami I pretty much ignored the climate and made whatever looked interesting, but I guess I'm just in a different mood this year. Running the oven in a 90 degree kitchen just doesn't sound appealing. So I'm keeping an eye out for dishes both served cold and requiring less cooking. Certainly I'll be making exceptions, but I do want to shift the majority in that direction.
I found both of these recipes on the Food Network's website. The Mesa Grill recipe is Bobby Flay's obviously. The brisket is from a 2004 episode of a show called Making It Easy that I don't think I've ever encountered. I'm no expert in either slow cooker cooking or Southwestern cuisine so I didn't make any significant changes in either recipe. I hope you don't mind a bit of cutting and pasting from the original sources as they both had quite a few ingredients and I don't see any particular reason to rewrite a scrupulously followed recipe.
Pulled brisket ingredients:
3 pounds beef brisket
Kosher salt
Freshly ground black pepper
2 tablespoons vegetable oil
5 cloves garlic, peeled and smashed

1 Spanish onion, halved and thinly sliced
1 tablespoon chili powder
2 teaspoons ground coriander
2 teaspoons ground cumin
1/4 cup apple cider vinegar
1 1/2 cups water
1 (14 1/2-ounce) can whole peeled tomatoes, with their juices
2 whole canned chipotle chiles en adobo
2 bay leaves
3 tablespoons molasses
Soft sandwich buns
Pickled jalapeños [sweet pickles are just as good. The results aren't really all that Southwestern]
1. Season
 the beef generously with salt and pepper, to taste. Heat a large, heavy skillet over medium-high heat. Add the oil and heat just until beginning to smoke. Add the meat and cook, turning once, until browned on both sides, about 10 minutes total. Transfer the meat to the slow cooker; leave the skillet on the heat.
2. Add garlic, onion, chili powder, coriander, and cumin to drippings in the skillet and stir until fragrant, about 1 minute. Add vinegar and boil until it's almost gone,
 scraping the bottom of the pan with a wooden spoon. Stir in water and pour the mixture over the brisket. Crush the tomatoes through your fingers into the slow cooker; add the tomato juices, chipotles, bay leaves, and molasses. Cover the cooker, set it on LOW, and cook the brisket until it pulls apart easily with a fork, about 8 hours.
3. [The
 original recipe calls for just pulling the meat apart in the cooker and serving, but I wanted a thicker sauce which requires a few more steps.] Remove meat and bay leaves from the slow cooker. Turn off the slow cooker or remove the cooking vessel from the heater or pour out the sauce into a large bowl. Discard the bay leaves and let the brisket and sauce cool a bit.
4. When it's cool enough
 to handle, pour the sauce into a food processor or blender and blend smooth. Return to slow cooker if it has a High setting that's pretty high or pour into a pot on the stovetop. [I tried the former first but switched to the latter.] Cook the sauce down until it's thick enough to splatter when it bubbles.
5. Meanwhile, pull the brisket apart with forks and/or tongs. When the sauce is to your ideal thickness, mix it with the meat.
Serve on buns or in tortillas with the pickled jalapeños on top. Over egg noodles or rice wouldn't be bad either.
Ingredients for Mesa Grill potato salad:
[I halved these amounts. If I had known how poorly potato salad freezes, I would have quartered them. Instead, I've been eating potato salad way too many meals in a row. It's good but I've got my limits.]
1 1/2 cups prepared mayonnaise

1/4 cup Dijon mustard
2 tablespoons fresh lime juice
2 tablespoons chipotle pepper puree [or one chipotle en adobo chopped fine]
1 large ripe tomato, seeded and diced
1/4 cup chopped cilantro leaves
3 scallions, chopped, white and green parts
1 medium red onion, thinly sliced
1/2 teaspoon cayenne
4 cloves garlic, finely chopped
Salt and freshly ground black pepper
16 new potatoes, about 3 to 4 pounds
1. Heat a large pot of water. Cut potatoes into large, similarly-sized pieces. When water comes to a boil, add potatoes and a generous amount of salt. Lower heat to medium-low. Simmer until potatoes are tender. Remove to cutting board, let cool until you can handle them and slice into 1/2-inch thick slices.
2. Combine all the ingredients, except the potatoes, in a medium bowl and season with salt and pepper, to taste. Mix in potatoes. Check seasoning and serve warm.

I cooked the sauce down more after this first sandwich but this picture isn't too far off from the final version. The sauce tasted a bit muddy at first, but the flavors clarified after a night in the refrigerator with more of the spices unique character coming through instead of just a general heat. The small amount of vinegar in the sauce isn't enough to balance on its own; the pickles (of whatever sort) are important to cut through the rich meaty flavors. And I'm pleased that there is some meaty flavor left in the meat. Often it's all leached out after 8-9 hours of cooking.
As for the potato salad, I can't recall ever having better. Just the lack of chunks of raw celery is a huge plus. Beyond that, large tender slices of potato are an improvement over chunks. There's a freshness from the scallion and cilantro that balances against the creaminess, slight tartness and gentle heat. Nicely complex and a lovely pairing with the the brisket. The only possible issue is that the sauce to potato ratio is pretty high so it might be better to put the potatoes in a large bowl and add the sauce to taste.
Wednesday, May 26, 2010
Annie's Organic Buying Club - Week one
In an attempt to get back into the cooking groove, I signed up for a buying club this summer. Unlike the CSA, this has a pay-as-you-go system with no commitments. And also, unlike the CSA, most of these fruits and vegetables aren't local. They are all organic, though.
I only signed up for a half share every other week. I just want a little inspiration, not the weekly challenge the CSA gave me. That was good thinking as this half share is still quite a bit of produce. This cost me thirty-five dollars plus a couple bucks processing fee since I paid on-line.

I picked this up Monday after work so I've already used a bit of it. Corn loses its sweetness quickly and I had no idea how long these ears have been traveling so I wanted to make something with it right away. Chowder was the quick and easy answer, particularly with the potatoes and onions needing to be used too. I've done a corn chowder post before so I'm not going to bother this time around. I will mention though, that starting off with plenty of salt pork and hot peppers is a good idea, as is stirring in diced shrimp and salmon for the last couple of minutes.

A big salad yesterday used half of the lettuce and some of the sweet onion and cucumber.
And today I used another pound of potatoes for a potato salad to go with a pulled brisket. That's worth it's own post so look for that up next.
Using the potatoes first probably wasn't the best idea. The spinach is likely to start rotting any day now. I'm hesitant to use them in a recipe where a box of frozen spinach would do as well. And I haven't had greens this delicate to work with for a while so all my initial impulses are for methods that will turn them into mush. There's spinach salad, I suppose. Maybe eggs Florentine.
I might go with a simple stir fry for the broccoli. I've got some pork tenderloin in the freezer that would go well with it. Something more interesting may well present itself, though.
I have an interesting recipe for stuffed sweet onions I want to try. They'll keep fine so I think I'll put that off until next week.
I've already used the ripe tomato. The green one I've put in a paper bag with the green tomatoes I've salvaged from my tomato plants. I've definitely got the blight out there so I don't think I'm going to have any luck trying to ripen them on the vine. If they ripen in the pantry, I've got one plan for them, but I've got something rather more interesting in mind if, after a week, they're still green.
The squash is just one small squash, best used as a side dish and I never have to make an effort to use garlic so that just leaves quite a lot of fruit.
There are actually six bananas back there. Quite large ones too. I'm thinking ice cream. I've made plenty of banana ice creams before but I've got a new idea. I don't feel like shopping again right now so that's for next week too.
That's a full pound of strawberries in the back there and they've got pretty good flavor. The berries are big and photogenic so I want to do something that keeps them whole. Maybe I'll candy them or dip them in chocolate or some such.
The blueberries are getting a little over-ripe so I may boil them down into a syrup.
The mango. I don't recognize the varietal so I don't know quite what I've got here. Eh, smoothies work with the full range. That's a safe choice.
And lastly, the peaches. They came underripe, the better for shipping. And there's your major distinction between a CSA and a buying club. Only two of them so probably best to just eat them out of hand instead of trying to use them as an ingredient. In fact, let me go check...one's ripe already. Mmm, tasty.
Monday, May 24, 2010
Bagels, a third variation
After a year away and two not-entirely-satisfactory batches, (scroll down on this page to see them) I'm returning to making bagels. The recipe I'm using this time is from Peter Reinhart's Artisan Breads Every Day. There doesn't seem to be anything distinctively Reinhartian about it, though, so far as I can see. His schtick is soaking whole grains overnight to soften the hull-shards and this recipe doesn't contain any whole grains. I thought that, with this cookbook, he had joined no-knead and/or keep-dough-in-the-refrigerator-indefinitely crowds, but I don't see any sign of that here.
This recipe isn't particularly different from the last version I made. The only major distinction is a night in the refrigerator, but that's nearly always a good idea when baking bread. I do like that it measures the ingredients by weight for more precision. I want to do more of that in my baking. To add a little more distinctiveness, I thought I'd try the looped rope method of shaping the bagels instead of the poke-a-hole-through method I used last time.
Also, I doubled the recipe since bagels freeze well and are handy to have around.
Ingredients:
2 Tablespoons barley malt syrup
2 teaspoons instant yeast
1 Tablespoon fine kosher salt
510 grams (a bit over 2 cups) lukewarm water
908 grams (around 7 cups) bread flour
poaching liquid:
2-3 quarts water
1 1/2 Tablespoons barley malt syrup
1 Tablespoon baking soda
1 teaspoon fine kosher salt
toppings:
poppy seeds
sesame seeds
dehydrated onion or garlic, rehydrated
coarse sea salt
1. Mix the malt syrup, yeast and salt in the water. Let sit while you measure out the flour. Mix into the flour until the dough forms a stiff, slightly shaggy ball. There should be just barely enough moisture for the flour. Let rest 5 minutes then knead for 3 minutes until gluten forms and the dough smoothes out. Add a little more flour if the dough is sticky. Place dough in a clean oiled bowl, cover with plastic wrap and let rise 1 hour.
2. Dump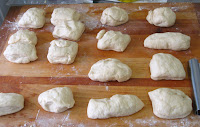 dough out onto an unfloured surface and cut into pieces. I decided I wanted modestly-sized, but not mini-, bagels so I partitioned out 16 3 ounce pieces of dough.
3. Cover two baking sheets with sheets of parchment paper. Lightly oil the paper. Clear space in your refrigerator for the sheets to fit.
4. Roll each piece of dough out into a rope about 10 inches long with a little taper at each end. Hold the rope by one end, whip it around over your fist and catch the other end so the dough loop snugly encloses your hand. Roll the overlapping ends against your work surface with your palm until they're well fused (I didn't do the best job of this). Place each formed bagel on a baking sheet not worrying about leaving too much space around them as they're not going to be rising yet. When you've laid out all your bagels,
  lightly oil their tops, cover with plastic wrap, put in the refrigerator and wait a day.
5. Remove the bagels from the refrigerator 60 to 90 minutes before you want to start baking. After 60 minutes check if the bagels are ready by gently dropping one into a bowl of water. If it floats, they're ready. If your poaching liquid isn't ready yet, put the bagels in the refrigerator until it is. Preheat the oven to 500 degrees. Bring the poaching water to a boil in a large pot or dutch oven, lower heat to bring down to a simmer and add the malt syrup, baking soda and salt.
6. Gently add the bagels to the poaching liquid in batches. Don't overcrowd as they'll be expanding. Poach for 1 minute, flip them over and poach for 1 more. Remove from the liquid, dunk in your prefered the toppings (domed side down), and return to the parchment sheets with a little more space this time.
7. Put the bagels in the oven and turn the heat down to 450 degrees. Bake for 8 minutes, rotate and revolve the baking sheets, and bake for 8 to 12 minutes more until golden brown and a bit crisp.
Cool for at least a half hour before serving.

During cooling I noticed that these bagels have the appropriate distinctive malty smell. Funny how it's instantly recognizable as malty now but I never pegged it before even when I used malt previously. There's a touch of malt in the flavor and I think there's a little depth from the overnight in the fridge too. These taste just about right.
But really, the texture of a bagel is the important thing. The crust has a slight snap to it, like a good hot dog. That's perfect, but it never lasts. You only get that when the bagels are fresh from the oven.

The insides are chewy but not overly dense. There are uneven holes inside which means I didn't get out all the air bubbles I should have. That's not too bad, but the uneven holes through their centers are less appealing; the rope method is harder than it looks.
Aesthetically, not fabulous, but the flavor and texture is dead on. I'm quite happy with the results and will need some good reason to stray from this recipe from now on.
---
Report from tomorrow: the bagels went stale remarkably quickly. Luckily I put most into the freezer immediately so they should be OK. I might add a bit of whole wheat and/or rye next time to improve their shelf life.
This recipe isn't particularly different from the last version I made. The only major distinction is a night in the refrigerator, but that's nearly always a good idea when baking bread. I do like that it measures the ingredients by weight for more precision. I want to do more of that in my baking. To add a little more distinctiveness, I thought I'd try the looped rope method of shaping the bagels instead of the poke-a-hole-through method I used last time.
Also, I doubled the recipe since bagels freeze well and are handy to have around.
Ingredients:
2 Tablespoons barley malt syrup

2 teaspoons instant yeast
1 Tablespoon fine kosher salt
510 grams (a bit over 2 cups) lukewarm water
908 grams (around 7 cups) bread flour
poaching liquid:
2-3 quarts water
1 1/2 Tablespoons barley malt syrup
1 Tablespoon baking soda
1 teaspoon fine kosher salt
toppings:
poppy seeds
sesame seeds
dehydrated onion or garlic, rehydrated
coarse sea salt
1. Mix
 the malt syrup, yeast and salt in the water. Let sit while you measure out the flour. Mix into the flour until the dough forms a stiff, slightly shaggy ball. There should be just barely enough moisture for the flour. Let rest 5 minutes then knead for 3 minutes until gluten forms and the dough smoothes out. Add a little more flour if the dough is sticky. Place dough in a clean oiled bowl, cover with plastic wrap and let rise 1 hour.
2. Dump
 dough out onto an unfloured surface and cut into pieces. I decided I wanted modestly-sized, but not mini-, bagels so I partitioned out 16 3 ounce pieces of dough.
3. Cover two baking sheets with sheets of parchment paper. Lightly oil the paper. Clear space in your refrigerator for the sheets to fit.
4. Roll
 each piece of dough out into a rope about 10 inches long with a little taper at each end. Hold the rope by one end, whip it around over your fist and catch the other end so the dough loop snugly encloses your hand. Roll the overlapping ends against your work surface with your palm until they're well fused (I didn't do the best job of this). Place each formed bagel on a baking sheet not worrying about leaving too much space around them as they're not going to be rising yet. When you've laid out all your bagels,
  lightly oil their tops, cover with plastic wrap, put in the refrigerator and wait a day.
5. Remove the bagels from the refrigerator 60 to 90 minutes before you want to start baking. After 60 minutes check if the bagels are ready by gently dropping one into a bowl of water. If it floats, they're ready. If your poaching liquid isn't ready yet, put the bagels in the refrigerator until it is. Preheat the oven to 500 degrees. Bring the poaching water to a boil in a large pot or dutch oven, lower heat to bring down to a simmer and add the malt syrup, baking soda and salt.
6. Gently
 add the bagels to the poaching liquid in batches. Don't overcrowd as they'll be expanding. Poach for 1 minute, flip them over and poach for 1 more. Remove from the liquid, dunk in your prefered the toppings (domed side down), and return to the parchment sheets with a little more space this time.
7. Put the bagels in the oven and turn the heat down to 450 degrees. Bake for 8 minutes, rotate and revolve the baking sheets, and bake for 8 to 12 minutes more until golden brown and a bit crisp.
Cool for at least a half hour before serving.

During cooling I noticed that these bagels have the appropriate distinctive malty smell. Funny how it's instantly recognizable as malty now but I never pegged it before even when I used malt previously. There's a touch of malt in the flavor and I think there's a little depth from the overnight in the fridge too. These taste just about right.
But really, the texture of a bagel is the important thing. The crust has a slight snap to it, like a good hot dog. That's perfect, but it never lasts. You only get that when the bagels are fresh from the oven.

The insides are chewy but not overly dense. There are uneven holes inside which means I didn't get out all the air bubbles I should have. That's not too bad, but the uneven holes through their centers are less appealing; the rope method is harder than it looks.
Aesthetically, not fabulous, but the flavor and texture is dead on. I'm quite happy with the results and will need some good reason to stray from this recipe from now on.
---
Report from tomorrow: the bagels went stale remarkably quickly. Luckily I put most into the freezer immediately so they should be OK. I might add a bit of whole wheat and/or rye next time to improve their shelf life.
Friday, May 21, 2010
Black sapote clafoutis
I'm not really out of my cooking funk quite yet, but two out of three of my black sapotes finally ripened and I did have an interesting recipe prepared for them so it didn't take too much to prod me into action.
So you probably want to know what a clafoutis is. From an American perspective, it's a French version of a buckle. You might also want to know what a buckle is. It's a dish in the crumble family. Depending on how you prepare the floury stuff that goes with the fruit, you can make a crumble, a crisp, a buckle or a grunt. For a buckle, you put your fruit on the bottom of a baking dish and pour over cake batter. For a clafoutis, the batter is closer to a crêpe: looser and eggier mainly.
Traditionally, clafoutises are made with cherries, but you do see them with other fruits, mainly tart berries. And if I had a reasonable amount of fruit to work with I'd whisk some lemon juice into the pulp and go with that. But I don't so I went with my black sapote back up plan which is to mix it 50/50 with a nut butter. Almond by preference, but peanut by what I've actually got on hand. In this case I mixed something like:
1/3 cup black sapote pulp
1/3 cup natural peanut butter
1 Tablespoon honey
1 Tablespoon sugar.
That gave me enough for about a third of a standard batch of clafoutis so I scaled down.
That means the batter was:
a bit less than 1/3 cup flour
1/6 cup sugar
1 teaspoon cornstarch
1 small pinch salt
1 egg
1 1/3 Tablespoons unsalted butter, melted
1/4 cup milk [I used cream since I had some some]
As with crêpe batter, I mixed the dry ingredients, whisked in the egg, then the butter then the cream.
Then I poured the batter over dollops of the sapote mixture in a small baking dish and baked at 350 degrees for a half hour until browned and puffy.
I let cool to, if not room temperature, then at least not hot and served with a little powdered sugar or, as pictured, with cinnamon whipped cream.

The baking has brought out the chocolatier aspects of the black sapote, which is certainly not a bad thing in this context, although it makes the flavor a bit less Floridianly exotic. I had hoped the honey would have helped to boost the fruity flavors, but I guess not. The crumbly brownie-esque texture of the fruit mixture contrasts with the lighter moist sponge-cakey texture of the cake bit. Its milder flavor cuts the intensity of the fruit and is mildly sweet and a little eggy on its own. This is very different than how this dish would work with cherries, but it's pretty tasty in its own, heartier way. I'd like to try it with the sapotes unadulterated by peanut butter to see how it goes.
So you probably want to know what a clafoutis is. From an American perspective, it's a French version of a buckle. You might also want to know what a buckle is. It's a dish in the crumble family. Depending on how you prepare the floury stuff that goes with the fruit, you can make a crumble, a crisp, a buckle or a grunt. For a buckle, you put your fruit on the bottom of a baking dish and pour over cake batter. For a clafoutis, the batter is closer to a crêpe: looser and eggier mainly.
Traditionally,
 clafoutises are made with cherries, but you do see them with other fruits, mainly tart berries. And if I had a reasonable amount of fruit to work with I'd whisk some lemon juice into the pulp and go with that. But I don't so I went with my black sapote back up plan which is to mix it 50/50 with a nut butter. Almond by preference, but peanut by what I've actually got on hand. In this case I mixed something like:
1/3 cup black sapote pulp

1/3 cup natural peanut butter
1 Tablespoon honey
1 Tablespoon sugar.
That gave me enough for about a third of a standard batch of clafoutis so I scaled down.
That means the batter was:
a bit less than 1/3 cup flour

1/6 cup sugar
1 teaspoon cornstarch
1 small pinch salt
1 egg
1 1/3 Tablespoons unsalted butter, melted
1/4 cup milk [I used cream since I had some some]
As with crêpe batter, I mixed the dry ingredients, whisked in the egg, then the butter then the cream.
Then
 I poured the batter over dollops of the sapote mixture in a small baking dish and baked at 350 degrees for a half hour until browned and puffy.
I let cool to, if not room temperature, then at least not hot and served with a little powdered sugar or, as pictured, with cinnamon whipped cream.

The baking has brought out the chocolatier aspects of the black sapote, which is certainly not a bad thing in this context, although it makes the flavor a bit less Floridianly exotic. I had hoped the honey would have helped to boost the fruity flavors, but I guess not. The crumbly brownie-esque texture of the fruit mixture contrasts with the lighter moist sponge-cakey texture of the cake bit. Its milder flavor cuts the intensity of the fruit and is mildly sweet and a little eggy on its own. This is very different than how this dish would work with cherries, but it's pretty tasty in its own, heartier way. I'd like to try it with the sapotes unadulterated by peanut butter to see how it goes.
Saturday, May 15, 2010
A question for bloggers
I know a lot of my readers (assuming anyone is still paying attention during this lull) are other food bloggers. If you're one of them, I've got a question for you.
In the last couple of weeks I've been e-mailed with come-ons by a couple websites looking to monetize my blog and a PR firm promoting a cooking demo at Macy's. That's more notice taken of me than I've seen in the entire rest of time I've been doing this thing. Have you all started getting these e-mails too or is it just me who's seen a sudden surge?
The only thing I did recently that could have suddenly put me on their radar is my participation in the Food and Garden Festival, but that was so low key I have a hard time believing that that's the case. If any of you have some insight into what's going on here, I'd be obliged if you could enlighten me.
Wednesday, May 12, 2010
CSA leftovers - The last of the winter produce
Both the black sapote in pantry and the tomatoes in my garden are insisting on rotting instead of ripening so I haven't made the dishes I was hoping to have made by now. And that leaves me without the interesting posts that would have results.
Instead, since it seems I feel compelled to post something, here's a couple of less interesting dishes I've made recently. These feature the leftover turnips and beets from the last few weeks of the CSA. I thought they'd last longer in the refrigerator, but they started getting squishy pretty quickly. Maybe it was because of the leaky water jug that boosted the humidity. Whatever the reason, using them promptly seemed prudent.
 First, we've got roasted chicken with turnips. Roasting chicken with root vegetables is pretty standard, but here, following a Bittman recipe, I surrounded the chicken with fairly thinly sliced turnips about halfway through cooking and then, after this photo was taken, finished them up under high heat while the chicken was resting. No picture of the finished dish as it turned out unpresentably beige. It's because I finally found a chicken under three pounds to roast. It's good that I finally had a sensible amount of meat, but bad that it cooked through before anything had a chance to brown up crispy. Still, unlike the other times I've cooked chicken with chunks of potatoes or carrots or whatever, the thinly sliced turnips cooked through and picked up a lot of good flavor from their swim in the drippings. A bigger pan and a longer cooking time is all they really would need to be something special.
Second up is pickled beets. There are lots of variations on pickled beet recipes out there suggesting a lot of different techniques. There were a couple elements that seem important to me: a)roast the beets instead of boiling them. This concentrates the flavor and leaves the vegetable
  cells ready to soak up the pickling brine instead of saturated with unflavored water, and b)keep the seasoning simple to let the flavor of the beets come through. I used white and white wine vinegar and a tarragon herb blend along with a fair amount of sugar and just a little salt. I had salted the beets before roasting already, mainly to just draw out the moisture. I also layered the beets with sliced onion and threw in a couple eggs since, apparently, that's what you do when you're pickling beets. It's early days yet, but signs are pointing towards tasty.
How are you folks adjusting to South Florida's summer produce drought?
Instead, since it seems I feel compelled to post something, here's a couple of less interesting dishes I've made recently. These feature the leftover turnips and beets from the last few weeks of the CSA. I thought they'd last longer in the refrigerator, but they started getting squishy pretty quickly. Maybe it was because of the leaky water jug that boosted the humidity. Whatever the reason, using them promptly seemed prudent.
 First, we've got roasted chicken with turnips. Roasting chicken with root vegetables is pretty standard, but here, following a Bittman recipe, I surrounded the chicken with fairly thinly sliced turnips about halfway through cooking and then, after this photo was taken, finished them up under high heat while the chicken was resting. No picture of the finished dish as it turned out unpresentably beige. It's because I finally found a chicken under three pounds to roast. It's good that I finally had a sensible amount of meat, but bad that it cooked through before anything had a chance to brown up crispy. Still, unlike the other times I've cooked chicken with chunks of potatoes or carrots or whatever, the thinly sliced turnips cooked through and picked up a lot of good flavor from their swim in the drippings. A bigger pan and a longer cooking time is all they really would need to be something special.
Second up is pickled beets.
 There are lots of variations on pickled beet recipes out there suggesting a lot of different techniques. There were a couple elements that seem important to me: a)roast the beets instead of boiling them. This concentrates the flavor and leaves the vegetable
  cells ready to soak up the pickling brine instead of saturated with unflavored water, and b)keep the seasoning simple to let the flavor of the beets come through. I used white and white wine vinegar and a tarragon herb blend along with a fair amount of sugar and just a little salt. I had salted the beets before roasting already, mainly to just draw out the moisture. I also layered the beets with sliced onion and threw in a couple eggs since, apparently, that's what you do when you're pickling beets. It's early days yet, but signs are pointing towards tasty.
How are you folks adjusting to South Florida's summer produce drought?
Saturday, May 8, 2010
Thai beef and betel salad
Well past time to use my betel. It's two weeks old at this point and a little faded. A little late on the blog post too; sorry about that. Mussels were on sale at Whole Foods and you've got to bump them to the front of the queue.
This recipe is a take off of a betel leaf salad recipe I found on ImportFood.com with some elements from the ubiquitous ground-beef-wrapped-in-betel-leaves recipe added in, plus some adjustments to compensate for the tiny amount of betel I've got and some adjustments that just seemed like a good idea at the time. Pretty standard origin for me, really.
Ingredients:
1/2 cup betel leaves, shredded
1/2 cup carrot, shredded
1 small handful cilantro, well stemmed and roughly chopped
1-2 sprigs mint, chiffinaded (is chiffinade a verb?)
1 medium-hot chili, seeded and thinly sliced
1/4 pound tender beef, sliced into strips and cut into sensible lengths
marinated in fish sauce and lime juice with a little sugar and a little cilantro
2 Tablespoons roasted unsalted peanuts
1 Tablespoon dried shrimp
ground together or crushed in a mortar and pestle
2 teaspoons tamarind pulp dissolved in 5 teaspoons water
juice of 1/2 lime
1 Tablespoon palm sugar or any sugar with some molasses left in
1 Tablespoon light soy sauce
salt, sriracha
1. If your betel leaves, like mine, are a bit soggy from moisture expressed during storage, lightly toast them to dry them out. Only a few minutes or they'll start to crisp up. Hmm...betel chips; I've got to make a note of that.
2. Mix the betel leaves, carrot, cilantro, mint and chili in a large bowl.
3. Heat a cast iron pan over high heat, add a little oil and heat some more. Drain the marinade from the beef. Add the beef to the pan and cook, stirring but not stir frying, until cooked though and maybe a little browned. Remove to a bowl. Feel free to add them to the vegetables, actually.
4. Strain the tamarind mixture into a small bowl. You'll have to force it through the mesh and scrape it off the bottom of the sieve most likely. Add the lime juice, sugar and soy sauce. Don't measure, just mix them to your taste.
6. Mix together the beef, peanuts and shrimp with the vegetables. Add the dressing bit by bit just until the vegetables are coated. I used about half, myself. Add salt if necessary and maybe a little more lime or sugar until the flavors are balanced.
OK, let's give it a try. This is my first time using raw betel, and I've seen a fair number of complaints about its strong medicinal flavor, so I'm not sure how this is going to turn out.

Oh, this is very nice indeed.
The betel is the foreground flavor, but it's not overbearing. The sweetness of the carrots, emphasized by the tamarind, and the tangy tartness of the dressing blend with it for an pleasantly interesting whole. And there's just a bit of aroma from the herbs floating above the bolder flavors.
It could use a little more heat--I shouldn't have seeded the jalapeño I used--so I added just a little sriracha. That helps and adds just a touch of burn in the aftertaste which I like. Brought up the acid a little too which isn't a bad thing.
Each bite has a slightly different character; I particularly like it when the beef-betel-peanut combinatination of flavors comes out.
Texturally, it's mostly the crunch of the carrot and the chew of the beef. The herbs have wilted a little but there's still a little leafiness in there.
I think it helped that my betel's flavor was faded. If I were working with perfectly fresh leaves, I think I'd boost the carrot and add some shredded daikon to thin it out. That would help making this more than two small or one large serving, too. The original recipe I based this on actually has double the betel to carrot ratio. I can't see that working, at least for my palate. I'm curious to try a properly authentically prepared Thai dish using betel leaves. I think Robert from Possum Trot is the only one growing piper betel locally. I know he's unlikely to be reading this; anyone else know if he's supplying any local restaurants?
This recipe is a take off of a betel leaf salad recipe I found on ImportFood.com with some elements from the ubiquitous ground-beef-wrapped-in-betel-leaves recipe added in, plus some adjustments to compensate for the tiny amount of betel I've got and some adjustments that just seemed like a good idea at the time. Pretty standard origin for me, really.
Ingredients:

1/2 cup betel leaves, shredded
1/2 cup carrot, shredded
1 small handful cilantro, well stemmed and roughly chopped
1-2 sprigs mint, chiffinaded (is chiffinade a verb?)
1 medium-hot chili, seeded and thinly sliced
1/4 pound tender beef, sliced into strips and cut into sensible lengths
marinated in fish sauce and lime juice with a little sugar and a little cilantro
2
 Tablespoons roasted unsalted peanuts
1 Tablespoon dried shrimp
ground together or crushed in a mortar and pestle
2 teaspoons tamarind pulp dissolved in 5 teaspoons water
juice of 1/2 lime
1 Tablespoon palm sugar or any sugar with some molasses left in
1 Tablespoon light soy sauce
salt, sriracha
1.
 If your betel leaves, like mine, are a bit soggy from moisture expressed during storage, lightly toast them to dry them out. Only a few minutes or they'll start to crisp up. Hmm...betel chips; I've got to make a note of that.
2. Mix the betel leaves, carrot, cilantro, mint and chili in a large bowl.
3. Heat
 a cast iron pan over high heat, add a little oil and heat some more. Drain the marinade from the beef. Add the beef to the pan and cook, stirring but not stir frying, until cooked though and maybe a little browned. Remove to a bowl. Feel free to add them to the vegetables, actually.
4. Strain the tamarind mixture into a small bowl. You'll have to force it through the mesh and scrape it off the bottom of the sieve most likely.
 Add the lime juice, sugar and soy sauce. Don't measure, just mix them to your taste.
6. Mix together the beef, peanuts and shrimp with the vegetables. Add the dressing bit by bit just until the vegetables are coated. I used about half, myself. Add salt if necessary and maybe a little more lime or sugar until the flavors are balanced.
OK, let's give it a try. This is my first time using raw betel, and I've seen a fair number of complaints about its strong medicinal flavor, so I'm not sure how this is going to turn out.

Oh, this is very nice indeed.
The betel is the foreground flavor, but it's not overbearing. The sweetness of the carrots, emphasized by the tamarind, and the tangy tartness of the dressing blend with it for an pleasantly interesting whole. And there's just a bit of aroma from the herbs floating above the bolder flavors.
It could use a little more heat--I shouldn't have seeded the jalapeño I used--so I added just a little sriracha. That helps and adds just a touch of burn in the aftertaste which I like. Brought up the acid a little too which isn't a bad thing.
Each bite has a slightly different character; I particularly like it when the beef-betel-peanut combinatination of flavors comes out.
Texturally, it's mostly the crunch of the carrot and the chew of the beef. The herbs have wilted a little but there's still a little leafiness in there.
I think it helped that my betel's flavor was faded. If I were working with perfectly fresh leaves, I think I'd boost the carrot and add some shredded daikon to thin it out. That would help making this more than two small or one large serving, too. The original recipe I based this on actually has double the betel to carrot ratio. I can't see that working, at least for my palate. I'm curious to try a properly authentically prepared Thai dish using betel leaves. I think Robert from Possum Trot is the only one growing piper betel locally. I know he's unlikely to be reading this; anyone else know if he's supplying any local restaurants?
Wednesday, May 5, 2010
Green tomato hoja santa galette
I vacillated for a long time over whether to follow through with my plan to use hoja santa in this. The other elements--green tomatoes, onions, bacon and goat cheese--are easy to see together (if you've been reading a bunch of savory green tomato pie recipes anyway) and there was a fair chance of ruining the whole thing with a wild card like hoja santa. If I only had to answer to myself and didn't need material for the blog, I probably would have backed down and just thrown in a little oregano instead. But that wouldn't be worth writing about would it? So, in that spirit, here goes...
Ingredients:
2 thick slices bacon, chopped
2 green tomatoes, thinly sliced
1/2 medium onion, thinly sliced
3 ounces fresh goat cheese, crumbled
2 leaves hoja santa, deveined and chopped
salt and pepper
Crust ingredients:
1 cup flour
1/4 teaspoon salt
6 Tablespoons cold unsalted butter, cut into chunks
2-4 Tablespoons cold water
1. Blend flour and salt in a food processor. Add butter and process until incorporated and the mixture has a crumbly texture. Blend in water until the dough just comes together.
2. Dump dough out onto a work surface. Form it into a ball, split into two, flatten and put into refrigerator to chill for 30 minutes. Preheat oven to 400 degrees.
3. Meanwhile, put bacon in a medium cast iron pan and cook over medium heat until well rendered, browned and crispy (stirring as necessary). Remove bacon to a paper towel.
4. Add green tomato and onion to bacon fat in pan. Salt lightly to draw out juices and cook until tomato starts to soften and onion becomes translucent. Add hoja santa and cook briefly to wilt and blend flavors. There's plenty of cooking later so don't overdo it now. Remove to a bowl and chill in the refrigerator until the dough is finished chilling.
5. Mix cheese and bacon into tomato mixture.
6. Take one of the dough rounds out of the refrigerator and, on a well-floured surface, roll out into 9-10 inches diameter circle. Drape the dough into a pie plate, optionally, to make it easier to fill. Fill with tomato mixture and fold excess dough over top. Spray exposed dough with olive oil and bake for 40 minutes until tomatoes have dissolved, the cheese has melted and the crust is golden brown. Cool for 10 minutes and serve.

The flavors here have pulled together nicely. Bacon and onions are a natural pairing. Goat cheese makes perfect sense with them. The green tomatoes add an almost citrusy tartness and the hoja santa an odd herbal aromaticity. It strikes an odd note just through its unfamiliarity. I'm still trying to decide if I like it. It's not bad, but is it an improvement over, say, oregano? ... Upon consideration, I think that when there's just a hint, it blends nicely with the green tomato flavor and counterpoints the smokiness. When there's a lot, it's weird and distracting. It's good, but I should have used less. One leaf would have done it. Two did seem like a lot, but with ten in the pack, I thought maybe I could use it more as a vegetable component than an herb. It's really too strongly flavored for that, though, at least in this sort of application. Maybe in a salad, though.
Ingredients:
2 thick slices bacon, chopped
2 green tomatoes, thinly sliced
1/2 medium onion, thinly sliced
3 ounces fresh goat cheese, crumbled
2 leaves hoja santa, deveined and chopped
salt and pepper
Crust ingredients:
1 cup flour
1/4 teaspoon salt
6 Tablespoons cold unsalted butter, cut into chunks
2-4 Tablespoons cold water
1. Blend flour and salt in a food processor. Add butter and process until incorporated and the mixture has a crumbly texture. Blend in water until the dough just comes together.
2. Dump dough out onto a work surface. Form it into a ball, split into two, flatten and put into refrigerator to chill for 30 minutes. Preheat oven to 400 degrees.
3. Meanwhile, put bacon in a medium cast iron pan and cook over medium heat until well rendered, browned and crispy (stirring as necessary).
 Remove bacon to a paper towel.
4. Add green tomato and onion to bacon fat in pan. Salt lightly to draw out juices and cook until tomato starts to soften and onion becomes translucent. Add hoja santa and cook briefly to wilt and blend flavors. There's plenty of cooking later so don't overdo it now. Remove to a bowl and chill in the refrigerator until the dough is finished chilling.
5. Mix cheese and bacon into tomato mixture.
6. Take
 one of the dough rounds out of the refrigerator and, on a well-floured surface, roll out into 9-10 inches diameter circle. Drape the dough into a pie plate, optionally, to make it easier to fill. Fill with tomato mixture and fold excess dough over top. Spray exposed dough with olive oil and bake for 40 minutes until tomatoes have dissolved, the cheese has melted and the crust is golden brown. Cool for 10 minutes and serve.
The flavors here have pulled together nicely. Bacon and onions are a natural pairing. Goat cheese makes perfect sense with them. The green tomatoes add an almost citrusy tartness and the hoja santa an odd herbal aromaticity. It strikes an odd note just through its unfamiliarity. I'm still trying to decide if I like it. It's not bad, but is it an improvement over, say, oregano? ... Upon consideration, I think that when there's just a hint, it blends nicely with the green tomato flavor and counterpoints the smokiness. When there's a lot, it's weird and distracting. It's good, but I should have used less. One leaf would have done it. Two did seem like a lot, but with ten in the pack, I thought maybe I could use it more as a vegetable component than an herb. It's really too strongly flavored for that, though, at least in this sort of application. Maybe in a salad, though.
Sunday, May 2, 2010
CSA 2009-10 wrap-up
It's a little tardy, but nobody else has written up the season and somebody ought to.
This was my third year in the Bee Heaven ~Pikarco CSA--the only CSA I've ever subscribed to--so I have only the tiniest modicum of perspective. With that caveat, from that perspective, I'm a bit less happy with this year than the others, both with my cooking and with the CSA overall.
For the latter, the blame can fall squarely on the freezes. That put a big dent in both the variety and, some weeks, the quality of the produce we got. Not a big reduction in the total amount though, I think. I had big plans for beans and for daikon but we never saw either. No white sapotes either. On the other hand, it was nice to try betel leaf and hoja santa; Those were both new this year.
I missed the a la carte offerings we saw in previous years, too. I would have liked to try the various goat cheeses and Mediterranean offerings, but they were only offered in full subscriptions that would have been too much for just me. I also would have bought the occasional bottle of honey had it been offered. I know the freeze limited the supply of milk for the cheese. I recall some mention of it hurting the bees too. I wonder if it affected the ingredients for the Mediterranean stuff.
As for my cooking, looking back over the year I see that I punted with dull and catch-all recipes more often than I would have liked to. I think I got burnt out on all the greens and didn't have much use for all the lettuce and celery. In the first post of the season, I mentioned a plan to revisit recipes from earlier years but I think I only did it a couple times. Still, some interesting recipes in there and some easy and versatile enough to become weekday regulars I can add to my repertoire. I probably won't, but I could.
So what's coming up? I picked up some black sapotes, goat cheese, hoja santa and betel at the Fairchild Food and Garden Festival last week so I need to get on using all of that. Not all in one dish, mind.
I've also got a couple of tomato plants threatening to dump way too many tomatoes on me all at once at some point, assuming the tomatoes ever ripen. How long are tomatoes supposed to hang around growing anyway? The big storm earlier this week knocked a couple green tomatoes off so I've got those to use too. I have an idea that they might go well with the hoja santa but I'm not sure exactly how that might work. Both might be good with chipotle. I could see the goat cheese going in there too. Hmm...
I've definitely got to clear out my overstuffed freezer before so expect some slow down of posting while I deal with that. Also, I have to get a new microwave. The old one still works fine except the little spring that tensions the door latch popped off its mount so now it won't turn on. I wonder if there are any new innovations in microwave design I should consider or if I should go get another tiny defrosting machine.
I think that's about it. Do you folks have any CSA thoughts or summer plans you want to share?
Subscribe to:
Posts (Atom)