Wednesday, May 6, 2009

Chicken in curdled milk

Curdled on purpose; you were wondering, right?

This is a Jaime Oliver recipe that got a fabulous review on the thekitchn blog. Thekitchn's kind of a mixed bag for me. I could do without (most of) the Cooking-101-level posts, the reviews of farmers markets places I'm not and the kitchen design stuff, but they also put up some interesting but simple recipes that are just the sort of thing I like for weeknight cooking. This one I've got to admit I was skeptical of, but they liked it a lot so I took a chance.

Here's the original version from Oliver's website. You'll notice he leaves the "curdled" out of the title. I'm for truth in advertising myself.

"chicken in milk
serves 4
A slightly odd, but really fantastic combination that must be tried.

ingredients
• 1 x 1.5k/ 3½lb organic chicken [Publix Greenwise will do]
• sea salt and freshly ground black pepper
• 115g/4oz or ½ a pack of butter
• olive oil
• 1/2 cinnamon stick
• 1 good handful of fresh sage, leaves picked
• zest of 2 lemons
• 10 cloves of garlic, skin left on
• 565ml/1 pint milk

Preheat the oven to 190°C/375°F/gas 5, and find a snug-fitting pot for the chicken. Season it generously all over, and fry it in the butter and a little olive oil, turning the chicken to get an even colour all over, until golden. Remove from the heat, put the chicken on a plate, and throw away the oil and butter left in the pot. [Or save it for frying something later.] This will leave you with tasty sticky goodness at the bottom of the pan which will give you a lovely caramelly flavour later on.

Put your chicken back in the pot with the rest of the ingredients, and cook in the preheated oven for 1½ hours. Baste with the cooking juice when you remember. The lemon zest will sort of split the milk, making a sauce which is absolutely fantastic.

To serve, pull the meat off the bones and divide it on to your plates. Spoon over plenty of juice and the little curds. Serve with wilted spinach or greens and some mashed potato."

Mine actually looks a little better than the picture on his website. He seems to have burned his a little bit. You can't see it while it's still in the pot, but it turns out kind of weird with lovely crisp skin on top and soggy soaked skin on the bottom.


I followed his direction all the way down to the side dishes so I have some lovely smashed red potatoes and braised Swiss chard I had saved in the freezer. Be carefully defrosting chard; I ended up with a big puddle of bright red juices on the cutting board and dripping onto the floor. But, back to the main dish: the meat is falling off the bone as advertised throughout, but on the top it's the overcooked sort of falling off the bone. Not extraordinarily juicy on the bottom, either. Not compared to a brined bird, anyway. A good bit of flavor infused, more in the bottom half than the top, but the combination of garlic, sage, cinnamon and lemon isn't something I would have picked out if I wasn't following a recipe.

The sauce thinned out as the milk solids bunched up leaving the remaining liquid to just about turn into chicken stock. I would have liked it to cook down a little, but the chicken juices formed a film on top keeping evaporation low. It's definitely not an elegant presentation with the watery sauce with the curdy bits floating around. The flavors are in there, though, if somewhat diffuse. I may cook it down a bit later. I was worried about the curdling, but I'm actually finding the broken milk less off-putting than the big pieces of sage and scraps of garlic paper floating around in there. On the plus side, I fished out a couple of the garlic cloves, squeezed them out of their pods and mashed them into the potatoes. Now that's the stuff.

Overall, a decent roast chicken variation. Not the best I've made; not the worst either. Some points for the novelty factor, but I don't know where the raves TheKitchn gave it come from. I'm going to go back and take a look...Oh, I see. They accidentally put the lid on the pot so the chicken steamed. I'd miss the crisp skin I suppose, but I can see how that would infuse more flavor and keep the chicken moist as it cooked. If you're going to try it, keep the lid on for the first hour and then take it off. That might be enough time for the skin to dry out and the meat not to.

Tuesday, May 5, 2009

Parisian bagels

I wish I could remember how I came across this recipe. I wasn't looking for bagel recipes; I can't imagine I'd settle on a Parisian one if I was. It comes from a radio show I've never heard of, adapted from cookbook I've never heard of, from a recipe by someone I've never heard of. Perhaps some blog I have heard of pointed to one of those three?

Anyway, if you're interested in any of those here's a link. And here's the recipe. It looks complicated, but it was actually pretty simple and quick as bread recipes go. The cook's notes are from the original. Everything went so smoothly, I don't think I have any notes myself.

"JO GOLDENBERG’S PARISIAN BAGELS

Now, how elegant is this?! A French bagel! Actually, in Paris there is a huge Jewish community (more than half of all of France’s 500,000+ Jews live in Paris) and the MOST famous bagel restaurant-deli is that of Jo Goldenberg at 7 rue de Rosiers. It’s a Paris institution less than a mile from the famous Cathedral of Notre Dame.

Our listener Caryn started all of this (be sure to check out her picture – and her bagels’ picture - on the “Look at Us” page – menu at left) and the subject proved so interesting that the recipe is our feature this week. It turns out to be lots of fun to make bagels – and not difficult at all.

To make things even easier, the making-a-rope technique for shaping bagels, used by professional bakers, is NOT the one we’re using here. It’s very difficult to make that rope of dough perfectly even in thickness, as it wraps around the baker’s open hand, being rolled back and forth expertly. For the home baker, this recipe simply calls for making a ball of dough, then pushing a hole through the center – you’ll see, below. There are also some Cook’s Notes, and a few suggestions for variations (this recipe is for plain water bagels) in case you’d like to make onion or sesame or poppy seed or other flavors….variations follow the recipe…more of the "fine points" will be discussed on the show.


MAKES 10 LARGE BAGELS

3 1/2 cups (approximately), bread flour [or substitute all-purpose flour]
2 packages, dry yeast
3 tablespoons, sugar
1 tablespoon, salt
1 1/2 cups, hot water (120-130 degrees)
3 quarts water
1 1/2 tablespoons, barley malt syrup [or substitute sugar in the same amount]
1 egg white – beaten with 1 teaspoon, water
topping of choice, if any (see Variations, below)
cornmeal for sprinkling on the baking sheet


Make the dough: In a mixing bowl (or the bowl of an electric mixer) measure 3 cups of the flour and stir in all the remaining dry ingredients. Pour in the hot water, and stir vigorously with a wooden spoon (or with the flat paddle attachment of the electric mixer at low speed) and beat for about 2 minutes.

Add the remaining half-cup of flour, a little at a time, stirring by hand. When the batter becomes thick and heavy, attach the mixer’s dough hook (if using) or lift the dough from the bowl and place it on a lightly floured work surface for kneading by hand.

Knead the dough: Knead the dough at medium low speed on the mixer – or by hand (using a push, turn and fold motion, energetically) for about 10 minutes – or until the dough is firm and solid when pinched with the fingers. Add flour as needed if the dough is sticky in your hands, or sticks to the sides of the mixing bowl (if using electric mixer).

First Rising: When dough is kneaded enough, place it in an oiled mixing bowl, cover the bowl tightly with plastic wrap, and set aside at room temperature until it has doubled in volume – about 1 hour.

Prepare water bath: Near the end of this rising time, bring the 3 quarts of water to the boil in a large saucepan. Add the malt syrup or sugar; then, reduce the heat and leave the water just barely moving – at a slow simmer.

Shape the bagels: When the dough has doubled in volume, turn it out onto a lightly floured work surface and punch it down with extended fingers to remove excess gas.

Divide the dough into 10 pieces (each will weigh about 3-4 ounces). [I halved the recipe and made my bagels on the small side so I ended up with six.] Shape each piece into a ball. Allow the balls to stand and relax for a few minutes – then flatten each one with the palm of your hand.

With your thumb, press deep into the center of the bagel and tear the depression open with your fingers. Pull the hole open, pull it down over a finger and smooth the rough edges. It should look like a bagel! Form all of the bagels and place them on your work surface.

Second Rising: Cover the shaped bagels with wax paper or parchment paper. Leave them at room temperature just until the dough has risen slightly – about 10 minutes (this is called a “half proof”). [Cook’s Note: If the bagels are allowed to rise too much during this “second rise” – they will not sink when put in the simmering water; but, if that should happen, just pretend that they DID sink – and cook them for the same 1 minute as described below. The difference will be unnoticeable to most anyone.]

Prepare the baking sheet: Preheat the oven to 400 degrees. [Cook’s Note: If using a convection oven, reduce the heat by 50 degrees.] Grease a baking sheet with shortening (or use a non-stick baking sheet, or line a baking sheet with “Silpat” or similar material) and sprinkle the baking sheet with cornmeal.

Water-bathing the bagels: Into the gently simmering water prepared earlier, slip one bagel at a time (use a large skimmer, and gently lower them into the water). Simmer only 2 or 3 bagels at a time – do not crowd the pan. The bagels will sink and then rise again after a few seconds. Simmer gently for one minute, turning each bagel over once during that time. Lift each bagel out of the water with the skimmer, drain briefly on a towel, then place each bagel on the prepared baking sheet. Repeat until all bagels are simmered, drained and on the baking sheet. [Cook’s Note: Thanks to the malt syrup or the sugar that was added to the simmering water, the bagels will be shiny as they come from the water.]

Baking the bagels: If toppings are desired, (see “Variations” below) now is the time to add them, by sprinkling the desired topping over the bagels. Brush each bagel lightly with the egg-white-water mixture first, then sprinkle the topping if desired – or leave unadorned, for water bagels.

Place the baking sheet on the middle rack of the preheated oven for 25-30 minutes. When the bagel tops are a light brown, turn them over to complete baking. This turning-over step will keep the bagels in a rounded shape, instead of their being flat on the bottom. When brown and shiny, remove the finished bagels from the oven.
Place the bagels on a metal rack to cool.

Variations:
Toppings may include: coarse salt, shredded onion, sesame seeds, poppy seeds, caraway seeds, or other flavors of your choice. Sprinkle toppings over before baking bagels, as described above. [I made sesame, salt, onion and everything bagels. All out of poppy seeds.]

Another tasty treat: slice each bagel crosswise into 4 thin rounds. Return the rounds to the oven and bake the rounds until dry throughout, and just beginning to brown – about 20 minutes. Remove the rounds from the oven, immediately butter them and salt lightly – then return to the oven for about 5 minutes until the butter is absorbed by the rounds. Serve hot or at room temperature as a snack.

Recipe adapted from Bernard Clayton’s New Complete Book of Breads (Simon and Schuster)"

And here they are:


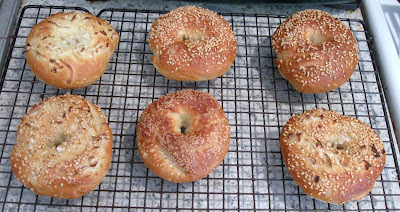
The outsides looks great, but inside, that's not quite what the inside of a bagel should look like. After taking a bite, the crust has just the right crunch then chew you want in a bagel. My jaw hurts which means either I did this right (This is Jewish food: all joy brings pain.) or I should stop putting off my dental check-up. On the other hand, the inside just squishes to nothing. That part needs work. The flavors are good though, even through the onion and sesame, cream cheese and tomato (no lox today; making the bagels was a spur of the moment decision and you have to travel to find good lox.) you can taste the distinctive warm, hearty and slightly sweet bagel flavor. Not bad at all for a first try.

I do want to improve the insides, though, so a little more research is in order. ... Done. Here's what I've learned:
* First, my dough wasn't stiff enough. A good bagel dough should be very hard to work. That should give a denser crumb in the final product.
* Second, my bagels were puffy because the simplified forming method gets out fewer air bubbles than the traditional method of rolling them out into a rope and then joining the ends.
* Third, the recipe I used had a particularly short poaching time in the sugar water. An extra minute or two would cook the outer surface more, increasing its chewiness and keep it tight so the dough couldn't rise in the oven, further reducing its puffiness.
* Fourth, a more traditional recipe uses malt syrup or powder instead of sugar, both in the dough and in the water. I'm not entirely clear how that effects the result, but the bagels I had in New York certainly used it so it couldn't hurt if I'm trying to match them.
* Fifth, a slightly higher baking temperature will get them crunchier, and
* Sixth, mixing some of the toppings into the dough isn't a bad idea.

I wonder how much of the differences are Paris vs. New York and how much from over-simplification for the home cook (something you really need to look out for if don't know where your recipes are coming from). They all seem to be easy fixes for next time, although I may have to go to a brewing supply store for the malt. Still, even without those refinements, these bagels are easily the best I've had in Miami. Of course, fresh from the oven counts for a lot. The real test will be how they freeze, defrost and toast. [And the result: eh. Not bad; could be better.]

Sunday, May 3, 2009

Dim Sum Sunday - Creamy macaroni and cheese

A little while back I was invited to join the Karmic Kitchen's Dim Sum Sunday food blog event:

"Is your Sunday dinner delectable? Daring? Succulent? Shareable? If it's any or all of those things, or even something completely different, we'd like to invite you to participate in "Dim Sum Sunday" - a weekly food meme. Each week, a theme will be given. The participants will use the theme (from the literal to the avant-garde) when creating their Sunday suppers the following week. Then, just take a picture or two of the meal, and tell us all about it. Does it have to be home cooking? Not necessarily - you can go out, eat in, or even go to a friends house...as long as your post reflects the theme in original (you don't have to be a professional photographer) pictures of your dinner, and personal stories (and recipes and how-tos if you choose...)!"

I declined at the time as I was working the Sunday late shift on the reference desk and wasn't having a Sunday dinner. I still am, but I've belated realized that the Sunday dinner doesn't have to be literal; I just need to post it up on Sunday. This dish was actually my Friday dinner. The theme this week: comfort food.

Mentioning the reference desk there is actually relevant as I've decided to misuse my librarianly abilities for personal gain. I have access to databases filled with over a century of newspaper backfiles and while, yes, man walks on moon, man also cooks mac and cheese and writes articles about the recipe.

Actually, it's woman, not man, in this case and the article is just from 2006 so it's probably on-line somewhere. But it's from an article with some interesting things to say about the philosophy of mac and cheese with some recipes that are proper macaroni and cheese not macaroni in a cheese-flavored white sauce. This is an exceptionally interesting one that uses ingredients and techniques I haven't seen before:

Creamy Macaroni and Cheese
Time: 1 hour 15 minutes

2 tablespoons butter
1 cup cottage cheese (not lowfat)
2 cups milk (not skim)
1 teaspoon dry mustard
Pinch cayenne
Pinch freshly grated nutmeg
1/2 teaspoon salt
1/4 teaspoon freshly ground black pepper
1 pound sharp or extra-sharp cheddar cheese, grated [I used half sharp cheddar and half colby]
1/2 pound elbow pasta, uncooked.

1. Heat oven to 375 degrees and position an oven rack in upper third of oven. Use 1 tablespoon butter to butter a 9-inch round or square baking pan.

2. In a blender, purée cottage cheese, milk, mustard, cayenne, nutmeg and salt and pepper together. Reserve 1/4 cup grated cheese for topping. In a large bowl, combine remaining grated cheese, milk mixture and uncooked pasta. Pour into prepared pan, cover tightly with foil and bake 30 minutes.

3. Uncover pan, stir gently,

[and stir in anything that you want mixed into the dish. I wanted to keep things simple so I sautéed some onion, pepper and good quality, but neutrally-flavored ham (for something like this you want the ham to taste like ham, not smoke or maple syrup) in a little butter and a whole lot of truffle oil. The little black specks you can see in the pan are bits of truffle. I've heard of truffled mac and cheese plenty of times, but I've never tried it and now seemed as good a time as ever.]

sprinkle with reserved cheese and dot with remaining tablespoon butter. Bake, uncovered, 30 minutes more, until browned. Let cool at least 15 minutes before serving. Serve with a green salad and white wine.

Yield: 6 to 8 servings."

And here it is:


It looks pretty darn good, but that's definitely not what I'd call creamy. The cheese is clotted up pretty solid, really. I went back to the article to see if there was a description of the completed dish to compare with my results:
"One of the most surprising recipes I tried called for uncooked pasta. Full of doubt, I mixed raw elbow noodles with a sludge of cottage cheese, milk and grated cheese. The result was stunning: the noodles obediently absorbed the liquid as they cooked, encasing themselves in fluffy cheese and a crust of deep rich brown."
and on the origin of the dish:
"Daphne Mahoney, the Jamaican-born owner of Daphne's Caribbean Express in Manhattan's East Village, makes a wonderfully dense version of macaroni and cheese that combines American cheese with extra-sharp cheddar. Macaroni pie is hugely popular in the Caribbean, especially on islands like Jamaica and Barbados that once received regular stocks of cheddar from other members of the British commonwealth: Canada, Australia and New Zealand."
and more generally:
"'Starting at about the turn of the 20th century, there was a huge fashion for white sauce in America -- chafing-dish stuff like chicken à la king, or creamed onions,' [cookbook author John Thorne] said last week. 'They were cheap and seemed elegant, and their legacy is that people choose 'creamy' over everything else. But I maintain that macaroni and cheese should be primarily cheesy.'"

"Creamy" as a negative. "Macaroni pie". "Encasing themselves in fluffy cheese". I think this recipe turned out exactly as it was supposed to; it was just mislabeled. And once past that cognitive dissonance I could enjoy the dish for what it was. Putting the macaroni in uncooked resulted in them coming out firm and chewy, but not al dente. And far from the limp and soft overcooked macaroni you often get when using pre-cooked pasta in a baked mac and cheese. The cheese is solid, but soft and light. Almost like a soufle, really. That's from the cottage cheese. Plenty of good cheese flavor, but deeper and richer than straight chedar and/or colby. And that's the truffles doing. The ham, onion and pepper are just fiddly bits adding a little interest.

I don't make mac and cheese very often so I don't have a standard recipe, but I can see coming back to this one to try variations.

Saturday, May 2, 2009

Butter poached shrimp, new potatoes and pearl onions

It should tell you how far awry my cooking went today that none of those four ingredients were in the recipe I was making. Also, that recipe was for ice cream.

The original idea here was to a) use the last of the CSA celery and b) make a new ice cream flavor since I hadn't in a while. Put those two together and you get, first, celery ice cream--which might work as a component in a savory dish--second, celery and peanut butter ice cream--a natural sweet pairing that is interesting but presents textural issues--and third, celery-infused peanut butter ice cream with raisins--an ice cream version of ants on a log (ants in a bog maybe?).

Peanut butter ice cream recipes aren't hard to find, but how to infuse the celery flavor? I don't want to cook it as I want the raw flavor so I can't use the usual infusion method. But I figure celery is mostly water; if I run it through the food processor it should break down into mush easily enough. And with supermarket celery I think it would have worked. CSA celery is different though, much more dense. I processed it with a little milk and just got a bowlful of celery shards.

Plan B: add all the milk and cream and process the celery until everything turns green and it's fairly smooth. Strain out the big chunks and there you go. I give it a few pulses and things are indeed turning green, but there's not a lot of celery flavor getting into the liquid. I figure a couple minutes processing should get everything good and combined and add in the celery leaves for good measure. But when I check the progress I find the tiny bits of celery encased in a mass of creamy gunk--I've churned the cream into butter. I thought making butter was supposed to be a lot harder than that. The cream was ultrapasturized; Isn't that supposed to stop it from separating quite so easily?

So, the ice cream is ruined. I fish the solids out of what I suppose is now celery-colored skim milk and ponder what to do with them. Nobody wants celery-flavored butter so I'm going to have to get them apart. I can do something like distilation. Just like water and alcohol boil at different temperatures allowing their separation, butter and celery melt at different temperatures and that should let me separate them.

I want to use gentle heat so I put it in a double boiler. It works, sort of, but a lot of the milk solids are stuck to the celery and aren't going anywhere. In that case, I may as well skip the gentle heat, simmer it for a while and try to clarify it. When you simmer plain butter, the milk solids turn brown and sink to the bottom leaving clarified butter on top; maybe these milk solids will be able to drag the celery down with them. I simmer for ten minutes and I can start to see some clarification around the edges, but no browning. Close enough, I scoop it into a cheesecloth-lined strainer and squeeze out the liquids.

Here's the result.

Still not quite clear, but at least it isn't green. It does taste of celery so, hey, at least I finally managed to infuse some flavor. While it hardened in the refrigerator I considered what to do with it and came up with butter poaching. Looking at what I've got around the house to poach, I first thought of salmon, which isn't bad with celery, but I only found one proper butter-poached salmon recipe on the web and lots of butter-poached shellfish, so I'm going to go with the wisdom of crowds on this one.

I melted the butter back down, added a blorp of white wine, the juice of half a lemon, salt, pepper and a good pinch of a Parisian herb blend, mixed well to emulsify and brought it to a bare simmer and backed off the heat a little to keep the cooking to a poach. In went the smallest of my CSA red potatoes, the larger ones quartered to match the smallest in size. They simmered (as the heat crept up on me) for 10 minutes before I added the still-mostly-frozen onions. Twenty more minutes of semi-simmering got them done and then I dropped the heat down a little more before adding, still in their shells, the three shrimp I had left in the house. They only needed three minutes poaching. Everyone out of the pool and kept warm while I turned up the heat and cooked down the liquid into a sauce for four more minutes. I finished off the sauce with some capers and poured it over top.


Not bad at all. A hint of celery comes through in the sauce and works with its tart and rich flavors. The potatoes are creamy, the onions squish like they should and the shrimp are done just right and, with the lemon and butter sauce, are plenty tasty. All in all, a pretty good salvage job for a failed ice cream.

Thursday, April 30, 2009

CSA week 20 - Glazed turnips, cabbage and kielbasa

As I mentioned a while back, I wanted to try a variation on the very successful and rather odd glazed turnip recipe I made a while back. I was just going to mess with the seasonings a little, but since I've got half a cabbage and a little sausage that might do well in this inverse braise why not try it all together?

It's the same simple procedure: slice a turnip into wedges, add them to a cold pan, dot with butter and add water to halfway up. Bring to a boil on high, turn heat down to medium, boil away the water stirring infrequently (about 20 minutes, when the pan's dry turn the heat back up and cook five minutes more until the turnips are tender and browned.

This time I added the sausage when the water came to a boil and laid the cabbage over top for it to steam. I tried to keep it elevated after stirring with some success, but just mixed everything up for the final sauté. That caused a small problem as the cabbage stuck to the cast iron pan and burnt a little. I should have used non-stick.

I decided not to do a full vinegrette since that would have been weird with the sausage. Instead I just seasoned with a little mustard seed, a little caraway seed, salt and pepper and drizzled a little cider vinegar over top when it was done. I would have deglazed the pan with it if it wasn't for the burnt bits.


The turnip didn't turn out quite as well as last time. They could have used a little more time in the pan when the cabbage was ready to come out. Also, this turnip was a bit past its prime so its texture was sub-par before I started. Given all that, it turned out fine. The cabbage worked out better--tender, lightly browned (the overbrowned bits stayed in the pan) and flavorful. And the keilbalsa was well cooked and had a bit of browning too.

So, a good one pot meal. I just need to cook the turnips a little longer before adding everything else.

And that does it for the CSA season bar some leftover celery that I've got a plan for and a pile of potatoes that I don't. The first a la carte CSA offering is this weekend but you have to pick it up down at the farm and I really don't like driving in Miami even on Saturdays so I passed this time around. I think I'm happier with how it went this time around than last year. I threw out less lettuce for one thing and I think the dishes I made were, on average, both tastier and more interesting. I have the CSA to thank for my increased blog readership certainly, although given the number of people in the CSA I thought I'd have more than a few dozen regular readers. I guess most folks know what they're doing and don't need my ideas. I wonder if a message board would get more traffic? I also wonder how many folks will stick around as I switch from CSA-driven posting to working through the recipe to-do list I've accumulated. Time will tell.

Tuesday, April 28, 2009

CSA week 19 - Pizzoccheri

Pizzoccheri is both the name of this dish and the buckwheat noodles that make it so unusual and interesting. I've only ever seen buckwheat noodles before as Japanese soba noodles. These come from Valtellina in northern Italy. This casserole seems to be the only thing that gets done with them.

There are quite a few versions of this recipe on the web. I picked one that made a reasonably small amount for my first try, but beyond that convenience and some small variation in the ratios, they're all pretty much the same.

I could have substituted in soba and saved myself a bit of trouble, but I decided to make the pizzoccheri noodles from scratch. I need the practice.
I used:
1 cup buckwheat flour
3/4 cup semolina flour
2 large eggs [some recipes just use water]
a pinch of salt,

mixed them all together in the usual way, kneaded for a good ten minutes to compensate for the lack of gluten in the buckwheat, let it rest and then clogged up my pasta machine with the soft, sticky, friable, unworkable dough. That clearly wasn't going to work so I rolled it out by hand as best I could and then cut out broad, short noodles.

I let them dry a little as I brought a pot of water up to a boil.

Meanwhile, I fried 2 ounces of chopped pancetta in a small pan. This is an unusual addition to a simple peasant dish, but since I'm not actually a peasant I figured I could splurge a little. Once they were crisp, I fished them out and set them aside. Then I added a modest 3 Tablespoons of butter to the pan [I saw recipes that used a whole stick], melted that down, added a smashed clove of garlic and 4 julienned sage leaves and simmered on low for a couple minutes to infuse the flavors. No browning.

By this time, the water had come to a boil so I added the noodles. Because they were so thick, they took a good 15 minutes to cook through. I fished them out and kept them warm. Then I added six ounces of shredded cabbage [some recipes use chard] and a large potato, thinly sliced and boiled them for ten minutes until they were tender. A lot of recipes start with the vegetables, cook a little while and then add the noodles to the pot, but I had no idea how long my noodles were going to take so this way seemed best.

And finally, I shredded 4 ounces of fontina cheese and 2 ounces of Parmesan. Again, many recipes use a lot more.

Once everything was cooked, I got out a big bowl, put some noodles in the bottom, added a layer of vegetables then a layer of cheese and repeated until I had three full layers. The pancetta goes on top and then the sage butter. A few recipes added a couple cups of bread crumbs before the butter and then baked the whole thing like a lasagna, but I kept it simple; the hot ingredients were plenty to melt the fontina to bring the dish together.


And the result is...not all I had hoped, honestly. Thinner noodles would have helped; Right now there's not much textural contrast between the noodles and the potatoes. And both are on the bland side. Pair those with boiled cabbage and mild cheese and you've got a big hearty bowl of kind of boring. It's not really bad, it just clearly could be better. Double the sage, quadruple the garlic, add some hot pepper flakes, sauté the cabbage to condense the flavor (instead of boiling it away. There's a lot of flavor in the boiling water that should be in the dish.), crisp up the potatoes, switch out the fontina for something with a bit more punch and then I think you've got something. Or maybe just more salt in the pasta water and heap up the cheese and butter. I think I was too conservative and missed the point of the dish.

I've been doing a bit more reading and thinking about buckwheat pancakes I've had. People are saying, and I'm thinking, that buckwheat by itself doesn't taste so good. The flavor you're looking for is the combination of buckwheat and butter. I've got a couple servings of leftovers and I'm adding a sizable chunk of butter to both before they go into the freezer. Also, a sprinkling of pine nuts for a bit of texture. I think that should do the trick.

Monday, April 27, 2009

CSA week 20 - Khoresh karafs

Khoresh is a type of Iranian stew and karafs is Persian for celery. Wait, hold on, I've just did a bit more research and I'm going to say that khoresh just means stew. The term is used across the Middle East and there's so much variation in recipes that I can't really pin down what would make one stew a khoresh and another not. That said, if you look up Iranian khoresh, this recipe is what you'll turn up.

The particular version I used is from here as it's a little more complicated than the other versions I found. I probably should have made this a bit sooner as the week in the refrigerator has made the CSA celery a little rubbery, but the flavors are so close to the beet soup I made last week that I wanted to put a little space in between.

Ingredients:
1 teaspoon saffron
1 teaspoon sugar
1/4 cup olive oil
6 garlic cloves, finely chopped
2 large onions, roughly chopped [I'm low on onions so I used one and one shallot]
1 1/2 teaspoon turmeric
1 teaspoon sweet paprika
1 pound stew beef cut in 1-inch pieces
salt and pepper to taste
1 large celery bunch with leaves [Our CSA celery went beyond 'large' to 'huge' so I only used three quarters of it.]
3 cups chopped herbs--a mix of parsley, cilantro and mint [I'm well off mint, at least combined with saffron, so I went half and half with parsley and cilantro.]
Juice of 1 lime [or Iranian dried or preserved limes which I haven't got]
1 Tablespoon tomato paste

1. Using a mortar and pestle, grind saffron and sugar. In a small bowl, combine ground saffron-and-sugar mixture with 1/4 cup hot water; set aside for 10 to 15 minutes.

2. In a large shallow saucepan, heat 2 tablespoons olive oil over medium heat. Add garlic and onions. Cook until golden brown, about 10 minutes. Stir in 1 teaspoon turmeric and paprika. Add beef, salt, and pepper. Cook until meat is browned, about 10 minutes. Add 1 1/2 cups hot water, and stir to combine. Cover, and cook for 20 minutes. [This recipe calls for two very large saucepans, but I've only got one. Instead of adding the water to the pan, I heated it up in my dutch oven on a back burner and added the beef mixture to it.]

3. Cut celery on the diagonal into 1 1/2-inch pieces. In a large skillet, heat remaining 2 tablespoons olive oil over medium heat. Add celery, and cook for 20 minutes, stirring occasionally. Add parsley and mint to cooked celery. Stir in additional salt and pepper, and remaining 1/2 teaspoon turmeric. Cook for 2 minutes.

4. Add celery mixture, lime juice, tomato paste, 1 tablespoon saffron-and-water mixture (saving the remainder for another use [for instance, adding to the rice you're going to serve this with]), and 2 cups hot water to beef; stir to combine. Cover, and cook over low heat for 1 hour [or into the oven at 350 degrees for 2 hours for a more foolproof method]. Serve with Persian rice [or just plain rice if you don't feel up to making fancy rice].


Not a bad preparation for someone not entirely fond of celery as their flavor is rather washed out. The dish is fragrant with herbs and saffron. The celery flavor actually blends in with the parsley and cilantro as another herb. It isn't spicy, but the turmeric and paprika are prominent keeping the stew well localized to Iran and the broth flavorful enough to keep a mouthful of celery palatable. Beyond just that, the flavors do meld well into a tasty and unusual (to me. Your standards of unusual will, of course, vary) whole. Rather better than they melded with beets, at any rate.

If you find yourself stuck with a big head of celery, this is a fine way to use it. But if you're the sort of person who goes out and buys a big head of celery, you might want to find a recipe that plays it up a little more.