Monday, November 30, 2009

CSA week one - Mchicha

I mentioned a while back, I think, that mchicha is the Swahili word for callaloo. It's also the name of this Tanzanian dish, but all of the versions I found called for spinach. I'm making a, small I'll grant you, logical leap that these are Westernized recipes substituting in spinach for amaranth. Cooking times quite unsuitable for spinach are good supporting evidence that of a late insertion or a clumsy translation. But those cooking times are too long for amaranth too so I'm not entirely sure what to make of that.

Whatever the case, I used the calalloo and it turned out just fine once I cut it in quarter to use the small bunch we got this week and tweaked the cooking times a bit.

Ingredients:
1 small bunch callaloo
1 1/2 Tablespoons natural smooth peanut butter
1/4 cup thin coconut milk
1 Tablespoon butter (or ghee if you've got it)
1 small tomato (I used four cherry tomatoes), peeled (unless you're using cherry tomatoes, then don't bother)
1/4 onion, chopped
1/2 teaspoon curry powder (a South Indian blend would be most traditional, but whatever you've got is worth a try)
1/4 teaspoon salt

1. Trim the woody stems from the callaloo, separate the leaves, roughly chop the remaining stems and roughly tear the leaves. Wash everything somewhere along the way. I got about 1/2 pound after cleaning.

2. Mix the peanut butter and coconut milk. Set aside.

3. Heat the butter over medium heat in a medium frying pan or dutch oven. When it stops foaming add the onion, tomato, curry powder and salt. Cook, stirring frequently, until the onion softens and the tomato breaks down, about 5 minutes.

4. Add the callaloo stems. Cook 5 minutes more.

5. Add the callaloo leaves. Cook 3 minutes more to wilt and begin cooking the leaves.

6. Add the peanut butter and coconut milk. Stir well and scrape the bottom of the pan. Cook 5 minutes more to blend the flavors adding water to keep the sauce saucy as necessary.

Serve with an approximation of ugali, a Tanzanian starch dish that is essentially an extra-thick polenta made with more finely ground corn meal.


It looks a mess, but I really like how this turned out. The flavors have blended together in a synergistic way I haven't seen in other African recipes using similar ingredients. There's an earthiness, but I'd be hard pressed to identify peanut butter; a spiciness but I couldn't say it was curry powder; there's a creaminess but no clear coconut. The amaranth, though, is unmistakable. It stands up to the strongly flavored sauce in a way spinach couldn't. I even like the pairing with the ugali, and polenta really isn't something I could have predicted to work with these flavors.

This may be the first fully successful sub-Saharan African dish I've made (although I don't think I've done any Ethiopian cooking. How could I have missed that? That's going right on my to-do list.) If you've still got your amaranth, give it try.

Saturday, November 28, 2009

CSA week one - My Thanksgiving dinner

I'm alone again this year and when that happens I generally feel compelled to create some approximation of a traditional holiday meal: poultry prepared whole, a starch and a vegetable or two.

This year I made a flattened pan-fried chicken, wilted mizuna, a turnip gratin and stewed roselle.

That first was from a recipe I saw on a local cooking show I saw while visiting my mother earlier this month. It's the specialty of a restaurant either in Philadelphia or Wilmington whose name I paid insufficient attention to catch. The show skipped over some details so I really only picked up a three-part technique:
1. Remove all of the chicken's bones, leaving the skin in one piece.
2. Fry it skin side down until the skin is browned and crispy.
3. Flip it to finish.

It might have struck you that step one is the tricky bit. You're not wrong about that. One further detail I did see in the show was to cut out the chicken's backbone and then squish the bird flat as if starting to butterfly it, but after that I was on my own.
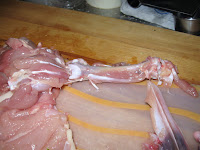
I cut the backbone a bit too narrowly, so I started with the bits remaining and sliced towards the center, under the rib cages, until I hit the clavicle to get each side off in one big piece. That went pretty smoothly and didn't slash up the meat too much. I had to dig deeper to get out the thigh bones and the keelbone and basically shredded up the chest area to get the wishbone out. Some of that required more digging around with my fingers than careful slicing with my boning knife. But here it is with the main body deboned. Not too bad. I thought chilling the chicken to firm up the meat would help, but it actually got easier to work as the bird warmed up.

Deboning the legs and wings was a little tougher. I ended up slowly turning the legs inside out, pulling out the bone, scraping the meat off and snipping the tendons as I went along and then peeling the skin off the very end. Finally I poked my finger into the skin like an inverted rubber glove to turn it back right side out. The first joint of the wing worked similarly, but the second and third joints were hopeless so I just chopped them off and stuck them in the stockpile. (it's a pile of bones for making stock. Stockpile. Ha.)

And there you go. One boneless chicken. I generously seasoned both sides with salt and pepper, heated up a couple teaspoons of olive oil in a 12-inch cast iron pan and dropped it in, skin side down. I started with the heat at medium-high for 15 minutes and then turned up the heat to get the skin browning. I could tell by smell when it was ready to turn. After the flip, I could see into the center of the breast meat through the slices I had pulled the wishbone out of so it was easy to judge when the thickest part was finished cooking. Around another 10 minutes.

I removed it from the pan and let it rest a few minutes before slicing. Since it has no bones, I could slice it any way I wanted which was kind of interesting.

The chicken is amazingly flavorful, tender and juicy considering the lack of any brining or other special preparation and my random stabs at cooking times (not to mention my random stab version of butchery). The skin is wonderfully crisp and tasty. The only minus is maybe that it's rather greasy, but it's all the natural chicken fat so you can't complain too much. This turned out so very well and, although the deboning process was a bit complex, it was an engaging complexity so I didn't really mind. I think this just became my new favorite method of cooking chicken.

I wonder if it would be a good idea to remove the legs and wings. They kind of get in the way and keep the skin on the outer bits of the body from crisping, but they also prop up the thinner parts of the chicken away from the heat. That's probably important to keep them from overcooking while the breast is finishing cooking. It might be worth the experiment to compare the results.

An added bonus of this method of cooking the chicken is that you can wilt greens in the pan afterward and they soak up all the juices and crisp up at the edges. Mighty tasty. I didn't cook the mizuna quite long enough and it ended up a little chewy, but not too bad. The flavor of the greens only contributes a little to the final result given how flavorful the pan juices it's couriering are. I wouldn't try this with spinach; that would be entirely overshadowed. Mizuna, at least gets to be a bit player. Kale, finely shredded, might be even better.

All of that goodness is kind of a shame because it takes the spotlight off of the turnip gratin which turned out fabulously in its own right.

I've got a new mandolin that does paper-thin slices easily (at least while it's still sharp) so prepping was a breeze. Here's the bottom layer--concentric overlapping circles of turnip (which is so much easier to do with properly sliced turnips, let me tell you) topped with a couple teaspoons of chicken broth, a couple Tablespoons of heavy cream, a sprinkle each of parsley, garlic and salt and a handful of shredded fontina. With the turnip slices so thin, I managed six layers from the CSA share of turnips--a bit under a pound I think--and six layers of cheese plus some grated Parmesan on top. 40 minutes at 375 degrees with foil on top and 20 without and here's the results.

Since I went light on the liquid, the cheese isn't oozing out. Instead it mortars together the layers of just slightly toothsome turnips. The cheese and turnip flavors blend and the parsley and garlic come through adding elements of complexity and elevating the dish. You've had turnip gratin; I don't have to tell you how good it can be and this turned out to be a very fine example.

Finally, we've got the roselle. I cleaned and roughly chopped them and then stewed them in a little chicken stock. I added a little salt, but no sugar. I should have added a little sugar too. Instead of the traditional peanuts, I added some toasted pine nuts for texture.

The roselle is brightly tart and floral. Probably a bit too tart, but still quite palatable. It cuts right through the heavy fatty elements on the plate just the way it's supposed to. The pine nuts give a bit of textural contrast, but their flavor is drowned out. Not bad, but this needs a little more work.

That off note aside, this was a great meal. I regret a bit that nobody else is going to get to appreciate it. On the other hand, it's so good I really don't want to share.

Now then, what's for desert?

Wednesday, November 25, 2009

CSA week one - Thai corn, coconut and crab soup

This isn't a real Thai recipe. There's a real Thai corn and crab soup, Kaeng Poo Kab Kao Phod, but the recipes I found for it call for a can of creamed corn. I went a different way.

First up, I needed a base for the soup and this seemed a good time to make a batch of shrimp stock. Every time I cook shrimp, I keep the shells and I had accumulated a quart bag full in the freezer. I knew it was going to make more than what I needed today so I kept the seasonings simple:
1 quart shrimp shells
2 corn cobs
1 half onion, cut in two
1 teaspoon salt
1 teaspoon whole peppercorns

All that went into a large pot with water to cover--around six cups--and simmered for twenty minutes. Then I strained it, set two cups aside to freeze, and started into the dish proper.

To start building the Thai flavors, I added:
2 lemongrass stalks, trimmed and crushed
1 hot pepper, split
2 cloves garlic
1 piece dried galangal (Galangal is a relative of ginger with a less sharp, more floral flavor)
4 ears of corn kernels

and simmered for a half hour.

Afterwards, I fished out the lemongrass, galangal and a cup of the corn, added:
1 cup coconut milk
1 Tablespoon fish sauce

and blended in batches until the soup was fairly smooth.

Then I returned the reserved corn and added:
6 ounces of picked crab (Lump crab would have been better. Crab claws would have been better still. Dropping in a whole fresh crab might have been interesting.)
and, if I had thought of it, this would have been a good time to add some thinly sliced kaffir lime leaves. But I didn't remember until much later so I only added them to the leftovers.

and simmered for 5 minutes to blend the flavors.

Finally, I garnished with copious cilantro and scallion, a squirt of sriracha and a squeeze of lime. And, after tasting, a bit more fish sauce and, to compensate for few-day-old corn, a bit of sugar.


I think you can see that the texture ended up kind of sludgy. The fresh corn was kind of tough and didn't blend so well instead of the creamy result you'd get from blending canned or frozen corn. You're going to get sludge from the picked crab anyway so that's OK.

The corn flavor, once I had tweaked it with a little sugar, was strong through and harmonized nicely with the crab. The lemongrass and galangal flavors, which were prominent before blending were kind of lost and the coconut was pretty mild so it was up to the herbs and the funkiness of the fish sauce and kaffir lime leaves to add complexity to the soup and make it definitely Thai. A slight shift and this could have easily ended up Chinese or Southwestern or a bisque and been just as good. Lots of room for variation to preferences here.

Monday, November 23, 2009

P.I.G. - Pork is Good

[Edit: Most of you are coming here looking for chicharones. I have some tips a few paragraphs down by the picture of Chef Jeremiah's creations, but my recipe for making them at home is here. Also, chicharrones is spelled with two r's. You only found this page because both of us mis-spelled it with one. Search for it with two and you'll find a lot more info.]


That there is the advertisement for last afternoon's PIG event. The event was a not-quite-underground dinner organized by Frodnesor of the Food for Thought blog (a first time CSA subscriber this year and good luck to him) as part of his Cobaya gourmet guinea pig project.

The
Chef Jeremiah mentioned is Jeremiah Bullfrog, late of Bullfrog Eatz in Wynwood and soon to be of a retro-fitted kitchen in a 1962 Airstream trailer, and currently caterer at large. (You can read a recent interview with him here if you want to know more.) The menu is all pork with a bit of experimentation with new recipes.

Harvey's
on the Bay is not just inside Legion Park, it's a back porch attached to the Legion Hall. Kind of musty and creepy until you get through the hall and come out to this view:


I sprung for a VIP pass so I got in early and got my serving of all of the dishes. Chef Jeremiah kindly explain each dish, answered question and put up with nearly half of the twenty-some-strong crowd that rushed him with cameras each time he brought out something new. With all that documentation, I'd better not be the only person writing this up.

He
started us off with chicharones and a fizzy cocktail of black cherry syrup and store-bought moonshine. Who knew you could buy such a thing? The cocktail went down dangerously smoothly and the chicharones were mighty tasty and a substantial improvement over my recipe. Three reasons for that: 1. a rather thinner layer of fat for a more skin-centric experience, 2. an overnight brine before simmering and 3. dehydrating at 150 degrees instead of roasting at 250. Those first two steps, at least, are easy improvements to make so I'll definitely be making better pork rinds next time around.

After
the appetizer, it was time to get the pig roasting. It was a 50 pound baby pig from West Hialeah the chef picked up earlier in the week. He entirely deboned it, made a stock from the bones and head-cheese from the head and wrapped it up into a giant roulade. Here it is brining in sour orange, lime, oregano, garlic, a little sugar and lots of salt: traditional Cuban flavors.

And
here it is going into the caja china box. There's surprisingly little charcoal under there putting out enormous amounts of heat. And it took very little fussing with, I was told.


Then
back inside for the first dish, the chef's take on char chui bao--steamed pork buns. Instead of the standard Chinese roast pork filling, he used a barbecued pork butt coated with a traditional Southern-style spice blend, smoked then roasted at 350 degrees. The soft, milky and slightly sweet dough compliments the tender flavorful pork, but the pairing is a little dry. To compensate, we got little syringes filled with soy sauce to inject into the buns which tied the flavors together nicely. Also, a couple hot sauces to put on top. I chose the Malaysian crispy prawn chili sauce that added some texture and just a little funkiness that I though rounded out the flavors nicely.

The non-VIP crowd started filtering in at this point. Good to get the bloggers down under 25%.

Next
up were banh mi tacos--all the rage in Los Angeles; unheard of in Miami. Hard enough to get a decent standard taco or banh mi here. I'm not sure if the meat in there is the head cheese or trotters. Either way, its flavored with fish sauce and cilantro and topped with pickled carrot and daikon and a drizzle of sriracha. A pretty presentation, but difficult to eat so I stuffed the salad inside. That muted the bright sweet flavors though, letting the corn tortilla dominate. There was just a hint of fish sauce in the lovely flavor of the pork, but the meltingly soft fat had the texture of refried beans and reinforced the Mexican aspect of the dish for me. Very successful as a cabeza (or possibly pie) de puerco taco; less so as a banh mi.

Around this time the guitar guy started playing. Poor guitar guy sitting all alone and strumming his heart out with everyone ignoring him and wishing he'd stop. So sad.

But
back to the food. Next were simplified Cuban sandwiches, anyway. He left out the ham and cheese--which I can't say I really missed--so it was just mustard, homemade pickles and thick slices of pork belly. The flavors were good--maybe a bit heavy on the mustard--but I had a little problem with the texture. The pork belly was chewy which is undercooked to the Western palate, but about right for most Asian applications. And that's fine on its own, but I don't think the pairing with the texture of the Cuban bread was great. But then I think Cuban bread is lousy with just about anything so I'm not the best judge.

One more dish before the main event--homemade hot dogs. The dogs were simply seasoned, cured and not lightly smoked, as hot dogs should be. A nice snap when bit, also good. But they were outshined by the very tasty pickled onions.

Finally,
the roast pig! Quite good indeed. Well done, but not dry due to the brining which also subtly enhanced the porky flavor. The real star, though, is the skin--fatty, crispy and oh so tasty. The sweet potato flan isn't half bad either. Light, smooth and creamy and a flavor that was just right with the pork.

I had to run off to get to work at this point. The room was getting crowded and the band had just finished setting up so I presume I missed the real party. Thank god. Anyone who stayed please continue the story in the comments. Actually, even if you didn't stay, if you could talk about how the event went as an event with actual humans socializing, I'd be obliged. Although I did make a little conversation, overall I wasn't really paying much attention to that part. I'll just leave it with thanks to Chef Jeremiah and to Frodnesor for making this event happen and to go so smoothly. Folks seemed to be having a good time so far as I could tell. I certaintly did. And I'm looking forward to the next event.

Sunday, November 22, 2009

CSA week one - starting up after all

I contacted Margie about the missing shares and it turns out they weren't actually missing; they were camouflaged. They accidentally switched the numbers of half and full shares and then some folks who picked up full shares didn't sign off on the sheet which hid the excess boxes. So I went down a picked up a full share. I left a couple ears of corn since I had picked up two earlier, but since this is for two weeks I think I should be able to use it all up, barring maybe the beans. The trick is using more than one ingredient in each dish.

I figure I can use the corn, bok choy and lemongrass in a soup. I'm going pickle the green beans with the dill. Avocado and tomato will go into a guacamole. Mizuna and lettuce in a salad. The turnips I'd like to use in a gratin. The calalloo in mchicha. Or maybe it would work better than the bok choy in the soup? That just leaves the hibiscus. I made an unsuccessful sorbet last time and I think I'd like to try them in a savory side-dish this time around. As I mentioned then, I've read that somewhere in Africa they stew them and serve them with ground peanuts. I might try that. If you look up hibiscus recipes, keep in mind that we've got calyces, not flowers and most recipes that call for flowers really mean dried flowers so adjust amounts accordingly.

The real problem for me here is going to finding uses for the leftovers after making dishes that use up half of a particular vegetable. I'll have to make new plans when I see what I've still got around after a week.

Saturday, November 21, 2009

CSA week one start-up - stalled at the starting line

I was really looking forward to the start of the CSA today. I've cleared space in the freezer, sorted through my stockpiled recipes and I've avoided serious cooking for the last couple of weeks to build up anticipation so I could start this week with some alacrity. But when I got to my pick-up spot all of the half-shares were gone. I looked over the check-in sheet and it looks like we were at least three boxes short. Darn.

I did pick up a couple ears of corn from the extras bin so I'm not entirely bereft. There's a salad recipe I've set aside for the first CSA corn that I can make. Beyond that, I guess it's back to the off-season model for a couple more weeks.

Still, I may as well talk a bit about my plan for this year. I'm deliberately going to be trying fewer new recipes this time around. There are lots of recipes over the last couple years I subscribed to the CSA that I just made once. Many of them showed promise that that first try didn't fully capture and I'd like to go back and improve on that result. I'm not sure how much of that will be worth blogging about. A few tweaks isn't a fully worthy new post, but it's not like anyone's been going through the backfiles. Maybe I'll post with a note that it's a repeat. Any bloggers reading this have thoughts on a proper methodology?

If you want a more proper CSA start-up post, I think there are a few other bloggers who are going to covering it. The Tropical Locavore over at Eating Local in the Tropics has promised a CSA post. I know La Diva of La Diva Cucina and Trina of Miami Dish have talked a bit about their subscriptions in previous years. This is also the first year Bee Heaven's had a blog so we can hear how the first week looks from the other side. Go check them out and see what they have to say.

Wednesday, November 18, 2009

Pizza 101

Earlier this evening the Italy-America Chamber of Commerce Southeast hosted a social networking happy hour at Piola Brickell that was preceded by Pizza 101: "we invite you to learn how to make a real Italian pizza with one of Piola’s master pizza makers! They will teach you all the tricks you need to know to make a superb pizza, while you make it with them right then and there. As a final reward for your efforts, you will get to eat the pizza you made during the class and share it with your friends!!"

I've got no particular need of the networking, but my pizza skills could sure use some work. So, off I went.

Parking's a pain in Brickell, but I got there more or less on time which meant, of course, waiting a good ten minutes for Piola to get their act together and for anyone else to show up. Once they did, they got four of us lined up along a table, dumped a truckload of flour on it and handed out discs of dough for us to work with.

The instructor did far more flirting than teaching, but I managed to pick up a few pointers. First of all, the texture of the dough was unusual. Soft, but not wet. Elastic, but not tight. That seemed to be the biggest trick of the night and I wish they told us how they managed it. I suspect part of it is from intensive kneading following by a lengthy rest to relax the gluten. The hydration level was hard to pin down, though. It can't have been too high as the dough didn't seem to pick up any of the flour, but normally a dough that dry is stiff. I dunno.

I'm also not sure why they used so very much flour. The dough didn't seem in any risk of sticking to the work surface. I presume it served some important function, though. There was a big minus as they never warned us to shake off the excess and we had big problems with baked on/caked on chunks of flour on the finished pies.

The chef demoed stretching the dough, so even if he didn't try to explain it, we had a model to follow. I've seen some folks say to use your knuckles, but he used his fingertips. He also had an interesting technique of letting half the dough droop off the side of the table while he rotated it around, letting gravity stretch it out. It worked pretty well for me too, but the texture of the dough was very forgiving. I'd want to be really confident any dough I made at home wasn't going to tear before trying it.

Most folks used tomato sauce and they showed us the technique you probably know of spooning a dollop in the middle of the pie and then using the back of the ladle to swirl it outwards. It was hard to judge just how much to use since a little goes a long way, but never quite as far as you'd like. Then a couple handfuls of shredded mozzarella and a pretty good selection of toppings. I lot of folks, I think, overloaded both with cheese and with too many and too much toppings. I believe it's traditional (and just a good idea) to use no more than three. I went with ham, roasted peppers and basil. OK, also some ricotta, but I went light on the mozzarella so the ricotta was intended as part of the cheese element, not a separate topping.

Here's before:


and after:


It turned out OK, but I had problems with excess flour and I like a spicier sauce than Piola uses so their unexpectedly sweet sauce threw off the balance of flavors a bit. One other point I learned from someone else's pie was that anchovies are to be used sparingly no matter how high quality they are (and these were really nice ones).

I think the big takeaway here was that getting the right texture on the dough at the start makes the process go much smoother and faster and gives you a better texture and flavor at the end. Does anyone have a favorite recipe they'd like to share?

Monday, November 16, 2009

Mocha ice cream with malt balls and warm caramel sauce

Sorry about that last post. I really should know better to try such things and just stick to recipes.

This particular recipe is a remake of one of the first ice creams I made when I got my churn a couple years ago. I've updated it into the Britton style, tweaked it a little and added the caramel which I though would go well with the other flavors.

I started by coarsely grinding 12 Tablespoons of coffee beans. Which was a mistake, I think. I added them to 1 1/2 cups cream and 1 1/2 cups milk, brought the mix to a boil, simmered for a few minutes to cook down the dairy a little, turned off the heat, covered and let steep for 10 minutes. That nicely infused the flavor, but the grounds grabbed on to a lot of the milk solids and I ended up mashing them in a sieve to try to get all the good stuff out. Kind of a pain, not terribly effective and some grounds make it through and back into the pot. Since the ice cream was going to be gritty from the maltballs anyway, I thought it would fly, but if I were to do it again, I'd just crush beans, not grind them.

Once the dairy was infused with coffee, I mixed in 1/2 cup sugar which isn't a lot for 3 cups, particularly with the bitterness of the coffee. I wanted to keep the ice cream on the less sweet side so the malt and caramel would contrast nicely. Once the sugar was dissolved, I mixed 1 Tablespoon plus 1 teaspoon corn starch with 3/4 ounce by weight of Dutch-process cocoa (mainly as an aid to getting lumps out of both) and whisked the mixture into the pot and brought it back up to a boil to thicken up. Finally, I whisked in 1 1/2 ounce by volume of cream cheese (whipped up for easier incorporation) and checked for flavor and texture. It was both too intense and too thick so I thinned it out with 1/4 cup of cream.

The malt balls are the fancy sort from the bulk bin at Fresh Market. I think the chocolate to malt ratio is too high, but they've certainly got Whoppers beat. I wanted irregularly sized pieces so I put them in a plastic bag and whacked them with a crab hammer. That's a couple handfuls. I don't know, 1 1/2 cups?

The caramel sauce is only a sauce since it's warm. It's really just a simple soft caramel. I forgot to write down the amounts I used, but I think it was a half cup of sugar, melted, and then the cooking stopped by mixing in 3 Tablespoons of butter and 1/4 cup cream. I may have added a dash of vanilla too. That's all there is to it.

So I chilled and churned the mix, folded in the malt balls and ripened in the freezer. I haven't got a beauty shot of the final product I'm afraid, so you'll just have to use your imagination. I made it for a baby shower that happened while I was away visiting my mother and I never got to taste the fully assembled dish. I asked for them to take pictures, but nobody did. I tried a little of the ice cream and thought the coffee overbalanced the cocoa flavor, but I hoped the chocolate on the malt balls would compensate. I'm told the ice cream went over well and certainly it was all gone when I got back, but I couldn't get any details about how it tasted from those I asked. You'll just have to use your imagination for that too.

Wednesday, November 11, 2009

Recipe Exchange

I'm off visiting my mom this week so, unless you're interested in a review of the new tapas place in Wilmington, Delaware, I've got nothing for you. But here's a class activity for the meantime.

I was recently sent this chain e-mail:
Hi!

You are being invited to be a part of a recipe exchange. I hope you will participate. Please send a recipe to the person whose name is in position 1 (even if you don't know them) and it should be something quick, easy and without rare ingredients. Actually, the best one is the one you know in your head and can type right now. Don't agonize over it, it's the one you make when you are short on time.

After you've sent your recipe to the person in position 1 below and only to that person, copy this letter into a new email, move my email to the top and put your email in position 2. Only mine and your email addresses should show when you send your email. Send to 20 friends. If you cannot do this within 5 days, let me know so it will be fair to those participating. You should receive 36 recipes. It's fun to see where they come from! The turnaround is fast as there are only 2 names on the list and you only have to do this once.

Unfortunately, I don't get out much so I don't know 20 new people to send it to. I'd be obliged if you guys could help out instead and send your favorite quick easy recipe on. I probably shouldn't stick her e-mail up on the web for spammers to harvest so just send them to me and I'll pass them on.

The e-mail assumes only 6 out of 20 people will follow through so no pressure. Only send a recipe along if it's something you really want to share. If you decide to extend the chain, put in:
1. my e-mail from my profile
2. your e-mail address
I'm much obliged for your help.

Proper posting will resume when I get my act together some time next week. Your patience is appreciated.

Saturday, November 7, 2009

Moroccan fried chicken

I usually prefer to use the original-language name in the title, and the cookbook, The World's Best Fried Chicken Recipes (if they say so themselves), calls this recipe "M'Hammer" which is a pretty cool name. But it's not a term that Google turns up much for and most of the recipes its attached to are for grilled, not fried, meats. Then again, Google only turns up one Moroccan fried chicken recipe and it doesn't have any Arabic name attached so who knows? Other than just about everyone living in Morocco that is.

All that aside (and since all that was just an excuse to use the term "M'Hammer" despite its doubtful applicability, aside is where it belongs), this recipe has a really interesting technique--a reversed fricassee--that I've never seen before and was curious to try.

Ingredients:
1 small chicken, under three pounds if you can find one
2 medium onions, thinly sliced
copious chicken broth (at least four cups if you're using canned. You can get by with less if you're using homemade that you condensed down for storage like I did.)
salt and pepper (preferably white)
1/4 teaspoon crumbled saffron threads
3 large sprigs parsley or cilantro
zest of 2 preserved lemons, chopped (did you know to use only the zest? I didn't until now.)
juice of 1 lemon
2 Tablespoons cilantro or parsley, chopped (I like to use both for north African recipes so I used sprigs of parsley and finished with chopped cilantro.)
4 Tablespoons butter
1 cup olive oil

0. Clean the chicken and pat dry. Season generously with salt and pepper.

1. Pick out a stew pot or dutch oven that will comfortably fit the chicken, but isn't much bigger than necessary for that. Layer the bottom of the pot with half of the sliced onion. Put the chicken on top, either side up. Add broth and/or salted water until the chicken is covered at least three quarters of the way up. The broth will get cooked down later so you can dilute it a bit now, but not so much that it tastes thin and weak. (It's up to you, but I think it's OK to taste the broth even with a raw chicken sitting in there. There's no way you found an industrial chicken under 3 pounds so had to have bought a boutique organic pastured bird that's unlikely to carry anything nasty. And even if it does, the nastiness hasn't had time to seep out into the broth. And even if it has, is one sip going to kill you?) Top the chicken with the rest of the onion and add saffron, parsley sprigs and preserved lemon to the pot.

2. Turn the heat to medium-high and bring the broth to a boil. This will be frustratingly slow, but don't rush it. If you turn the heat up, it'll wait until you get bored and wander out of the kitchen and then go into a full rolling boil all over the stove top. Instead, as soon as it starts to boil, loosely cover the pot, reduce the heat to low and slowly simmer until the chicken is very tender, about 45 minutes.

3. Move the chicken carefully to a draining rack over a platter or tray to catch the drippings. Remove the parsley sprigs (and, if you forgot the saffron earlier like I did, add it now). Move the broth off of your primary burner (and possibly into a smaller pot) and bring to a higher boil to start it cooking down. Adjust heat so that you end up with a reduced, thick sauce in about 20 minutes. Consider mashing up the onions a bit if they haven't fallen apart on their own. Add the drippings to the sauce and pat the chicken dry.

4. Place a medium cast iron or heavy-based non-stick pan or dutch oven on your primary burner. Add the butter and olive oil and turn heat to high to melt the butter and raise the temperature to near smoking. Carefully add the chicken to the oil and fry for a few minutes on each side until it is golden brown and delicious. Try to break the skin as little as possible or the oil will get in and dry the meat out. The skin's pretty delicate by now so I wasn't entirely successful. Once it's browned on all four (six?) sides, remove chicken from pan and drain again. Check the sauce for consistency and, if you're happy with it, turn off the heat and stir in the lemon juice and chopped cilantro. Cool the chicken for five minutes, carve into serving pieces and serve with (but not covered by) the sauce on a bed of couscous with maybe a vegetable of some sort.


In retrospect, I don't know if "fried chicken" is the right term for this dish. If I came at it without knowing that label beforehand, I think I might called it crisped stewed chicken. The frying is just a finishing touch. A pretty good finishing touch, sure, but not essential to the dish. I do like the idea; if I were to go back and do the chicken in curdled milk recipe again I'd fry the chicken afterward instead of before cooking it in the milk. On the other hand, that chicken picked up a lot more flavor from the cooking medium than this one did. Granted there was a lot more there to be picked up, but the cooking may have opened up the meat to outside influences. Certainly this chicken picked up a lot of flavor from the sauce during a night of soaking in the refrigerator.

As for that sauce, the onion, preserved lemon, parsley and cilantro is a normal combination of Moroccan flavors (at least for the American kitchen approximation)--boldly tart, savory and herbal. If you like that sort of thing then that's the sort of thing you like. I'm pretty happy with it myself. I'm just a little disappointed that the chicken was bland in comparison. I really don't like it when the meat in a dish becomes just something to put the sauce on. That chicken gave its life for my dinner; it seems the least I can do is to try to bring out its best.

Wednesday, November 4, 2009

Mushroom, mango and brie fondue

Last week was the new faculty reception at my library. Turnout's been lousy since the faculty realized we've dialed the catering back to wine and cheese. On one hand, that's pretty lousy since it's one of the few chances we get to pimp library services to a skeptical and indifferent audience. On the other hand, hey, free cheese.

Specifically, I liberated a big wheel of mediocre brie. I've been whittling away at it by eating it with crackers and in sandwiches with jamón ibérico and basil, but I wanted to do something more interesting with it. Not a lot of choices out there. You can bake it, of course, but the wheel was in two pieces so it would be an awkward process. Giada de Laurentis has a recipe for a brie, chocolate and basil sandwich that gets some mixed reviews. I was more interested in the pairings of brie with tart apple. I figured I could substitute in mango and get some interesting results. I was thinking of a mango, brie and bacon risotto, but I also had my eye on a brie fondue recipe and I don't think I've ever had fondue. So I thought I'd give it a try. Adapted from this recipe.)

Ingredients:
1 Tablespoon butter
2 shallots, finely chopped
1 clove garlic, finely chopped
1 handful dried cremini mushrooms, rehydrated and finely chopped (the original recipe called for an implausibly large amount of porcinins which were sold out in the two places I looked. I used what I had and, to boost the umami, added...)
a few slices of jamón ibérico, finely chopped (although jamón serrano or prosciutto would have done fine)
1/2 somewhat underripe sweet-tart mango, coarsely chopped
1/4 cup fruity but not overly sweet white wine
3/4 pound rindless brie (maybe 4/5 pound with rind), cubed
2-3 ounces goat cheese (I used Humboldt Fog, an ash-aged cheese whose fresh, slightly funky flavor nicely rounded out the brie.)
2/3 cup light cream
salt and pepper
parsley, chopped

1. Melt the butter in a large saucepan over medium heat. When it stops fizzing add the shallots, garlic and ham. Sweat until the shallots are softened.

2. Stir mushrooms and mango into the mixture in the pan. Add wine and cook briefly to blend the flavors and soften mushroom and/or mango if they need it.

3. Add the cheeses and stir until they start to melt. Add the cream and continue stirring until the cheese melts into a thick sauce.

4. Remove from heat and check seasoning. I found it needed a bit of salt and pepper. Garnish generously with parsley and serve before it clots with bread for dipping. (The original recipe also suggested serving with broccoli. I didn't think it would work so well with the adjusted flavors. I did try grape tomatoes, but I didn't care for the combination.)


Not bad at all. Mostly cheesy of course, but the other flavors bring some real complexity. There are earthy notes from the mushrooms; sweet and tart from the mango emphasized by similar notes in the wine; some herbal counterpoint from the parsley. The flavors intensify as the fondue thickens so it's a balance between ideal texture and flavor that shifts as you eat which adds a bit of interest.

I just did a search and found a recipe with paired a brie fondue with a mango chutney. Not quite the same, but close enough that I don't feel entirely original. Darn.