I know I said I wanted to do something boring with the daikon, but I did a bit of searching for recipes anyway and I found three pretty interesting options so I hope we see more daikon in the shares. I decided to go with this salad first because it's Burmese and I don't think I've ever had Burmese food before. I found this particular recipe in the Burmese collection at recipes.wikia.com but digging a bit deeper reveals that it's from the cookbook The Food of Asia. The only credits on the book say "text by Kong Foong Ling" and I don't know if "text" includes the recipes or just the commentary. I'm going to assume this is traditional.
The recipe calls for a large daikon, but I think the one I got in my share was more of a medium so I cut the other ingredients down by a third.
Ingredients:
2 Tablespoons rice vinegar
2/3 Tablespoon sugar
2/3 teaspoon salt
1 medium daikon, thinly sliced
1 medium shallot, thinly sliced [the original recipe calls for a small onion, but I think shallot is much nicer for raw applications.]
peanut oil for frying
6 cloves garlic, thinly sliced
1 1/2 Tablespoons peanuts
2/3 Tablespoon sesame seeds
2/3 teaspoon fish sauce
1 1/2 Tablespoons cilantro, chopped
1. Mix the vinegar, sugar and salt in a medium bowl until dissolved. Add daikon, toss to coat and chill for 15 minutes.
2. Soak shallot in cold water for 5 minutes. Drain. [I don't know what this step accomplishes that a rinse wouldn't, but it wasn't any bother so I went along with it.]
3. Meanwhile, heat oil over medium heat in a small pan until shimmery. Add garlic and fry until golden brown. [This doesn't take long so have your draining set up ready, keep a close eye and remove the garlic quickly once it hits the right stage. I was distracted, burnt my garlic and had to resort to the pre-packaged sort.]
4. Drain the oil from the pan and add the peanuts. Toast until they brown and start to smell toasty. Throw in the sesame seeds briefly. Shortly after the seeds start popping remove them and the peanuts to a food processor and grind until fairly fine. [Again keep a close eye or you'll end up making peanut/sesame butter that'll be pretty tasty but won't be of any use for this recipe.]
5. Remove the daikon from the brine and drain well. In a large bowl, mix the daikon and onion. Add garlic, peanuts and sesame seeds, then the fish sauce and cilantro. Toss well and serve with a Burmese curry.
To accomplish that last step, I made a simple Burmese chicken curry I found at asianonlinerecipes.com.
Ingredients:
1 large onion, roughly chopped
3 cloves garlic, squished
about an equal amount of ginger, chopped [the original recipe called for 5 centimeters of ginger. I don't really know how to interpret a linear measurement for something as irregularly shaped as ginger so I fell back on my default of using the same amount as I used of garlic.]
1 Tablespoon peanut oil
1/4 teaspoon belacan (Burmese shrimp paste) [There are a lot of types of shrimp paste and I only keep Chinese and Filipino on hand. Since belacan is fermented, Chinese is closer so I used that.]
2 chicken thighs, skinned, boned and cut into 1-2-inch pieces [Now that I look at it, this recipe doesn't call for cutting up the chicken thighs. Probably better not to, but I would remove the skin, I think.]
1/2 teaspoon salt
1 cup coconut milk
1/2 teaspoon chili powder
1/2 teaspoon tumeric
1. Add onion, garlic and ginger to a food processor (with a little water if necessary) and process until smooth.
2. Heat oil over medium high heat in a medium saucepan until shimmery. Add onion mixture and shrimp paste. Cook 5 minutes until starting to brown.
3. Add chicken, turn heat down to medium and cook a few minutes until the chicken loses its pinkness and the onion starts seriously browning.
4. Add salt, coconut milk and spices. Bring to a boil, reduce heat to low, cover and simmer 30 minutes. Stir and scrape the bottom on the pan occasionally.
5. Remove the cover and cook for 15 minutes or so to reduce the sauce by around half.
Serve over vermicelli noodles.
I found the curry's flavor a bit dull so I added traditional Burmese condiments: cilantro, scallion, fresh chili pepper, fried garlic and hard boiled egg.
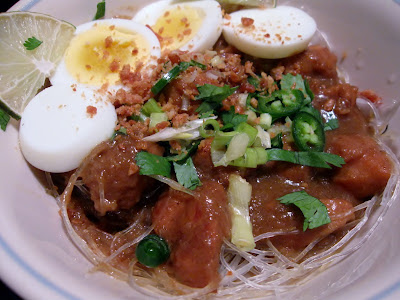
After its quick pickle, there's little left of the daikon's original mild bite, but it's not entirely lost. It balances against the sweetness of the sugar and the toastiness of the garlic, peanuts and sesame seeds. The salad is a lovely fresh and bright crispness against the heavy richness of the curry.
As this is the first Burmese curry I've made, and as I used the wrong shrimp paste, it's hard for me to judge, but, even heavily condimentated I find it rather flat (to the point where it needs a salad to contrast against, but maybe that's on purpose). The seasoning was rather simple, so maybe I'm missing a bunch of flavors from hard-to-find ingredients that were left out of the recipe. I'll have to do some investigation to learn more about Burmese cuisine. I did like the way the onion/coconut sauce browned as it cooked down. It's an effect I quite like in Indonesian curries I've made and there it's been quite flavorful. Maybe that's down to the galangal and kimiri nuts that usually go into that sort of dish.
Anyway, the salad was nice. It should go well with Thai or Vietnamese dishes too.
A blog about the art and science of cooking with a particular focus on tinkering with recipes to create a more perfect dish. Also a fair bit about eating local, slow food and that sort of thing. Less about the ice cream these days.
Sunday, November 28, 2010
Wednesday, November 24, 2010
CSA week one - Blue cheese, bacon and walnut green bean salad
Last minute Thanksgiving side-dish idea! I'm eating it by turkilessly and a day early myself, but you've probably got all the ingredients on hand and it would make a fine substitute for the usual green bean side-dish you had planned.
I modified this from a recipe I found on the Something blog. Kim Carney, who posted it, said that it came an issue of Parade Magazine. I tracked down the article and found it was by Sheila Lukins, author of the Silver Palate cookbook. Maybe I'm the only one who cares about proper attribution, particularly as I did change things around, but I care and it's my blog, so there.
Ingredients:
1 thick slice or 2 thin slices bacon
1/4 cup walnut pieces
3/4 pound green beans, stemmed and snapped into sensible lengths
2 ounces strong blue cheese, crumbled (the original recipe called for twice this. I cut it down to 3 and still found it a bit too much.)
1/2 Tablespoon Dijon mustard
1 Tablespoon red-wine vinegar
1 clove garlic, finely minced
1 Tablespoon parsley, finely minced (If you've got flat-leaf, or for some reason you like the texture of curly, chop less finely.)
1 and a bit Tablespoons extra-virgin olive oil
0. Bring a sizable pot of well-salted water to a boil.
1. Cook the bacon in your preferred manner until crisp. Reserve the fat. Chop the bacon.
2. Toast the walnuts.
3. When the water comes to a boil, add the green beans and cook until just tender, about 4 minutes.
4. Meanwhile, mix the mustard and vinegar in a medium bowl. Add the garlic.
5. Add the bacon fat (I had a teaspoon's worth) and enough olive oil to bring it to 1 1/2 Tablespoons total. Whisk until well-emulsified and slightly thickened.
6. Remove the green beans from the water into a colander. Run under cold water briefly and pat or spin dry.
7. Lightly mix the beans with the walnuts, cheese, parsley and bacon. Add the vinaigrette. Do not mix well or the chunky bits will all migrate to the bottom. Mix judiciously.
Serve with turkey.
This is quite a nice combination of flavors and textures. Texturally, the green beans had a bit of firmness left to them, the cheese was meltingly creamy (which is important. This is a warm salad and wouldn't work nearly as well if you let the beans cool all the way down before adding the cheese.), the bacon and walnuts crisp. The parsley is pretty much lost. You should probably use a couple Tablespoons so it can assert itself a little more.
ON the flavor end, the blue cheese dominates at first in each bite, but any combination of the other elements can rise to the front depending on the particular forkful you got. The vinaigrette lends just a little tang and doesn't overwhelm the other flavors. I liked the walnut and green bean pairing particularly, probably because I toasted the walnuts right to the edge of burning. That flavor pairs with the beans much better than raw walnuts did. Bacon and walnut is a very pleasant paring, too.
Hmm...I think I've just had an ice cream idea.
Saturday, November 20, 2010
CSA week one start-up
I apologize for slacking off on the blog recently. I got busy at work, then I was on the road for a bit and then I got busy again catching up after being away. I had ingredients on hand and interesting recipes picked out to use them, but the free time, energy and inclination to do serious cooking never came together. But that luxury of choice is in the past, the CSA has started. Fingers crossed that, as in past years, the weekly influx of produce will prove more inspiration than burden.
At the start of the CSA last year I said I wanted to perfect some of the recipes I had made in previous seasons instead of constantly trying new ones but I didn't follow through on that. I guess that's inspiration as burden. Huh. This year, I'm even more ambitiously unambitious. I want to not just redo recipes but also do more cooking not worth blogging about--thrown together stir fries and soups primarily. I'm tired of spending all my time thinking about cooking, cooking and then writing about cooking. I do have other interests; these video games aren't going to play themselves. We'll see if I can manage any sort of balance; it should add a little human drama to the blog even as it subtracts posts.
And one last blog-related thing before I get on with talking about the actual share. Marian of the Redland Rambles blog and I have talked a little about starting either a group CSA recipe blog or maybe a discussion group so folks who don't want to commit to regular posting can share their ideas and ask for suggestions. If you'd be interested in participating in either, please post a comment here or in Marian's CSA week one post. I think we'd need a least a half dozen folks involved to make it work.
At long last, let's see what we've got to work with this first week (well, fortnight. Thankfully, we're once again easing into this with no delivery next week).
Starting in the upper left corner, there's dandelion greens. I think I'd like to do another variation on hindbeh bil zayt with them. They work so well with deeply browned onions and garlic that I'm not particularly curious to try other combinations. Some of the parsley and garlic chives, also on the left side, will probably go in that. Otherwise, there's not so much there that I can't just keep them around for garnishing.
Next up is the daikon. I've struggled before finding daikon-centric recipes, but it's the utility starch of Japanese cuisine and often gets thrown into stews and such unremarked upon. That's how I'd like to use it this time around. Or maybe in a slaw; they work well in slaw or so I read.
I looked through my blog archives to see what I've already done for green beans, and it's quite a bit. There's over a dozen recipes there. But I also mention a cold green bean, blue cheese and bacon salad that I never got around to making. That sounds pretty good so I'll have to see if I can dig that recipe up.
There aren't enough cherry tomatoes there to do anything clever with. They'd go well in a salad, but I left the lettuce behind. I remember they grilled up well when my dad used to make shish kabobs. I wonder if that would work in my grill pan?
And finally, there's the bok choy (upper right) and yukina savoy (lower right). I think I'll just stir fry them up with an oyster-sauce-based sauce. That should be just dandy.
What do you guys have planned with your shares?
Tuesday, November 9, 2010
Fabada Asturiana
Fabada is a rustic Spanish bean and sausage stew. Pretty straightforward really, particularly if you invest in one of the ready-made fabada kits that Xixón Café sells at their meat counter. As you can see, they pack in the beans--fabas, a special Spanish variety not on the Publix shelves--a thick slice of Serrano ham, a couple links of chorizo and a link of morcilla de Burgos (a pork blood sausage with a lot of rice in the filling). There's a bit more to a proper fabada than that. They really ought to include the saffron and paprika, I think. Also, those beans about double in volume during an overnight soak so that sausage to bean ratio is a bit skimpy. I scrounged in my freezer and came up with a slice of ham hock and a couple more chorizo links--one Spanish, although a mass market brand, and the other of indeterminate South American ancestry. I really should improve my freezer labeling habits.
Anyway, after soaking the beans, I threw them into my slow cooker along with the Serrano ham, a few cloves of garlic, half an onion and half a green pepper. A lot of recipes didn't include these but you've got to have some vegetables. Those that did include them didn't agree on whether to chop and sauté them or just throw them in whole. I split the difference. I added a cup of stock and enough water to cover, about four more cups.
That simmered for a couple hours until the beans showed signs of tenderness. (An aside here: there was an article in the New York Times recently recounting a Mexican recipe that dispenses with soaking the beans and adds salt at the start and ends with tender beans after just two hours of simmering. It goes against all my experience but the author says it turned out fine. That author isn't Harold McGee so there's no explanation of why it turned out fine when we've all dealt with beans that have stubbornly refused to cook. Maybe I'll do some experiments myself.) Then I pricked the sausages with a fork so they wouldn't explode when cooking and added them to the pot along with good-sized scoops of sweet and smoked paprika and a pinch of saffron.
After another 45 minutes of cooking, the beans were tender and the sausages cooked through. I removed the sausages and ham and sliced them up. Some recipes don't simmer the sausages with the beans; instead they slice and fry them and add them at the last minute. That would add extra flavor to the meat while robbing it from the broth. I'd rather go the other way.
I had hoped more of the liquid would have boiled away at this point--fabada's supposed to be a thick stew, not soup--but it hadn't so I removed as much as I could and boiled it way down on he the stove top. I mashed the beans up a bit, as most recipes call for, returned the concentrated liquid and the meat, seasoned to taste with salt and pepper, topped with a little parsley and served.
Fabada is typically served with cidra and crusty bread, but I haven't got either today. For the cider I'm substituting a bottle of a spicy light ale and for the bread, a second bottle.
I've made my share of bean and sausage pots and this is certainly one of them. The variety of sausages is nice, I'll give it that. And the lack of heat in the spiciness is an interesting angle on the dish. It is quite tasty, but it's beans and sausages, of course it's tasty. Otherwise, fabada is rustic and hearty and perfect for the sort of cool evening Miami doesn't provide so often. I got pretty lucky to cook this just as the cool spell hit.
These beans have a pleasantly light and complex flavor. I wonder if the slow-cooker's low even simmer made a difference, or if it's the type of bean or if it's just that I've for once bought something other than whatever junk the supermarket has. I'll have to give those trendy heirloom beans a try and see if they can match this quality. I may have just ruined myself for the normal version of yet another staple. It gets inconvenient and expensive being a snob.
Thursday, November 4, 2010
Mamey sapote ice cream
I've made mamey ice cream a couple times before, but I tried something a little different this time around.
In earlier ice cream recipes, I've seen a big difference in batches made with raw and cooked fruit. Mango had a particularly profound transformation in flavor making an entirely different ice cream. Cooked recipes with mamey are rarer than with mango, but not entirely unheard of. I've never tried one so I was curious to give it a try.
Here's the sapote I used. According to the guy at the market stand, it's one of the last of the summer mamey crop and a different variety than get in the winter. More fibrous for one thing. No huge difference in flavor though, if I'm remembering right over the months. I didn't get many details from him so if you know something about this, do please share in the comments.
I started by scooping out a couple cups worth of pulp, mashing it up with a half cup of sugar and put it over a low heat to cook. I, thoughtlessly, expected it to break down like mangoes do on the stove-top; I should have known it would have a texture more like sweet potato. It took a lot of attention to keep it cooking without burning, but over ten minutes or so it turned into a paste and developed a bit of a caramelized smell.
I didn't want to risk burning it went out of the pot and into the blender with:
1 cup heavy cream
1/2 cup milk
1 Tablespoon cream cheese (which seems to help scoopability)
the juice of 1 lime
2 teaspoons vanilla, and
a few dashes cinnamon
But it was too thick to blend properly so it definitely needed thinning down. I added another half cup cream, a quarter cup of a tropical juice blend and a couple Tablespoons of agave nectar which does a good job of bringing out fruity flavors along with bolstering the sweetness.Finally, I wanted to add some alcohol to keep it from freezing solid. I'm out of vodka and rum which would have been my first choices, but found that the flavor of dry sake and mamey go really well together. (There's a pretty good cocktail in that combination for those interested in experimenting in that area.) I just added 2 Tablespoons to complete the recipe and gave it a serious blending.
After all that, the mix was still pretty thick, but I was pretty sure I'd added enough alcohol and fructose to keep it from thickening up too much further and my churn's got a relatively powerful motor so I was in good shape as long as I kept an eye on it.
Here it is right out of the churn:
and here it is after ripening in the freezer:
It did freeze up a bit more solid than I would have liked, but it is nearly 50 percent fruit so that's bound to happen.
Despite all the tweaking, the mamey flavor is clear, but in a mellow ice-cream-flavoring way instead of a fruit smoothie in-your-face way. There's an vapory hint of sake in the aftertaste which cuts the starchy throat-coating effect blended mamey can have so that's nice. The texture came out dense, but easily scoopable straight from the freezer (at least from the work freezer which is a bit warmer than my home freezer) and nicely smooth if not exactly creamy (despite all that cream in there). There's no hint of the fibers from the original fruit and just a little of the typical mamey grit.
So did cooking down the mamey make any difference? A bit in the texture I think, but it was a real disappointment that it didn't seem to change the flavor at all. There's probably some interesting bio-chemical reason for that. Non-volatility of the flavor compounds or some such. But the upshot is that this ice cream is pleasant enough, but nothing to get exercised about and a disappointment only so far as the new flavor territory I delved into is indistinguishable from the old.
Subscribe to:
Posts (Atom)