So what to do with the first big batch of rice I impetuously made after unpacking my new rice cooker? I considered just adding a little butter and digging in, but I wanted a real meal. I could have gone with the Chinatown steamed chicken I described last week, but I've only got chicken thighs and they don't steam up so well. Then it hit me: donburi! They're called rice bowls in English, giving the rice top billing over whatever they're served with, which seemed appropriate.
There are lots of variations, but usually it's a protein and some vegetables, including onion of some sort, mixed with beaten egg and served with a sweet sauce made of stock, soy sauce and a sweetener.
I, because I was feeling too lazy to defrost a chunk of meat, went with tofu as my main ingredient. I used firm tofu, cut into blocks about an inch square by two inches and deep-fried for about a couple minutes longer than you usually want to. Usually, when you're frying tofu, you're just getting it a little golden and crisp around the edges. If you cook it longer, the golden layer thickens and the tofu gets dried out and chewy. In this case, that's a good thing. The tofu firms up as it cools so it was still soft enough that I was able to squeeze out the absorbed oil with my tongs as I pulled it out of the pan.
I also dug up a few scraps of sirloin I had in the back of the refrigerator; sliced them thin; marinated in soy sauce, white pepper and sesame oil; shook them dry and gave them a quick dip in cooking oil. Just enough to brown since they're getting cooked a little more later.
Next, in a small pot, I combined 1 cup mushroom stock, 2 Tablespoons soy sauce and 1 1/2 Tablespoons sugar and brought it to a boil. I added the tofu and mushrooms, turned down the heat and simmered for 5 minutes to let them absorb the sauce's flavors. And just absorb the sauce, I suppose.
Meanwhile, I beat a couple eggs and mixed in a large scallion, sliced into 2-inch lengths and the beef I half-cooked earlier. After the 5 minutes were up, I turned the heat up a little and added the egg mixture. Once I saw that the egg had started to solidify, I turned the heat back down, covered the pot and let it simmer for 3 minutes more.
After that, I just dumped half over a big bowl of rice and served (and saved the rest for later). But what I should have done was to fish out the solids and then thicken the sauce with a little corn starch. That would have disguised the ugliness of this bowl a little bit.
Appearances aside, it tastes great. The sauce is a balance of savory and sweet that's a bit intense on its own, but just right absorbed into a whole lot of rice. The simmering has softened the tofu from leathery to a pleasantly meaty chew. The sauce's flavors penetrated through the outer layers, but left a creamy plainer tofu center. The mushrooms, on the other hand, soaked up the sauce and give off bursts of flavor at the bite. And the rest add some nice flavors and textures without being worth noting in detail.
It should make a good weekday meal since it's so quick and easy. Here's a more generalized recipe:
Ingredients:
1/2 pound of firm tofu, cut into largish chunks
a little meat or fish, cut into strips [or ditch the tofu and add more meat if you like]
4 small dried shiitake mushrooms, soaked and quartered
1 large or 2 small scallions, both white and green parts or a white onion, cut into 1-2" lengths
some broccoli, fresh mushrooms, greens or daikon wouldn't be a bad addition. Just add heartier stuff early and more delicate ingredients late
1 cup stock or dashi
2 Tablespoons soy sauce
1 1/2 Tablespoons sugar or mirin
maybe a couple teaspoons sake
2 large eggs, beaten lightly
lots of white rice
0. Start cooking the rice.
1. Deep or pan fry the tofu until golden brown and crispy. Par-cook the meat.
2. Mix sauce ingredients and bring to a boil. Add tofu and dried or tough vegetables. Simmer 5 minutes.
3. Mix egg with meat, delicate vegetables and onion. Add to pot. Cover and simmer 3 minutes more.
4. Remove solids from pot and divvy up amongst two or three bowls of rice. Measure 2 teaspoons cornstarch into a small bowl. Add a small ladle of the sauce and mix well. Pour back into pot and simmer until thickened slightly. Top the rice bowls, add a sprinkling of sesame seeds to garnish and serve.
A blog about the art and science of cooking with a particular focus on tinkering with recipes to create a more perfect dish. Also a fair bit about eating local, slow food and that sort of thing. Less about the ice cream these days.
Sunday, August 30, 2009
Thursday, August 27, 2009
Plain white rice
Hey look, I got a cool new rice cooker! It's a birthday present from my mother, (thanks Mom!) although I had to tell her exactly the make and model I wanted and where to get it from. I was kind of interested in the super-fancy models that have humidity and temperature sensors and use fuzzy logic to adjust the temperature and cooking time for perfect results every time, but I couldn't find one that did anything other than cook rice. I really wanted one that doubled as a slow cooker. One that tripled as a deep fryer would have been nice too, but, as far as I can tell, that remains a dream.
On the other hand, this one can also steam and make tofu. But that's for later, for now, let's talk rice.
My old rice cooker was fine if your expectations weren't too high. The rice tasted fine, but it was always kind of mushy and had a crunchy crust on the bottom which is a good thing in Chinese and Korean cooking, but it's a no-no in Japanese. The new cooker has settings for both styles along with the standard white, brown and congee settings.
Here's the first batch with the new cooker. I'm not sure I've zoomed in far enough for you to see, but each individual grain is distinct and has expanded until it looks like a little length of rice noodle. They're slightly sticky, but come apart easily; soft but not mushy; aromatic and flavorful (as rice goes, anyway). It's a far superior rice experience all the way around.
Since then, I've made a batch on quinoa (on the brown rice setting), which did turn into a bowl of mush, but I think that's just the nature of quinoa. It was a
fluffier mush than the old cooker ever managed and tastier too. Beyond the aesthetic improvements, I'm just pleased that it didn't burn as it did half the time in the old cooker.
Next up is slow cooking some short ribs, but that deserves a post to itself. And there's also the issue of what to top a big bowl of fine quality rice with which I'll be covering soon, too.
Tuesday, August 25, 2009
Blueberry buttermilk ice cream
My original plan was to make an olive oil ice cream, and I bought the blueberries to go with that, but I've got to get rid of this buttermilk and buttermilk and blueberries are a classic combination. Maybe too classic, really. This certainly isn't the most innovative ice cream I've ever made in concept, although, since I'm adapting Jeni Britton's basic recipe instead of adding a bunch of egg yolks again, there is some originality in practice.
Ice cream base ingredients:
1 1/4 cup buttermilk
1 cup milk
1 cup heavy cream
1 1/2 ounces cream cheese
3/4 Tablespoon corn starch
1 teaspoon vanilla
1/8 teaspoon kosher salt
1. Mix corn starch with two Tablespoons on milk in a small bowl.
2. Heat buttermilk, milk and heavy cream in a medium pot to boiling. Turn heat down to low and simmer for five minutes.
3. Meanwhile, whip cream cheese until fluffy.
4. Remove milk mixture from heat, whisk in corn starch mixture and return to heat for a minute or two until it thickens slightly.
5. Strain milk mixture into the container you're going to store it in. Whisk in cream cheese, vanilla and salt. Let cool on counter for a half hour then in refrigerator for at least two hours until it reaches 40 degrees before churning.
The blueberry swirl is adapted from a blueberry sauce in David Lebovitz's The Perfect Scoop. I'm really not sure if leaving in the cornstarch from the original was a good idea. It'll thicken plenty just from the freezing temperatures. On the other hand, I think the cornstarch improves the texture as it melts on the tongue. I'd have to try it without to be sure, though.
Blueberry swirl ingredients:
1 cup cultivated blueberries (wild don't have enough juice in them)
1 ounce (by volume) sugar
3/4 teaspoon cornstarch
1 1/2 teaspoons cold water
1 1/2 teaspoons lemon juice
3 Tablespoons vodka (berry flavored or kirsch if you've got it. Lebovitz suggests crème de cassis as a variation.)
0-2 Tablespoons light honey or agave nectar to taste
1. In a small nonreactive saucepan, heat blueberries and sugar over medium heat until blueberries begin to release their juices. Smush them up a bit to help the process along if you're getting impatient.
2. Mix the cornstarch with the water and lemon juice until smooth. When the pan is full of more juice than berries, add the cornstarch slurry, stir well, bring to a boil, reduce heat to a simmer and cook for 1 minute more.
3. Remove from heat and mix in the vodka. Let cool slightly and check the flavor. Don't worry about any alcohol bite; that goes away in the freezer. Make sure it's good and sweet as the cold dampens that down.
4. Pour into a storage container and store in the freezer until you're ready to start churning the ice cream. At that point, remove to the kitchen counter to thaw. Once the ice cream is ready, give the swirl a good stir to make sure it's at least vaguely liquid. You can either pour it into the churn to let it swirl for you for 10 seconds or so, or do it manually.
I chose to do it manually since I was doing another mix in too. I figured this wasn't interesting enough as is and added chunks of a blueberry buttermilk oat quick bread I baked a few days previous. I made the recipe just as I found it at The Kitchn so I'll send you over there instead of making this post any longer.
Mine didn't turn out nearly as fluffy as theirs. I think they meant to say 2 teaspoons of baking soda, not baking powder, as the baking soda would react with the acid buttermilk to make bubbles to raise the loaf.
Fortuitously, the dense chewy bread worked rather well as an ice-cream mix in when a light cakey bread would have fallen apart into crumbs. All's well that ends in ice cream, I always say.
Here's everything piled up before I swirled it together. Actually, I did more of a fold. It worked out better than my swirling usually does so I'm going to stick with that technique in the future.
And here's the final result:
Pretty isn't it?
I was hoping all that alcohol would keep the swirl liquid, but it doesn't quite. It does melt rapidly on the tongue, though, releasing a burst of tart blueberry flavor over the creamy tangy buttermilk base. Most folks misidentified the tanginess as from cream cheese as there's a distinct cheesecake flavor here (and I've let the cream cheese age to create a cheesecake flavored ice cream before).
There's the occasional intact berry in there which has a little bit of icy crunch, but not so much that it's unpleasantly crunchy. The quick bread is a nicely sweet contrast to the other components, both of which aren't actively un-sweet, but do have more prominent flavors hiding their sugar content. I was afraid the bread would freeze hard, but it's waterlogged so it's soft and a bit crumbly. Not really necessary, but if you used flavored liquor in the berries, it might be nice to soak the bread in a little of that too. There's a lot of good stuff going on here with all those different flavors and textures working well together.
I still want to do an olive oil ice cream but I'm thinking of pairing it with a dark chocolate stracciatella and fleur de sel.
Sunday, August 23, 2009
Crispy chickpea and tuna salad
This is a variation of a recipe I saw on Serious Eats that I thought had some good flavors, but didn't combine them in the best way to really bring them out. You might disagree so take a look at the original too if you think you might want to make it. ... Now that I look back on that recipe, I see that they adapted from Nami-Nami who got it from Pertelote who posted what I presume to be her original creation back in May '05. Her version; with its dried chickpeas, copious roasted piquillo peppers and smoked paprika; is rather different than what I made, but sounds pretty darn good, so clearly this is a dish amenable to variations. Here's mine:
Ingredients:
1 15-ounce can chickpeas, drained and rinsed
5 Tablespoons extra virgin olive oil
2 teaspoons whole cumin seeds
1 teaspoon whole fennel seeds
1/2 teaspoon chili flakes
1 handful small red and yellow bell peppers (or one standard-sized pepper), thinly sliced
1/2 roasted red pepper, chopped
1 medium onion, diced
2 teaspoons hot paprika
1 4-5 ounce can tuna, flaked and, if not packed in its own juices or olive oil, drained [I'm a recent convert from supermarket pouch tuna to canned bonito del Norte tuna from the local Spanish market. The top brands, like Ortiz, can get pretty pricey, but the cheaper ones are still pretty good.]
2 Tablespoon champagne vinegar
1 large handful flat-leaf parsley, stems removed and leaves chopped
Salt and, optionally, pepper
1. Heat half the olive oil in an 8-inch non-stick or cast iron pan over medium-high heat. When the oil is shimmering, add the whole spices, chili flakes and the chickpeas. Cover with splatter screen because all three will start to pop. Cook, stirring frequently, until chickpeas are a deep toasty brown--maybe five minutes. Remove to a bowl, including the spices, but leaving as much oil as possible. Add a good pinch of salt, mix well and try to restrain yourself from eating them like popcorn. Or forget the rest of the recipe and eat them like popcorn; That's a fine choice too.
2. Turn the heat to medium-low and add the rest of the olive oil, the onion, the fresh peppers and another pinch of salt. Sweat for ~10 minutes, until the onion is soft and translucent, turning down the heat if it starts to brown. Add the roasted red peppers and paprika a few minutes from the end.
3. While the onions and peppers are cooking, put tuna, parsley and vinegar in a large bowl. When the vegetables are ready, dump them in and scrape out the pan into the bowl. Stir to combine. Mix in the chickpeas just before (adjusting the seasoning, and) serving to maintain their crispiness.
Both the chickpeas and the whole spices give a nice extra crunch to the textures of the salad, and the cooked chickpeas have the light, slightly puffed texture that good french fries can get from the escaping steam. It's personal preference if you prefer that to the creaminess of raw chickpeas; I know what my choice is, particularly against the softness of the soft sweated onions and peppers and the unctuousness of the olive oil.
The salad is fragrant with spices and bright with the vinegar and fresh with parsley. Those three elements are blended together into a backdrop to the earthy chickpeas, whose flavor have been deepened and rounded out by the toasting, sweet tuna and savory peppers. There are nice moments when you crack open a fennel or cumin seed, boosting that flavor and changing the whole character of that mouthful. I also suspect that the sauce would be a mucky sludge if all those spices were in powder form so I'm pleased to have avoided that.
If there's a weakness here, it's the tuna which has a little trouble standing up to the other elements and only pokes up its head when you find a particularly large piece. There's nothing about these flavors that requires fish; beef or lamb would be a nice substitutions. Or, if you wanted to go vegan, firm tofu's texture would work and it should absorb the flavors nicely.
Thursday, August 20, 2009
Italian Cooking Show III part 2
Remember back in June when I said that the Italian Cooking Show was informative and fun and you ought to go? Well, maybe not so much.
This was, I think, the fourth of the Italian cooking demos held at Mia Cucina this summer (and the third annual series, which is where the III comes from), and the last before the grand finale in September. I would have thought they'd be getting better at running them, but there were serious logistical problems this time around.
I'll spare you a full pointless blow-by-blow, but suffice it to say that out of the six dishes, we got three proper cooking demos and three cooking-free descriptions. And none of the recipes demoed or described matched what we had in our handouts.
But demos aside, we still got full-serving samples to try with some very nice wine pairings so it wasn't an entirely wasted evening.
My favorite dish in concept was the fregoletta prepared by Chef Davide Piana from Sardinia. (The name of both the restaurant and the cuisine. Piana himself is from Genoa, I believe he said.) Fregoletta is a somewhat paella-like dish of saffroned fregola, a grain I don't think I've ever had before, tomatoes and clams. If they had bowls so the dish could include the clam broth that moistened the dry grain and tied the dish together, I think it would have been quite good indeed.
My favorite dish in actuality would have to be the Calabrian stuffed peppers prepared by Chef Rosario Corrao from Pelican. It was just a standard stuffed pepper, but the pepper itself was fork tender but not at all mushy which I've never been able to accomplish with the recipes I've tried. I wonder if that's from simmering them before stuffing and then a short baking without saucing. That's what he described, but the recipe in the handout skips the simmering and has the peppers in the over for an hour. That seems more practical to serve a large group so I think maybe it was done that way instead.
Other than those two dishes, it wasn't so great this time around. I'm not entirely disuaded from attending the finale, but they'll have to have some pretty compelling attractions to get me there.
Tuesday, August 18, 2009
Buttermilk-brined southern-fried chicken gizzards
For some of you, I know, this is standard fare--nothing worth blogging about, particularly since it isn't my recipe. But for me this is exotic ethnic fare and one step closer to my unfulfilled pledge to eat more offal.
Also, I don't think I've ever soaked chicken in buttermilk before--the recipe calls it a brine, but there's no salt so it's just a soak--even though it's a standard Southern technique. There seem to be a few different reasons to do so. The acid in the buttermilk tenderizes chicken and, a lot of recipes say, keeps it moist. Those both seem logical enough. Acid breaks down tough proteins; Normal meat might get mushy, but tough meat gets tender. And soaking in any water-based liquid plumps up meat which lets it stay moist through cooking. Gizzards can use the help in both regards, but for a whole chicken, these days it's tough to find the old well-exercised birds would need this sort of processing.
A lot of places also say that a buttermilk soak makes the breading extra crispy. That doesn't make a lick of sense, but it does work and I think I've figured out why.
[If you'd like a bit more information, later I tried prepping the gizzards by simmering instead and compared the results. That post is here.]
The recipe I used called for soaking one pound of chicken gizzards and a coarsely chopped small onion in buttermilk to cover (maybe a cup and a half) for a day or two. I did two only because it was too hot in the kitchen the first evening.
After the soak, I drained but didn't rinse the gizzards and cut them into pieces about an inch across, removing the sinew-iest bits.
For the breading, there's an egg dip and then a simple seasoned flour coating: 1 cup flour, plenty of salt and spices of choice. My choice was Gullah Cuisine's Fried Chicken Seasoning. The recipe suggests Old Bay which could be interesting, too.
And then deep frying at 350 degrees for two to three minutes. I did a rather better job of regulating my oil temperature this time than I usually do so I'm quite pleased with that.
Here are the results--perfectly golden brown, crispy, spicy, chewy--but not too chewy--meaty, slightly gamy and slightly tangy. Yummy. In most fried chicken, the meat has a hard time competing with a highly flavored breading, but the gizzards definitely hold their own and the combination of flavors is very nice.
You can see the lovely knobbly crust. That's the extra-crispy crust from the buttermilk. Specifically, it's from the excess egg-and-buttermilk mixture that dripped into the flour as I breaded the gizzards. Because the buttermilk is thicker than standard milk and certainly much thicker than a watery brine, you get nice cohesive little lumps of batter instead of just generally wet flour. The later the batch, the more lumps adhered to the meat with more crispy flaky convolutions on the final product. Luckily, there was plenty of the breading left, so I'm keeping the leftovers in the refrigerator as a head start for the next time. Do other people do that? I don't think I've heard of anyone doing that.
Sunday, August 16, 2009
Another roast chicken variation
A nice thing about roasting a chicken is that, although it does heat up the kitchen, you don't actually have to be in there with it most of the time. I think I've mentioned before that my kitchen door has a rubber gasket around the edges that can seal the heat in without it contaminating my air conditioning. I get a headache if I go back and forth too often, but for roasting, that's generally not necessary.
Last roast chicken I made, I used the Zuni Café recipe. I did it by the book that time; This time I wanted to tweak the recipe in a few different ways to see how it would hold up.
My first change was to replace the basic salt and pepper dry marinade with a fancier spice mix. I used more to compensate for the low salt percentage in the hot Cajun spice mix I picked, but not enough. I had to salt the chicken again at serving. Surprisingly, that seemed to be just as good. Usually, post-cooking salting of meat doesn't work as well; Maybe this method primes the meat to take up flavorings? I have an idea of how that might work, but I don't actually know what I'm talking about so I'll spare you the details.
Post-refrigerator-rest, the original recipe calls for heating a skillet on the stovetop, dropping the chicken into it and then putting it into a preheated oven. Instead, I heated a cast iron skillet in the pre-heating oven. When the oven was up to 475 degrees, I took out the pan, added potatoes that I had cut into pieces about an inch across and a handful of garlic cloves, still in the peel, both of which I had rolled in salt, sprigs of fresh thyme and olive oil. The chicken went on top of that. The goal here was not just to roast some potatoes, but to elevate the chicken out of its juices. Last time I ended up with one side with crisp skin and one side that was tasty but soggy. Maybe this will help.
Oh, and I stuffed half a lemon and a few stems of parsley into the chicken's cavity. That's pretty standard and I was surprised the original recipe didn't do it. On the other hand, I couldn't detect either flavor in the final chicken so I dunno.
Then I roasted as per the original recipe: 30 minutes breast side up, flipped for 10-20 more and then flipped back for 5-10 for crisping. This was a 3 3/4 pound chicken so my times were on the upper end of those ranges.
Once the chicken was done, I removed it to a cutting board, pulled out the potatoes and, instead of just cooking down the drippings into a sauce the chicken didn't really need, I added a couple handfuls of spinach to the pan to wilt. It's always nice when you can get all the elements of a dinner out of one pan.
On the whole, pretty good, but no particular improvement over the Zuni original. Actually, I think the potato roasting rack idea backfired and ended up steaming the skin on the bottom of the chicken to flabbiness instead of letting it crisp. The potatoes themselves are nicely chewy on the outside, soft inside and nicely flavored by the drippings, but that flavor was taken away from the pan so the spinach didn't gain from it. Next time, I'll roast the potatoes in a separate pan alongside the chicken. Ah well, worth a try.
One more thing before I go. Since the chicken wasn't heavily spiced, but was nicely succulent, I was able to use the leftovers in a classic Chinatown chicken on rice. If you've had this dish, you know that it's a whole lot of white rice, sliced plain boiled chicken served at room temperature, maybe a little leafy green vegetable and an amazing sauce that elevates it to equal the roast pork and roast duck its served alongside. I did a bit of research and discovered that the sauce is amazingly simple, just chopped scallions, grated ginger and salt poached in a neutral oil to infuse the flavor plus a drizzle of good soy sauce and a drizzle of sesame oil. I didn't get a good picture so you'll just have to imagine it, but it was better than the original dinner and really easy if you've got the chicken and some extra spinach or somesuch about.
Thursday, August 13, 2009
Speaking of hearty brown bread...
as I did in passing near the end of my last post, I baked a loaf recently. It's just the second half of the batch of batter bread dough I made last month, but I baked it with a substantially different technique and got substantially better results, although, to be honest, I'm not sure why.
If you just re-read that first post or if you've got an exceptionally good memory, you'll recall that the batter bread was made without kneading which naturally resulted in a soft, crumbly texture from the lack of gluten. Since then I've given some thought to the matter and I wondered if I could adapt techniques used for other low-gluten breads made from batters like cornbread.
I've only recently started freezing dough so I'm not sure of the most appropriate way to get it ready for baking. What I've been doing is defrosting in the refrigerator overnight, putting the dough into a loaf pan in the morning and letting it sit, lightly covered, on the counter until I get home from work to give it enough time to come up to room temperature and then rise.
This time, instead of a loaf pan, I used an 8x8 inch baking pan. This dough, I figured, would be loose enough to spread out. I neglected to take a 'before' picture, so you'll just have to imagine a sizable lump of what looks rather like clay in the center of the pan. Here's the 'after' picture. The dough spread out nicely and rose to just about exactly fill the pan. There was a bit of a rise above in the middle, but the dough stuck to the parchment paper I used to cover it so it deflated a little when I removed it.
I was hoping for one of our usual summer afternoon thunderstorms to keep the room humid and blot out the sun, but it was a bright dry day and the dough crusted over in the oven-like heat of my kitchen. That, no doubt, hampered the rise, but this dough didn't have the structure to hold itself up very far anyway. I spritzed the top with water and olive oil to soften it up before baking.
Instead of the wacky baking method in the original recipe, I used a more standard cornbread/cake method of baking it at 350 degrees until a knife inserted in the center came out clean. It took about 40 minutes. There wasn't any extra rise in the oven; In fact it looks like it shrunk a little and the top crusted over hard.
On the other hand, take a look at the texture inside--dense and bubbly with a bit of chew. Even the crunchy barley bits softened pleasantly. Miles better than the texture I got from this same dough last time. Maybe I accidentally used the no-knead method and got gluten to form just by leaving a loose dough to sit?
I'd experiment more, but all this rigmarole hardly seems worth the effort if the point is to simulate a loaf properly made in the first place. Might be a good way to salvage a poorly kneaded loaf, but then so is kneading. Maybe I'll just write this off as a one time thing unless you guys see some practical upshot of all this.
Tuesday, August 11, 2009
Chilled pea and avocado soup with shrimp and corn salad
No great story behind this I'm afraid. Given the giganto avocados we get here in Florida and our CSA's insistence on giving us several at a time, I'm always looking for avocado-centric dishes. I stumbled across a recipe for pea and avocado soup, found a handful more (which means that this is a known recipe. I never thought of putting peas and avocado together, much less in a cold soup, but it must be common somewhere or have gone through a fad of popularity at some point. Have any of you heard of this before?), picked through them for ideas and worked out my own, rather more elaborate, version.
Ingredients:
1/2 cup tiny shrimp or crab meat
1/2 cup sweet corn kernels
1/2 medium tomato, seeded and chopped
an equal amount of roasted red pepper as the tomato, chopped
1 small handful cilantro, stems and leaves separated. Leaves chopped.
1/2 lime, juiced
extra-virgin olive oil
salt
vinegar-based hot sauce
olive oil
1/2 of a medium onion (or a few scallions), chopped
1 jalapeño or other meaty, not too hot, pepper, chopped
2 cloves garlic
the cilantro stems from above
1/2 teaspoon cumin
2 cups chicken stock (homemade is, as always, much preferred)
2 cups small sweet peas
1 large avocado, chopped or just scooped out if it's as old as the ones I've got
1/3 cup sour cream
salt and pepper
1. Mix the shrimp, corn, tomato, red pepper and cilantro leaves in a small bowl. Salt well, dress with copious amounts of lime juice and olive oil and hot sauce to taste. Make it a little hotter than you'd like, actually. Set aside in the refrigerator.
2. Heat a Tablespoon of olive oil in a small pan over medium heat. When it's hot, add the onion, pepper and garlic with a sizable pinch of salt. Cook for four minutes, turning down the heat if they start to brown, add the cilantro stems and cook for one minute more. Take off the heat and stir in the cumin. If your peas need cooking, use a larger pan and add them after the first minute.
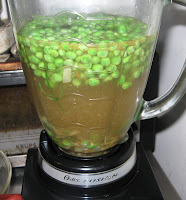
3. Scrape pan into a blender, add stock and peas. Blend smooth. Add avocado and sour cream and blend again. Salt and pepper (and cumin) to taste. Also adjust the texture with a bit more stock or avocado if you've got them to hand, water and sour cream if you don't. Some recipes call for straining it, but if it's chunky, blend it some more instead.
Serve soup topped with a sizable spoonful of the salad and a good drizzle of the dressing. Maybe with a chunk of hearty brown bread.
The soup tastes of peas and avocados naturally, sweet and creamy rounded out with touches of savor and spice from the additional ingredients and a slow burn in the background from the pepper. Each component of the salad, which separate out so you get one or two per spoonful, is a bright burst of flavor--salty, acid and spicy on top of its clearly delineated individual character. It's just gorgeous stuff. My expectations were far exceeded, here.
Sunday, August 9, 2009
Kuku paka
I've been meaning to try some more recipes from the Congo Cookbook
for a while now. I don't know much about the cuisines of sub-Saharan Africa and there's no better way to learn than actually cooking the dishes. But when I actually started looking around the site, the techniques and flavor combinations were familiar from the African diaspora. I've seen a lot of it before in Southern and Caribbean cooking. So, when choosing what to make first I ended up with Kuku Paka, an Ismaili dish from eastern Africa that mixes in influences from India. It's interesting that some of the same influences that went west into Africa also went east so this recipe actually has a fair bit in common with the Indian-influenced Thai Masaman curry. Well, I think it's interesting.
I didn't want to use the whole chicken the recipe calls for so I cut it (the recipe, not the chicken) in half and used a pound and a half of chicken thighs (which I tried to cut in half too, but my hatchet wasn't sharp enough to get cleanly through the bone. I ended up slicing down the side of the thigh bone to make smaller pieces instead.)
Kuku Paka
Ingredients:
1 Tablespoons cooking oil or butter
1/2 onion, finely chopped
1 sweet green peppers, chopped [I used a pile of small red and yellow sweet peppers instead]
1 clove garlic, minced
1/4 teaspoon ground ginger
1/2 teaspoon curry powder
2 whole cloves
1/2 teaspoon salt
1 1/2 pounds chicken thighs, cut into small serving-sized pieces
1/2 cup water
2 to 3 potatoes, cleaned and coarsely chopped
2 small tomatoes, cut into chunks
1 cup coconut milk
2 teaspoons lemon juice
fresh cilantro or parsley [or both], chopped
1. Heat oil in large saucepan over high heat. Add onions and peppers and fry, stirring, for a few minutes until softened and starting to brown. Add garlic and continue to stir for one minute more. Mix in spices and salt and cook briefly until fragrant.
2. Scrape mixture to the side and add chicken to the pot. Brown the chicken on all sides. Remove chicken and set aside.
3. Add water to pot, scrape up browned bits from the bottom, lower heat to medium low and bring to a low simmer. Add potatoes, cover pot, and cook until tender. [This step takes approximately for-flippin'-ever so you may not want to follow my example here. The original recipe offers the alternative of frying the potatoes in a separate pan while the chicken is cooking in the next step. You should probably do that.]
4. Add chicken and cook until done.
5. Stir in tomatoes and cook for several more minutes until they collapse and start to form a sauce. Add coconut milk, reduce heat and gently stir and simmer until sauce thickens to however thick you want it. If you want it particularly cooked down, remove the chicken to keep it from overcooking. If you're using proper boiling potatoes, they can take it and will absorb some flavor so leave them in.
6. Squeeze in lemon and garnish with herbs. Serve with chapati or rice.
The lemon is optional in the original recipe, being a modification from another coconut chicken stew from southeast Africa, but I think the dish definitely needs the acid.
It's...well, it's not bad, as such, but I've had a lot better coconut chicken dishes. Putting the tomatoes and coconut milk in at the end doesn't bring out their best. Even with the lemon and herbs, the flavors are muddy--probably from the onions, peppers and spices that were over high heat for rather a long time. A few dashes of Maggi sauce help and add some African character but I still find that I want to dose it with hot sauce to wake it up and hide its imperfections. I've found another couple recipes for the dish online and both use hot peppers so that's probably OK. They also cook the chicken in the tomatoes and coconut milk so maybe I should be looking over there instead. Too late for this dish, though. I'll have to count on some time in the refrigerator to improve the flavors.
Thursday, August 6, 2009
Vietnamese fried rice
O.K., this is just fried rice and you don't need to be told how to make fried rice, but this quick-and-easy way to use leftovers is a little different from the more familiar Chinese version so it's worth documenting.
When I did it, it turned into a huge production number, but you can just consider the contents of each bowl a list of possible ingredients to choose from and you'll be fine. Use whatever you've got handy and follow the same procedure of fluffing the rice then cooking the vegetables in stages before mixing the sauce then rice back in. It is really easy if you are using leftovers they way you're supposed to and not prepping everything right there like I did.
In that first bowl are:
a few cloves garlic, chopped
an equal amount of ginger, crushed and chopped
1 stalk lemongrass, cleaned and thinly sliced
1 small handful dried kaffir lime leaves [I've been picking them off my kaffir lime tree and drying them myself. I'm finding dried rather easier to work with than fresh although not nearly as flavorful so you have to use a lot more.]
1 carrot, peeled and diced small
In the second bowl are:
2 links lop chong (Chinese sausage), microwaved 1 minute to partially cook, cooled and sliced
1 half cup peas
1 1/2 cups bean sprouts
4 large shrimp, cleaned and cut into centimeter-sized pieces
1 small handful cilantro, chopped
On the plate are:
2 eggs, beaten, gently cooked into an omelet and sliced
2 scallions, chopped
In the sauce is:
2-3 Tablespoons Vietnamese fish sauce (milder than Thai)
2-3 Tablespoons dark soy sauce
1 Tablespoon sugar
1 Tablespoon sriracha hot sauce (did you know that this was invented in Los Angeles? You don't see this brand or quite this formulation outside the U.S.)
Step one was to heat up in my wok:
1 Tablespoon canola oil
1 Tablespoon chicken fat
1 teaspoon sesame oil
to which I added:
3 cups day-old rice
and stir-fried until the rice had regained its fluff.
Out that went and into the wok went another Tablespoon of canola and another Tablespoon of chicken fat. Once that was hot I added the contents of the first bowl.
When the aromatics were nicely aromatic and the carrot starting to soften, in went the contents of the second bowl.
When the shrimp was just about done (just a minute or two), I added the sauce and cooked it down a little. Then I returned the rice and tossed it around to get all of the rice coated before adding the eggs and scallions. A little more stirring to get everything well-distributed and warmed through and it all went out of the wok and into a big bowl.
To finish, I garnished each serving with:
chopped cilantro
ground peanuts
caramelized onion (I keep a small bag in the freezer)
crispy deep fried garlic (I keep a small jar in the pantry)
a squeeze of lime
and, after I took the picture,
thinly sliced hot pepper
a drizzle more of sriracha
So that's 25 ingredients all told. And you can really taste each and every one of them. Enormously complicated, but everything retains their own flavor and texture and works together. There are deep savory flavors infused into the rice, crisp fresh-tasting vegetables, aromatic citrusy notes and just a touch of heat. And all sorts of textures in there too. I don't know how I did it, but this is quite spectacularly good. Or maybe I was just very very hungry since dinner was two hours late?
Was it worth all the effort? Well, I am getting five servings out of it, so on average with the four zero prep-time meals, maybe?
Monday, August 3, 2009
Mango chutney ice cream
The title of this post is a bit of a spoiler for the end result. It wasn't my intent to make chutney. I just wanted to cook some mango down to concentrate the flavors, but I had the inspiration to add other elements and went with the impulse.
I started with:
1 large ripe mango, strongly flavored, sweet and low on fiber from the last CSA al-a-carte offering. I don't think Margie specified what variety these are, but they've got great flavor and texture. I ditched a few other mango recipes because I can't stop eating them fresh.
To the chopped mango, I added
2 fingerling bananas, firm and tart, frozen and defrosted. These are also from the CSA. They're unusual, but I don't detect a lot of their flavor in the final dish, so you could probably substitute one small Cavendish.
and
juice of half a lime
1/2 cup brown sugar
1 large pinch salt
2 large pinches cayenne pepper
Salt and cayenne are traditional accompaniments to green mango and not unheard of for ripe. Try a slice of ripe mango with generous pinches of both; it completely transforms the flavor. And that's where I went from mango ice cream to chutney ice cream.
I cooked all that down for a good 15 minutes until I had 1 3/4 cups of richly flavored caramelized goop.
I then added
1 1/2 cups cream
and since it needed to be extra sweet for freezing:
1/4 cup white sugar
and to thin it out a bit
1/4 cup milk, and
2 Tablespoons light rum.
I don't think I've used alcohol in an ice cream before (although I've used it plenty of times in sherbet). With all the other ingredients with textural effects, I can't really say if it helped. Didn't hurt, certainly.
Then I chilled and churned. I deliberately left the fruit mixture a little lumpy to add some texture to the ice cream. They got broken up a bit in the churn and, interestingly, the fibers from the mango accumulated on the dasher to create a bezoar sort of thing. Convenient for it to be automatically removed from the final product.
The texture is beautifully soft and creamy straight from the freezer, but with a bit of solidity to it. It's not chewy but it doesn't melt away to nothing immediately. With each bite you start with a shock of salt, fade into warm rich fruit with a slow fade out to the bite of cayenne. When the ice cream has melted away it leaves sweet little pieces of candied fruit that bring back the fruit flavor in a purer form without the mellowing cream. It's really quite lovely.
What's interesting here is that cooked mango, particularly spiced and salted cooked mango, is so unusual that its identity in here is difficult to pin down. It tastes more like the white sapote ice cream I made than fresh mango, but it doesn't taste quite like that either. I could see mis-identifying it as French vanilla with some obscure fruit mixed in, which is odd as it contains neither vanilla nor eggs. I think I said something similar about one of the dishes at the Mango Brunch at the Fairchild last year. Is it just me?
I'm curious what it might be like with some other more readily recognizable cooked fruit--blueberries or apples, maybe. That'll probably just taste like cobbler with a scoop of ice cream on top. Not that would be a bad thing.
Subscribe to:
Posts (Atom)