Showing posts with label turnips. Show all posts

Saturday, April 9, 2011

CSA week 17 wrap-up, week 18 start-up

Another week of low posting, but I did do some cooking worth mentioning.

As I thought I might, I made a kale and turnip gratin. Unfortunately, there was rather more of both than I counted on, and rather less cream and swiss cheese about than I thought. The results weren't fabulous so I decided to try a fix. Digging around, I found some dried mozzarella, a bit of cheddar a fair amount of pecarino romano and, to substitute for the lack of cream, some cream cheese. I disassembled the gratin, mixed all that in and put it back in the oven for a half hour. An improvement, but still more gooey than creamy so less than entirely satisfactory. The next day I attempted to melt the cheese down and dissolve it into a cream sauce by adding a cup of chicken broth and simmering on the stovetop. Instead, the mozzerella seized up into curds the texture of ground beef. Not bad, really. The turnips had gone soft at this point so I mixed in some noodles for texture and a couple beaten eggs to thicken up the sauce and I ended up with an odd but fairly palatable concoction. Too much of a haphazard mess to be worth a post, though.

In contrast, the pork chops in fennel and caper sauce I made was not worth a post because it's already written up quite adequately on Food.com. It's a Giada de Laurentis recipe that I didn't modify in any notable way. Pretty darn good, though. I do recommend it if you've still got your fennel around.

I bailed on the dill curry I've been talking about, though. I figure that if I've got the ingredients in the house for two weeks and I still haven't made the recipe, then that's a recipe I don't really want to make. And I'm not going to cook something I'm not interested in just for a blog post. Not to please you lot anyway.

On to this week then...


That's callaloo on the right, traded in the extras box for the kale that was in the share. I don't need any more kale. I think I'd like to make mchicha with it again as it turned out quite well the first time.

The green beans I'm going to pickle as the last batch I made turned out great.

For the leeks, I want to do something with a cream sauce. I remember liking a chicken and leeks dish my mom used to make and I haven't done anything using cream with the CSA leeks I've gotten yet.

That squash is the first we've seen in quite some time, isn't it? I know saved some squash recipes for CSA season that I haven't used. I'll have to look one up. I might go with fritters. I could go for fritters.

Potatoes and parsley I'll save until I need them which just leaves the dandelion. Oh, I'll probably have them over pasta in something simple. We haven't had any turnip greens for me to do that with in a while and dandelion should work just as well after a quick blanch.

One final note: I'm going to be out of town next weekend so my half-share is up for grabs. Nobody at work ever wants it when I offer. Do any of you? I use the Coconut Grove pick-up if that makes a difference.

Wednesday, May 12, 2010

CSA leftovers - The last of the winter produce

Both the black sapote in pantry and the tomatoes in my garden are insisting on rotting instead of ripening so I haven't made the dishes I was hoping to have made by now. And that leaves me without the interesting posts that would have results.

Instead, since it seems I feel compelled to post something, here's a couple of less interesting dishes I've made recently. These feature the leftover turnips and beets from the last few weeks of the CSA. I thought they'd last longer in the refrigerator, but they started getting squishy pretty quickly. Maybe it was because of the leaky water jug that boosted the humidity. Whatever the reason, using them promptly seemed prudent.

First, we've got roasted chicken with turnips. Roasting chicken with root vegetables is pretty standard, but here, following a Bittman recipe, I surrounded the chicken with fairly thinly sliced turnips about halfway through cooking and then, after this photo was taken, finished them up under high heat while the chicken was resting. No picture of the finished dish as it turned out unpresentably beige. It's because I finally found a chicken under three pounds to roast. It's good that I finally had a sensible amount of meat, but bad that it cooked through before anything had a chance to brown up crispy. Still, unlike the other times I've cooked chicken with chunks of potatoes or carrots or whatever, the thinly sliced turnips cooked through and picked up a lot of good flavor from their swim in the drippings. A bigger pan and a longer cooking time is all they really would need to be something special.

Second up is pickled beets. There are lots of variations on pickled beet recipes out there suggesting a lot of different techniques. There were a couple elements that seem important to me: a)roast the beets instead of boiling them. This concentrates the flavor and leaves the vegetable cells ready to soak up the pickling brine instead of saturated with unflavored water, and b)keep the seasoning simple to let the flavor of the beets come through. I used white and white wine vinegar and a tarragon herb blend along with a fair amount of sugar and just a little salt. I had salted the beets before roasting already, mainly to just draw out the moisture. I also layered the beets with sliced onion and threw in a couple eggs since, apparently, that's what you do when you're pickling beets. It's early days yet, but signs are pointing towards tasty.

How are you folks adjusting to South Florida's summer produce drought?

Monday, April 5, 2010

CSA week 18 - Chard and turnip gratin

Not the most complicated or unusual recipe to start the week with, but I encountered some trouble getting the ingredients I need for the other recipes I've got planned so it's the only one I've got ready to go. Also, the only other chard and turnip gratin recipe Google finds is a substandard one I made last year. As far as I can tell nobody's been looking for such a thing, but if anyone does, I want them to find something better.

I started by putting together the mise en place for the gratin assembly and preheating the oven to 375 degrees. And finding an 8-inch cast iron pan.

The chard needs to be blanched a bit. Our small bunch was particularly young and tender so I simmered the stems for a minute, added the leaves, and simmered for one minute more. Then I rinsed them in cold water to stop the cooking, squeezed out the liquid and chopped them fairly finely. I mixed that with chopped parsley and shallots, thyme and salt.

For the cheese, I mixed about even amounts of Kilaree, a young Irish cheddar and Havarti.

And I sliced, paper thin, three medium turnips.

Here's the first layer; Isn't it pretty?

That's a slightly overlapping single layer of turnip, a scattering of the chard mixture, a scattering of cheese and two Tablespoons of chicken stock and two Tablespoons of cream.

I think I got four layers before running out of chard. I topped with the last of the turnip and a layer of mixed Parmesan and bread crumbs and then covered it with foil.

40 minutes at 375 degrees foil on, 20 minutes foil off and a few minutes under the broiler and here it is:


The cooking brings out the turnip's sweetness which balances with the slight bitterness of the chard and the rich salty cheese for a nicely balanced combination of flavors. There's even a little toastiness from the topping. The turnip still has a little firmness to it, the chard a little chew and the top crisped up nicely. I went a little heavy on the stock so it's a little watery, but otherwise it's really very nice indeed.

Wednesday, March 24, 2010

CSA week 16 - Beef (and some pork) barley soup

This isn't much of a recipe, but it's all I've made so it's what I've got to post about. The only thing that's really noteworthy here, if anything, is that I made the stock from scratch first.

This morning, I loaded up my slow cooker with a medium turnip, a couple carrots, a stalk and a half of celery, half an onion and a couple cloves of garlic, all roughly chopped; thyme, rosemary, salt and pepper; a meaty beef shank well browned on both sides and enough water to get everything floating (nine cups which really was too much) and set the slow cooker to low and headed off to work.

When I got home I discovered that the vegetables were still surprisingly firm and the meat wasn't falling apart the way it should have been. Also, the broth was pretty bland. So I turned the cooker up to high and gave it an hour. That seemed to help a lot. I fished out the now cooked-out vegetables and the shank.

The vegetable are for the compost heap (or would be if I had one. Can I just bury them near my plants?) and the beef went into the refrigerator to firm up. Ideally, I'd like to let the soup cool and skim the fat at this point, but dinner time is approaching and I don't feel like starting from scratch at this point. So instead, I chopped up fresh turnips, carrots, celery and onions and fresh stew meat (The chunks of beef in the freezer turned out to be pork, but close enough.) to add to the pot along with some sliced mushrooms and half a cup of barley. I also dumped in some soy and Worchestershire sauce and a Tablespoon or so of Spice House's Milwaukee Avenue spice blend. I figure anything that's supposed to be good on steaks and chops should work here too. And another hour of simmering.


That should do it. I broke up and returned the beef to the pot and dished out a bowl to refrigerate down from tongue-scorching temperatures so I could check the seasoning. Hmm...in desperate need of salt and a bit greasy (although I'd have to add richness some other way if it wasn't), but otherwise quite good. The broth is clearly not just generic beef broth; the vegetables and herbs have added a lot of depth to it. And it's great to have vegetables that are both firm to the bite and actually deliver significant amounts of distinctive flavor.

So, was that useful at all? Even vaguely interesting?

I'll have something moderately better in a day or two and then I'm off to Columbus to visit my sister and I'm not blogging the Seder dinner. I might find my way to Jeni Britton's ice cream shop, but I'm guessing I'm really the only one who'd be interested in that.

I still need someone to take next week's share off my hands. Just post a comment and it's yours.

Saturday, January 2, 2010

CSA week four wrap-up, week five start-up

For the record, I'm feeling much better now. Once my course of antibiotics was done with I could go back on my probiotics and my tummy trouble faded rapidly. I appreciate the concern of all those who were concerned.

I believe the only item unaccounted for from week four is the turnips. The tops I had over pasta (with olive oil, tomatoes and sausage) that very first day. The roots I used in a beef stew that didn't turn out as well as I had hoped. I had read that, if you're going to make stew, you ought to deeply brown the ingredients to develop as much flavor as possible. You may dry everything out, but they'll be soaking in liquid for a few hours and all the tasty bits stuck to the pot will get dissolved back into the mix. A good idea, but I think I took it a bit too far. The flavor balance was all screwed up and the dried out meat didn't rehydrate; it just fell apart into chewy strands. It wasn't until after a night in the refrigerator and the dissolution of the dumplings that the flavors managed to stabilize into something palatable. Which is why I didn't write it up.

One other note before I move on. Remember a while back when I said the betel leaves tasted like root beer? This week I watched an old episode of Iron Chef America where Rick Bayless used an herb called hoja santa or acuyo which is also known as the root beer plant because of its flavor. The leaves looked a lot like betel too so I wondered if there was a connection. Turns out they're closely related: hoja santa is piper auitum and betel is piper betle. I think the takeaways here are:
a) my left-field description of betel was actually pretty apt. That means that I comprehended what I was tasting and was able to accurately describe it. It's an unexpected confirmation that I'm a half decent food writer.
and b) if we get betel again, and you aren't happy with the standard recipe options, there's a whole world of Mexican recipes you can substitute it into.


On to this week. I'm a little disappointed with the selection this time around; I find myself with a surfeit of eggs and slightly stale bread so I was hoping for something that would make a suitable filling in a bread pudding. The closest here is the mushrooms. I hadn't really considered a mushroom bread pudding before, but a little searching reveals a good number of recipes so I guess that's a plan.

I've also got a bit of salmon in the freezer so that's a natural partner for the dill. I haven't decided if that's going to involve a cure or a sauce yet, though.

Plum tomatoes are particularly good for sauce and I'm out currently so I guess I'll be making some more. I've never made a bolognese; maybe I'll try that.

The beets I want to roast. I'll probably roast a chicken to go with them as long as I've got the oven going.

The lettuce looks to be a sort that's good for wrapping stuff in, so I'm going to look around for recipes along those lines.

For the black sapote. I've got the idea to use it in a custard or mousse. I'll see if I've got sufficient eggs left to do that after I've made the mushroom bread pudding.

And that leaves the cabbage. I'm not sure what I'll do. It'll last a while so I may just pick at it over time instead of making one big cabbage-centric meal.

Saturday, November 28, 2009

CSA week one - My Thanksgiving dinner

I'm alone again this year and when that happens I generally feel compelled to create some approximation of a traditional holiday meal: poultry prepared whole, a starch and a vegetable or two.

This year I made a flattened pan-fried chicken, wilted mizuna, a turnip gratin and stewed roselle.

That first was from a recipe I saw on a local cooking show I saw while visiting my mother earlier this month. It's the specialty of a restaurant either in Philadelphia or Wilmington whose name I paid insufficient attention to catch. The show skipped over some details so I really only picked up a three-part technique:
1. Remove all of the chicken's bones, leaving the skin in one piece.
2. Fry it skin side down until the skin is browned and crispy.
3. Flip it to finish.

It might have struck you that step one is the tricky bit. You're not wrong about that. One further detail I did see in the show was to cut out the chicken's backbone and then squish the bird flat as if starting to butterfly it, but after that I was on my own.

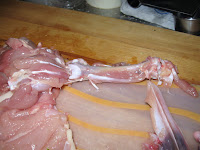
I cut the backbone a bit too narrowly, so I started with the bits remaining and sliced towards the center, under the rib cages, until I hit the clavicle to get each side off in one big piece. That went pretty smoothly and didn't slash up the meat too much. I had to dig deeper to get out the thigh bones and the keelbone and basically shredded up the chest area to get the wishbone out. Some of that required more digging around with my fingers than careful slicing with my boning knife. But here it is with the main body deboned. Not too bad. I thought chilling the chicken to firm up the meat would help, but it actually got easier to work as the bird warmed up.

Deboning the legs and wings was a little tougher. I ended up slowly turning the legs inside out, pulling out the bone, scraping the meat off and snipping the tendons as I went along and then peeling the skin off the very end. Finally I poked my finger into the skin like an inverted rubber glove to turn it back right side out. The first joint of the wing worked similarly, but the second and third joints were hopeless so I just chopped them off and stuck them in the stockpile. (it's a pile of bones for making stock. Stockpile. Ha.)

And there you go. One boneless chicken. I generously seasoned both sides with salt and pepper, heated up a couple teaspoons of olive oil in a 12-inch cast iron pan and dropped it in, skin side down. I started with the heat at medium-high for 15 minutes and then turned up the heat to get the skin browning. I could tell by smell when it was ready to turn. After the flip, I could see into the center of the breast meat through the slices I had pulled the wishbone out of so it was easy to judge when the thickest part was finished cooking. Around another 10 minutes.

I removed it from the pan and let it rest a few minutes before slicing. Since it has no bones, I could slice it any way I wanted which was kind of interesting.

The chicken is amazingly flavorful, tender and juicy considering the lack of any brining or other special preparation and my random stabs at cooking times (not to mention my random stab version of butchery). The skin is wonderfully crisp and tasty. The only minus is maybe that it's rather greasy, but it's all the natural chicken fat so you can't complain too much. This turned out so very well and, although the deboning process was a bit complex, it was an engaging complexity so I didn't really mind. I think this just became my new favorite method of cooking chicken.

I wonder if it would be a good idea to remove the legs and wings. They kind of get in the way and keep the skin on the outer bits of the body from crisping, but they also prop up the thinner parts of the chicken away from the heat. That's probably important to keep them from overcooking while the breast is finishing cooking. It might be worth the experiment to compare the results.

An added bonus of this method of cooking the chicken is that you can wilt greens in the pan afterward and they soak up all the juices and crisp up at the edges. Mighty tasty. I didn't cook the mizuna quite long enough and it ended up a little chewy, but not too bad. The flavor of the greens only contributes a little to the final result given how flavorful the pan juices it's couriering are. I wouldn't try this with spinach; that would be entirely overshadowed. Mizuna, at least gets to be a bit player. Kale, finely shredded, might be even better.

All of that goodness is kind of a shame because it takes the spotlight off of the turnip gratin which turned out fabulously in its own right.

I've got a new mandolin that does paper-thin slices easily (at least while it's still sharp) so prepping was a breeze. Here's the bottom layer--concentric overlapping circles of turnip (which is so much easier to do with properly sliced turnips, let me tell you) topped with a couple teaspoons of chicken broth, a couple Tablespoons of heavy cream, a sprinkle each of parsley, garlic and salt and a handful of shredded fontina. With the turnip slices so thin, I managed six layers from the CSA share of turnips--a bit under a pound I think--and six layers of cheese plus some grated Parmesan on top. 40 minutes at 375 degrees with foil on top and 20 without and here's the results.

Since I went light on the liquid, the cheese isn't oozing out. Instead it mortars together the layers of just slightly toothsome turnips. The cheese and turnip flavors blend and the parsley and garlic come through adding elements of complexity and elevating the dish. You've had turnip gratin; I don't have to tell you how good it can be and this turned out to be a very fine example.

Finally, we've got the roselle. I cleaned and roughly chopped them and then stewed them in a little chicken stock. I added a little salt, but no sugar. I should have added a little sugar too. Instead of the traditional peanuts, I added some toasted pine nuts for texture.

The roselle is brightly tart and floral. Probably a bit too tart, but still quite palatable. It cuts right through the heavy fatty elements on the plate just the way it's supposed to. The pine nuts give a bit of textural contrast, but their flavor is drowned out. Not bad, but this needs a little more work.

That off note aside, this was a great meal. I regret a bit that nobody else is going to get to appreciate it. On the other hand, it's so good I really don't want to share.

Now then, what's for desert?

Tuesday, September 1, 2009

Slow cooker short rib beef stew

Now that I've got a proper slow cooker, first on the agenda was a pork shoulder. But Millam's was all out. On the plus side, short ribs, the other classic slow-cooker meat, was half price. And it's remarkable just how quick thoughts of local, organic and such evaporate in the face of half price.

The standard recipe would be to do something sweet with a soy sauce and brown sugar glaze, but I've done that so I looked around for alternatives. I found three that looked interesting: a deviled short ribs recipe with a half cup of chili sauce, short ribs with onion gravy with 3 full cups of onions and savory braised short ribs that leaves out the sugar entirely. I'll probably go back and try the other two, but this time I settled on the third as a base.

The first modification I made was to add some vegetables. It seems kind of pointless to cook in a slow cooker and not get a whole meal out of it. I also changed the stock, boosted the flavorings and did a lot of modification after it came out of the cooker. It turned out not to be the big effort saver I was hoping for, but there were other good points to the method.

Ingredients:
3 1/2 pounds beef short ribs, cut into serving-sized pieces and trimmed of excess fat
1 Tablespoon cooking oil
1 medium-large turnip, peeled and cut into 1 1/2-inch cubes
several small or 2 large carrots cut into 2-inch lengths
1 cup full-bodied red wine
3/4 cup mushroom broth
1 medium onion, coarsely chopped
1 small handful peppercorns
1 Tablespoon Worcestershire sauce
3 garlic cloves, crushed
1 Tablespoon herbs de Provance
1 Tablespoon salt
--
1/4 pound cremini mushrooms, sliced
3 Tablespoons flour
1 large handful of parsley leaves, chopped
--
1/4 cup sour cream
1 Tablespoon Dijon mustard
1 1/2 Tablespoons prepared horseradish
1/8 teaspoon salt


1. Season ribs with a little salt. Heat oil in dutch oven over medium-high heat. Brown ribs in batches, 3-minutes per side, until well browned. Remove to slow-cooker pot.

2. Add vegetables to dutch oven and cooking, stirring frequently, until lightly caramelized and most of the yummy bits stuck to the bottom on the pan have been picked up. Remove to slow-cooker pot. Deglaze dutch oven with some of the wine. Pour into the slow-cooker pot.

3. Add everything else up to the salt to the pot, stir as best you can, set slow-cooker to low and cook all day.

4. When you're good and ready, open the slow cooker and fish out the vegetables to one bowl, the beef to another and strain the broth into a third. Place the first two into the refrigerator and the third into the freezer. Slice the mushrooms and mix the sour cream, mustard, horseradish and salt to make a horseradish sauce. Put that in the refrigerator too.

5. Take the meat out of the refrigerator when it's good and chilled. You'll find that the meat that was falling apart early is now fairly solid. Remove the bones from the ribs without breaking them up too much. Leave the bowl on the counter to warm up. Take out the vegetables too.

6. Take the broth out of the freezer. The fat should have solidified into a disk on top and a lot of the herbs should be trapped in it. Break up the fat and move it to a large cast iron pan. Measure out a half cup of the broth into a small container with a lid.

7. Heat the cast iron pan over medium heat until the fat is melted and sizzling. Add the mushrooms and a pinch more salt. The mushrooms should have lots of room. Cook without browning too much, stirring frequently and probably turning down the heat. Add the flour to the half cup of broth, put on the lid and shake until the flour is fully incorporated and then shake a little more. Let the flour hydrate as the mushrooms cook.

8. When you're happy with the mushrooms, add the broth, heat until warm but not hot then shake the flour mixture one more time and add to the pan. Stir well to incorporate and bring to a boil. Cook three more minutes until thickened. Add the meat, vegetables and parsley. Stir until everything is covered with the sauce and warmed through. Remove from heat.

Served topped with a small dollop of the horseradish sauce and a bit more parsley. Some sort of starch to soak up the sauce is a good idea too.


Like I said, a bit more trouble than I anticipated when I started, but definitely worth it. It's really good. The beef and vegetables retain a suprising amount of individual flavor and structural integrity despite the long cooking time. Chilling the beef before reheating it in the final preparation helped with that. I remember a Good Eats episode that explained just how that worked, but I don't recall any details.

The gravy is full of beef flavor developed during the long cooking time and a surprisingly strong mushroom flavor too considering how little is actually in there; it fragrant with herbs and has a tannin/pepper sting at the end. I was skeptical if the horseradish sauce would work with all the added flavors (although that part of the recipe is what caught my eye in the first place), but it's a great added touch with just enough bite to cut through the creaminess and heartiness of the stew, complimenting, but not drowning the main flavors (if used judiciously) and lightening up and giving a sophisticated touch to the whole.

I suppose this isn't really a very seasonable recipe. Somehow the sweet short rib recipes seem more summery. Why do you suppose that is?

Thursday, April 30, 2009

CSA week 20 - Glazed turnips, cabbage and kielbasa

As I mentioned a while back, I wanted to try a variation on the very successful and rather odd glazed turnip recipe I made a while back. I was just going to mess with the seasonings a little, but since I've got half a cabbage and a little sausage that might do well in this inverse braise why not try it all together?

It's the same simple procedure: slice a turnip into wedges, add them to a cold pan, dot with butter and add water to halfway up. Bring to a boil on high, turn heat down to medium, boil away the water stirring infrequently (about 20 minutes, when the pan's dry turn the heat back up and cook five minutes more until the turnips are tender and browned.

This time I added the sausage when the water came to a boil and laid the cabbage over top for it to steam. I tried to keep it elevated after stirring with some success, but just mixed everything up for the final sauté. That caused a small problem as the cabbage stuck to the cast iron pan and burnt a little. I should have used non-stick.

I decided not to do a full vinegrette since that would have been weird with the sausage. Instead I just seasoned with a little mustard seed, a little caraway seed, salt and pepper and drizzled a little cider vinegar over top when it was done. I would have deglazed the pan with it if it wasn't for the burnt bits.


The turnip didn't turn out quite as well as last time. They could have used a little more time in the pan when the cabbage was ready to come out. Also, this turnip was a bit past its prime so its texture was sub-par before I started. Given all that, it turned out fine. The cabbage worked out better--tender, lightly browned (the overbrowned bits stayed in the pan) and flavorful. And the keilbalsa was well cooked and had a bit of browning too.

So, a good one pot meal. I just need to cook the turnips a little longer before adding everything else.

And that does it for the CSA season bar some leftover celery that I've got a plan for and a pile of potatoes that I don't. The first a la carte CSA offering is this weekend but you have to pick it up down at the farm and I really don't like driving in Miami even on Saturdays so I passed this time around. I think I'm happier with how it went this time around than last year. I threw out less lettuce for one thing and I think the dishes I made were, on average, both tastier and more interesting. I have the CSA to thank for my increased blog readership certainly, although given the number of people in the CSA I thought I'd have more than a few dozen regular readers. I guess most folks know what they're doing and don't need my ideas. I wonder if a message board would get more traffic? I also wonder how many folks will stick around as I switch from CSA-driven posting to working through the recipe to-do list I've accumulated. Time will tell.

Tuesday, March 24, 2009

CSA week 16 - roasted kale, glazed turnips and, I dunno, a sausage or something

I took up Karen's suggestion in last post's comments to roast kale in bacon fat this evening. It's really the same recipe as kale chips with a shorter cooking time and more crowded pan so they only get crisped up around the edges. Cut out the stems, wash the leaves, toss them with plenty of bacon fat and salt, put them in the oven at 425 degrees. Roast for 7 minutes, stir, and cook for 3 more. I found it needed a few minutes more than that, but that's when to check for doneness. If you're happy with it, drop them back into your tossing bowl, dress with a little more fat or oil and a bit of vinegar and serve.

The turnip recipe I found here cooks wedges of turnip like pot-stickers--something that never would have occurred to me. Peel and slice your turnips, lay them out in a pan, dot with butter, add water to come halfway up and turn the heat on high. Bring to a boil, turn the heat down to medium and boil away the water. When the pan's dry, turn the heat back up and cook for five minutes more. Dress the turnips in a honey/red-wine-vinegar vinaigrette and serve. I'm out of the poppy seeds the recipe calls for so I used a sesame seed herb mix from Spice House instead. I don't think it made a huge difference.


The kale leaves are quite unevenly cooked depending on how thick they were and where they happened to be in the pile. There are thin crispy edges, but also thick chewy pieces. Almost, but not quite, too chewy; they're still manageable. Maybe they could have used another couple minutes in the oven. And they've got huge flavor--starting with the bacon fat, salt and vinegar--but the burst of those fades into the classic accents to kale they're meant to be.

The turnips are fabulous beyond all expectation--buttery and sweet--succulent but still with a little bite around the edges. The best of turnip flavor is front and center, not at all overwhelmed by the dressing. I declare this my new favorite way to cook turnips.

The sausage isn't bad either. I fried up a slice of spicy Portuguese chourico that pairs nicely with the kale. But I'm going back for seconds of those turnips.

Wednesday, February 18, 2009

CSA week 11 - Braised cabbage and turnips Anna Livia

I'm making two side dishes from The New Irish Table today. No main dish as I'm making plenty of both. That's despite the fact that both would clearly go well with pork. Maybe with the leftovers.

I'm making these by the book so I'll just give you the recipes straight:

Braised cabbage

Ingredients:
2 Tablespoon sunflower oil [I'm pretty sure high-smoke-point cooking oil is the point here and any will do.]
4 shallots, finely diced
1 head savoy or napa cabbage [or whatever we've got], shredded
1 teaspoon prepared horseradish
1 clove garlic, minced
1 Tablespoon grated fresh ginger
1 Tablespoon sugar
1 1/2 Tablespoons white wine vinegar
1 Tablespoon fresh lemon juice
salt and pepper to taste

In a heavy saucepan, heat the sunflower oil over medium-high heat. Add the shallots, cabbage, horseradish, garlic, and ginger and sauté for 5 to 8 minutes, or until the cabbage starts to wilt.

Stir in the sugar and cook to caramelize the cabbage lightly.

Add the vinegar and lemon juice and stir to scrape up the browned bits from the bottom of the pan. Season with salt and pepper. Serve immediately.


Turnips Anna Livia

Ingredients:
6 Tablespoons unsalted butter, melted
1/2 cup all-purpose flour
1/2 cup (2 ounces) grated Dubliner or white Cheddar cheese
salt and pepper to taste
1/4 teaspoon minced fresh thyme, plus more for garnish
1/4 teaspoon minced fresh rosemary
pinch of ground nutmeg [which I forgot]
1 1/2 to 2 pounds white turnips, peeled and finely sliced [I only had 1 1/4 pounds of turnips so I added one potato. Also I don't have all day so I didn't bother peeling them.]
6 slices bacon, cooked and crumbled [I presume they'd say Irish bacon if they meant that. And Irish bacon doesn't crumble well, does it?]
1/4 cup heavy cream

Preheat the oven to 450 degrees F. Brush the bottom and sides of a 9-inch pie plate with some of the melted butter.

In a small bowl, combine the flour, cheese, salt, pepper, thyme, rosemary and nutmeg.

Arrange a single layer of the largest turnip slices in a concentric circle in the bottom and up the sides of the plate. [I don't think I'm doing it quite right.] Sprinkle some of the flour mixture and some of the bacon over the turnips. Drizzle with butter. Repeat, layering, ending with a layer of turnips. Pour cream over top.


Place the plate on a baking sheet. Spray a 9-inch square of aluminum foil with butter-flavored cooking spray [who has that? I rubbed the foil with a knob of butter.] and place, butter-side down on top of the turnips.


Place a heavy 8- or 9-inch cast-iron skillet or pie plate on top and press firmly. Fill the pan with pie weights or dried beans [or, as I did, pile more cast iron on top] and bake for 40 to 45 minutes or until the bottom and sides are golden brown. (Check after 35 minutes and, if not browning, remove the foil and continue baking until the top is golden brown.) [That's two different indications of doneness. The sides did appear to be browning a little at 35 minutes, but not the top. I wanted a brown top so I removed the foil and kept baking.] [I got a good bit of smoke and some not so pleasant odors while this was cooking, but I think that's just my cast iron pans seasoning. I oil them and heat them on the stovetop after using them, but it's not the same. This experience will be good for them.]


Remove from the oven. With a spatula, loosen the cake around the edges. Let cool for 5 minutes, then invert onto a serving plate [Some small sticking problems there.] and cut into wedges. Garnish with minced thyme and serve.


The cabbage is nice enough, but it tastes of candied ginger. I like candied ginger, sure, but browned cabbage is good on its own and that ought to be more central than the ginger. I didn't even use a full Tablespoon of it and it's dominating the dish.

The turnips are pretty good too. Not quite soft like Potatoes Anna would be. A bit chewier and with a hints of turnip character standing up against all that butter, bacon and cream. The crispy golden brown outer slices are, of course, the highlight, but it's mildly tasty and hearty throughout.

That ginger is still bugging me, though. I want to add some fish sauce to balance out the spicy sweetness. What with this and Todd English's wacky caponata I'm drawing my line right here. Adding ginger to most European dishes is a fusion too far and I will not stand for it. OK, I'm not going to campaign against it or anything, but I'm leaving it out next time.

Thursday, January 8, 2009

CSA week five - Swiss chard and turnip gratin

The lentil soup I made yesterday only used half my chard--most of my leaves and none of the stems--so I had enough to try out Sandrine's suggestion of a gratin. Well, not quite enough, but I planted one of the turnips we got back in week one and its leaves have grown so large it's been blocking light to other plants in my herb garden. A quick look on-line found turnip gratin recipes that were close cousins to the chard gratin recipes I found so it was easy enough to split the difference. I used as my base a chard gratin recipe from The Art of Simple Food by Alice Waters and a turnip gratin by chef Alain Passard as plagiarized and lightly modified by Joe DeSalazar on his blog here.

I didn't measure anything or pay close attention to the time so here's kind of a sketchy description of what I did.

Ingredients:
1/2 bunch chard, mostly stems
1 large turnip with half it's leaves (the rest having been previously sautéed in butter and olive oil with anchovies and capers and served over papparadelle), peeled
fresh breadcrumbs
melted butter
more butter
2 ounces pancetta
1/2 large onion, chopped
2 teaspoons flour
1/2 cup milk
1/2 cup cream
2 to 4 ounces finely grated melty cheese (I used an edam-esque cheese called Amadeus)
seasonings to match your cheese (I used fresh thyme, pimenton and nutmeg. I've never used pimenton and nutmeg together before but it works. Thanks Joe.)

0. Preheat oven to 350 degrees.

1. Separate the chard and turnip stems from the leaves. Wash everything and roughly chop. Chop the turnip bulb too.

2. Heat a big pot of water to a boil. Salt as if you were cooking pasta. Add stems and turnip bulb. Return to boil and simmer two minutes. Add leaves. Simmer three minutes more. Drain, cool and gently squeeze out any extra liquid.

3. Meanwhile, prepare a cup or two of fresh breadcrumbs, toss with melted butter, salt and other appropriate seasonings. Bake in 350 degree oven until golden and crisp, tossing regularly. Five to ten minutes.

4. Melt some more butter in that big pot. Add onion, pancetta and spices and cook over medium heat 5 minutes until onion turns translucent. Stir in green and heat through. Add flour and stir until it's all moistened. Add milk, cream and cheese. Stir until cheese is melted and cook for 5 more minutes. The sauce should be enough to coat but not excessive beyond that. After five minutes it should be slightly thickened. Check for seasoning.

5. Butter a medium baking dish and add the chard/turnip mixture. Dot with a bit more butter and cover with bread crumbs. Bake at 350 degrees for 20 to 30 minutes. There isn't enough sauce to visibly bubble when it's done, but you should be able to hear it.

Serve hot as it clots when it cools. This would probably make a good side dish with red meat as it's got a creamed spinach sort of vibe going, but I found it a little unsatisfying on its own. No big flavors here, but the flavorings I chose nicely compliment the mild vegetables without overpowering them. I can see how this could be easily jazzed up into a full-fledged casserole, but the chard and turnips would get lost so better to leave it as is and let it be a supporting player.