Showing posts with label onions. Show all posts

Sunday, November 28, 2010

CSA week one - Monlar oo thoke

I know I said I wanted to do something boring with the daikon, but I did a bit of searching for recipes anyway and I found three pretty interesting options so I hope we see more daikon in the shares. I decided to go with this salad first because it's Burmese and I don't think I've ever had Burmese food before. I found this particular recipe in the Burmese collection at recipes.wikia.com but digging a bit deeper reveals that it's from the cookbook The Food of Asia. The only credits on the book say "text by Kong Foong Ling" and I don't know if "text" includes the recipes or just the commentary. I'm going to assume this is traditional.

The recipe calls for a large daikon, but I think the one I got in my share was more of a medium so I cut the other ingredients down by a third.

Ingredients:
2 Tablespoons rice vinegar
2/3 Tablespoon sugar
2/3 teaspoon salt
1 medium daikon, thinly sliced
1 medium shallot, thinly sliced [the original recipe calls for a small onion, but I think shallot is much nicer for raw applications.]
peanut oil for frying
6 cloves garlic, thinly sliced
1 1/2 Tablespoons peanuts
2/3 Tablespoon sesame seeds
2/3 teaspoon fish sauce
1 1/2 Tablespoons cilantro, chopped

1. Mix the vinegar, sugar and salt in a medium bowl until dissolved. Add daikon, toss to coat and chill for 15 minutes.

2. Soak shallot in cold water for 5 minutes. Drain. [I don't know what this step accomplishes that a rinse wouldn't, but it wasn't any bother so I went along with it.]

3. Meanwhile, heat oil over medium heat in a small pan until shimmery. Add garlic and fry until golden brown. [This doesn't take long so have your draining set up ready, keep a close eye and remove the garlic quickly once it hits the right stage. I was distracted, burnt my garlic and had to resort to the pre-packaged sort.]

4. Drain the oil from the pan and add the peanuts. Toast until they brown and start to smell toasty. Throw in the sesame seeds briefly. Shortly after the seeds start popping remove them and the peanuts to a food processor and grind until fairly fine. [Again keep a close eye or you'll end up making peanut/sesame butter that'll be pretty tasty but won't be of any use for this recipe.]

5. Remove the daikon from the brine and drain well. In a large bowl, mix the daikon and onion. Add garlic, peanuts and sesame seeds, then the fish sauce and cilantro. Toss well and serve with a Burmese curry.


To accomplish that last step, I made a simple Burmese chicken curry I found at asianonlinerecipes.com.

Ingredients:
1 large onion, roughly chopped
3 cloves garlic, squished
about an equal amount of ginger, chopped [the original recipe called for 5 centimeters of ginger. I don't really know how to interpret a linear measurement for something as irregularly shaped as ginger so I fell back on my default of using the same amount as I used of garlic.]

1 Tablespoon peanut oil
1/4 teaspoon belacan (Burmese shrimp paste) [There are a lot of types of shrimp paste and I only keep Chinese and Filipino on hand. Since belacan is fermented, Chinese is closer so I used that.]
2 chicken thighs, skinned, boned and cut into 1-2-inch pieces [Now that I look at it, this recipe doesn't call for cutting up the chicken thighs. Probably better not to, but I would remove the skin, I think.]
1/2 teaspoon salt
1 cup coconut milk
1/2 teaspoon chili powder
1/2 teaspoon tumeric

1. Add onion, garlic and ginger to a food processor (with a little water if necessary) and process until smooth.

2. Heat oil over medium high heat in a medium saucepan until shimmery. Add onion mixture and shrimp paste. Cook 5 minutes until starting to brown.

3. Add chicken, turn heat down to medium and cook a few minutes until the chicken loses its pinkness and the onion starts seriously browning.

4. Add salt, coconut milk and spices. Bring to a boil, reduce heat to low, cover and simmer 30 minutes. Stir and scrape the bottom on the pan occasionally.

5. Remove the cover and cook for 15 minutes or so to reduce the sauce by around half.

Serve over vermicelli noodles.

I found the curry's flavor a bit dull so I added traditional Burmese condiments: cilantro, scallion, fresh chili pepper, fried garlic and hard boiled egg.
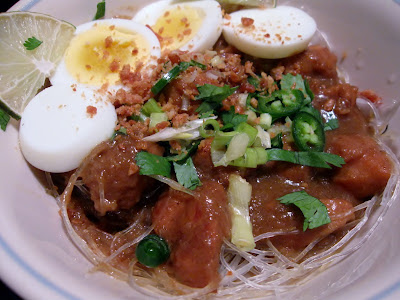

After its quick pickle, there's little left of the daikon's original mild bite, but it's not entirely lost. It balances against the sweetness of the sugar and the toastiness of the garlic, peanuts and sesame seeds. The salad is a lovely fresh and bright crispness against the heavy richness of the curry.

As this is the first Burmese curry I've made, and as I used the wrong shrimp paste, it's hard for me to judge, but, even heavily condimentated I find it rather flat (to the point where it needs a salad to contrast against, but maybe that's on purpose). The seasoning was rather simple, so maybe I'm missing a bunch of flavors from hard-to-find ingredients that were left out of the recipe. I'll have to do some investigation to learn more about Burmese cuisine. I did like the way the onion/coconut sauce browned as it cooked down. It's an effect I quite like in Indonesian curries I've made and there it's been quite flavorful. Maybe that's down to the galangal and kimiri nuts that usually go into that sort of dish.

Anyway, the salad was nice. It should go well with Thai or Vietnamese dishes too.

Friday, June 18, 2010

Saag aloo

Back in February I made aloo palak which is pretty much the same dish, at least in concept. That recipe and this one use the same ingredients, but combine them in interestingly different ways, particularly creating the sauce out of onion instead of spinach. Seemed worth a try.

Ingredients:
1/2 pound potatoes, cut into 1 1/2-inch diameter pieces
1 pound spinach, cleaned well
1 large onion (or one small onion plus some garlic and some shallot)
1 1/2 Tablespoons cooking oil
1/4 teaspoon whole coriander seed
1/4 teaspoon whole cumin seed
1/4 teaspoon cayanne powder
1/4 teaspoon ground coriander
1/4 teaspoon salt
1 teaspoon fenugreek
4 ounces canned tomatoes

1. Heat a medium pot of lightly salted water to boiling. Add potatoes and cook until just tender, 10 to 15 minutes

2. Heat a large pan over medium heat. Add the spinach with a little water from the cleaning. Cover and cook for 3 minutes. Remove from pan, let cool to handling temperature and squeeze out most of the moisture.

3. Slice the onion. Clean any spinach juice out of the large pan, add the oil and heat over medium heat. Add half the onion and sauté until golden brown. Add the whole coriander and cumin and cook for 1 minute more. Remove to a food processor.

4. Add the rest of the onion, shallots and garlic and blend until smooth.

5. Return to the pan and cook over low heat for 5 minutes. Add the potatoes, spinach and spices. Cook over low heat for 15 minutes. Add the tomatoes (the original recipe called for half as much tomatoes, but 2 ounces is barely any at all so I doubled it.), stir well, cover and simmer 10 minutes more.

Serve with rice or roti and a dollop of chutney.

The spinach is well overcooked, of course: on the verge of falling apart and a little mushy but the stems still have some texture. There's a bit of spinach flavor left plus mild spiciness, but the flavor is dominated by the onions and potatoes (which add welcome textural interest). It's all rather sedate so the spicy tangy bite of the chutney is a welcome addition. The amount of chutney in the picture is rather too much, but once I added another scoop of the saag aloo, it evened out nicely. It doesn't much resemble any restaurant saag aloo, I don't think, but it's been a while since I've had it. I wonder if this is a typical recipe or some weird aberation.

Sunday, December 13, 2009

CSA week three - Thai basil eggplant

There are lots of recipes on the web for Thai dishes using basil and eggplant. Mostly they're just: fry eggplant, add soy sauce and basil, serve over rice. That not only isn't going to satisfy me, I wouldn't get a blog post out of it. So I started with the most complicated recipe I could find (which, as a bonus, uses the bell pepper) and messed with it.

Ingredients:
1 medium-sized European eggplant, sliced into 1"-square cross-section strips
1 1/2 suntan bell peppers (or one red and one green), sliced into short broad strips
1 medium onion, chopped into pieces roughly the same size as the pepper pieces
hot peppers to taste, finely chopped
all the garlic left in the house, finely chopped (up to 3 Tablespoons, but I only managed 1)
1 generous handful Thai basic, roughly chopped

3 Tablespoons Thai fish sauce
1 Tablespoon soy sauce
1 Tablespoon brown sugar
1 chicken thigh, deboned, deskinned and cut into bite-sized pieces (meat is optional, but I'm compensating for less eggplant than the 3 Chinese eggplants the original recipe called for. If you want to stay vegetarian bar the fish sauce, tofu would be fine or just reduce the amount of onions and peppers.)
1/2-3/4 cup warm water

2 teaspoons corn starch
2 Tablespoons warm water

Instructions:
1. Mix fish sauce, soy sauce and brown sugar. Add the chicken and put it in the refrigerator to marinate. Mix the cornstarch and 2 Tablespoons water.

2. Heat a wok over high heat until it's smoking hot. Add a Tablespoon of cooking oil, the eggplant and a pinch of salt. Fry, stirring frequently for 5 minutes, until the eggplant is softened and, in spots, browned. Remove eggplant to a large bowl.

3. Heat another 1 Tablespoon of oil. Add onions and bell peppers and cook for 5 minutes, until both are softened and a little browned and the onions turn translucent. Remove to the bowl with the eggplant.

3. Heat a third Tablespoon of oil. Add the garlic, hot pepper and fry briefly. Add the chicken (drained of the marinade) and cook until the chicken loses its pinkness. Add the vegetables and mix thoroughly. Add the marinade, and a judicious amount of the warm water. Wait until the water starts boiling and add the basil then cook for at least one minute. When everything looks about right to you, add the cornstarch and take off the heat. Stir until the sauce turns glossy and thickens.

Serve over rice, noodles or a salad.

Hmm...not bad, but not fabulous. The texture of the vegetables is just right--soft but with a little firmness left to the bite. But the sauce isn't quite as flavorful as I'd like. A bit more fish sauce, a squeeze of lime and a whole lot of sriracha wakes it up, but the balance is off. Stock instead of water would help, but I think I just don't have enough flavorings for this much vegetation. Maybe my ratios were off.How big are medium-sized Chinese eggplants anyway?

Friday, December 19, 2008

CSA week three - Roasted ratatouille

Just a short note on this simple dish. I attempted to follow the recipe by Clotilde Dusoulier at the Chocolate and Zuchini blog that I pointed out earlier but had some small difficulty.

First off, it's one of those annoying recipes that feed a crowd but don't mention it. In fact, it's actively misleading since it says to put all of the sliced vegetables into a pan, but it would take a restaurant pan to fit them all.

I halved the recipe and still used both my 13x9 and 11x8 pans. Maybe that's optional; I kept the vegetables to a single layer to maximize the benefits of roasting, but you don't really have to if you just want to get everything cooked. I'm going make the other half tonight and I'll just pile everything up and stir it occassionally to compare and contrast.

Now that I take another look, Clotilde just assumes the reader knows what size to cut the vegetables, whether to stir, what size pan to use, how to judge when things are done. I managed to figure it out and so did a lot of other commentators on the post. Maybe I should give my readers more credit.

Anyway, I added some chicken sausage to the veges to make it more of a main dish, and used oregano instead of rosemary to make it a bit more Italian to match the sausage but otherwise I just chopped everything up into big chunks, tossed with salt pepper and olive oil and stuck it into the oven for a half hour covered with foil and a half hour without and the results were just dandy (although another 15 minutes for extra roastiness would have been worth the minor drying out I was worried about).

On the other hand, they were a just dandy roasted vegetable mix and not really a proper ratatouille to my mind. Maybe it's just me, but if the vegetables aren't melting into each other and blending flavors it's not quite right. I found a dash of balsamic vinegar tied things together well. Clotilde suggests a poached egg. Some mild feta or goat cheese would work too. Why not all three?

I think for the second batch I'm going to toss in some southern-style smoked sausages and add fresh sage to match flavors. These vegetables are so common they can match with a wide variety of flavor profiles and still work.

Saturday, November 29, 2008

CSA week one - Chicken stock, modestly improved

After cooking yesterday's Cornish game hen I had accumulated enough poultry scraps to make a new batch of stock. The ingredients I've got on hand are pretty close to what I had last March when I first posted about making stock: about two pounds of scraps (including a fair bit of offal this time which should improve the flavor. I tossed the livers though which I hear make stock bitter.), a couple carrots, a spare turnip or two, an onion, stems from assorted greens. Looking back, I noticed that my spices were on the basic side. This time around there are more cooked scraps in there and since they were all cooked with Gullah spices so I may as well roll with that. I added another teaspoon of Gullah baking spice mix along with some thyme and a bay leaf. I also added a couple handfuls of onion peels which I understand will improve the stock's color.

The process remains the same: Everything into the pot along with enough water to cover, bring it to a boil and then a low simmer all day long. Thanksgiving weekend is a good a day as I'm going to get for such an endeavor; It's not like I'm going anywhere. I did use 14 cups of water instead of the 10 last time to make sure everything stays well submerged. If necessary I'll cook down the final stock.

Six and a half hours later, after I've strained out all of the chunky bits, I've got this. Turns out cooking down isn't an issue as I've once again done a crappy job of topping off the pot. I really should mark the water level on the side next time. I suspect some good flavor was left behind due to my negligence. The flavor is quite intense so I watered it down to 10 cups which gives me proper stock flavor levels. I like the slightly more complex, but still bird-forward flavor I got this time around. It's not so distinctively geographically localized that I can't use it in any cuisine in small quantities, but I'm not sure I'd want to make Chinese hot and sour soup with it.

I notice that there's very little fat considering. I had to keep skimming semi-solid films throughout the cooking time; most of the fat must have been caught up in that. Also, the color is a much richer bronze, even when thinned out, than previous stocks I've made. Even if the flavor isn't improved by the onion skins that's a marked improvement in the overall stock multi-sensory experience.


Again like last time, I'm making a cottage pie. I've been calling it a shepherd's pie, but I've learned recently that a shepherd's pie is a cottage pie made with mutton and this one isn't so it's not one. I want to bulk it up so I sauté just about everything suitable I've got around: some onion, mushrooms, squash, the rest of the turnips (minus one I planted as an experiment), and some southern-style sausage. I added to that corn and peas as well as quite a bit of chicken picked from the bones in pot and a quarter of a game hen leftover from last night. Some green beans wouldn't have been bad, but I really don't feel like doing all the prep they require. Plus I ought to keep a full half pound for whatever other recipe I find to use them in.

I followed the green bean casserole methodology from this point: adding a Tablespoon of flour, cooking a minute, adding 3/4 cup chicken stock, cooking a minute, adding 3/4 cup milk, cooking for six minutes, removing from the heat and adding the topping.


That topping is made of the turnips and carrots (along with a few stray bits of onion and greens) from the stockpot blended well with a bit of butter and some milk. Too much milk actually, so I added some havarti cheese to thicken it up.


Even with that, it's spread rather thin over the pie filling. Well, nothing to be done about that. I sprinkled a good handful of bread crumbs over top and into a 350 degree oven for as long as it takes. It was bubbling nicely after 20 minutes so I moved it up to the top rack and turned on the broiler for 5 more. That pan can't really take 500 degrees but I figure it won't be in there long enough for anything really awful to happen.


And here it is. Tasty, but not entirely successful texturally. The sauce seems to have clotted up and the topping is a little too light and far too scant. The fillings are cooked well, though so there's a nice variety of textures and flavors there and the carrot and turnip topping is much more interesting than using mashed potatoes. I think the problem with the sauce may have been because the sauce to stuff ratio was too low and the thin topping didn't keep the moisture from evaporating. I'll adjust things next time around and see how it goes.

Wednesday, November 19, 2008

Red simmered pork - first iteration

About a month ago I failed quite spectacularly at slow cooking some pork in my crockpot. While the meat had shriveled up into hard little lumps and the vegetables melted to mush, the sauce had some promise. I said at the time "I'm thinking of straining out all of the overcooked solids, diluting it down and keeping it around as a marinade." And so I did.

Marination was my original plan today, but I remembered that the sauce wasn't far off from the red simmering sauce I've been wanting to try from the Thousand Recipe Chinese Cookbook by Gloria Bley Miller. This more than just a simple stew; red simmering sauces can be used repeatedly. Miller writes: "Tradition tells us of such sauces, known as "Master Sauces" in China, which were kept going for two or three hundred years and, like a legacy, passed from one generation to the next." Tell me that isn't pretty cool.

The sauce started out with soy sauce, sugar, garlic, ginger and star anise watered down by half. I added some fresh garlic, ginger, red pepper flakes and rice wine to freshen it up. Then in went cubes of pork, around half a pound I think, and a sliced onion. I brought it to a boil and then down to a bare simmer with the lid on the pot.

After a half hour I added a chopped carrot, and after another half hour soaked and slivered cloud ear mushrooms and lilly buds. Another fifteen minutes later and I added bamboo shoots and cubes of tofu along with a dash of salt and a dash of sugar for the last fifteen minutes of simmering. I used a rather higher vegetable to meat ratio than is traditional, but that's how much leftover pork I had in the freezer and I did want a more balanced dish.


The cookbook promises that over time the sauce will develop into a rich gravy, but for now it's light and aromatic with ginger and star anise. The flavors are infused throughout, but the individual ingredients weren't stewed so long they lost their identities to the melange.

The pork is not falling apart, but it is very nicely tender. I was worried about that as you can't really tell how high a boil you've got in a covered pot. I must have successfully kept it low enough to do the trick. Possibly, it could be the cut of meat I used. I should label my freezer bags better. The vegetables were cooked well for the most part. I wouldn't have minded firmer carrots, though.

I didn't have much spare sauce to save as the sauce to stuff ratio I used was quite a bit under the recommendations in the cookbook, but I managed to put away a half cup to enrich the sauce next time I make it. I'll let you know how it develops. This is precisely the sort of thing you start a blog for; you want to tell somebody but who would possibly care? Now I just put it up here and never bore my friends and family with such matters again.

Saturday, October 25, 2008

Migas de pan - a second try

I've got about half a big loaf of bread left over so I thought I'd take a second crack at migas. There are a few things I figure I did wrong the first time around.

First, I went overboard with the olive oil. No need to drown everything, particular as the sausage is going to release some fat itself.

Second, I mistook it for a stir fry and cranked up the heat in a way Spanish chorizo and bread crumbs both don't react well to.

Third, I cut the bread crumbs too small so by the time they were crisp on the outside they were crisp on the inside too which is not good.

Finally, I worried too much about what was or wasn't supposed to go into it. This time I improvised a little and didn't concern myself with a proper traditional Central Spanish recipe.

So, this time, along with the chorizo I added some southern-style uncured garlic sausage. Garlic sausage is universal and southern and Spanish styles aren't a huge distance apart. I also added some shrimp and jamon serano after the sausages, onion and pepper had spent a couple minutes over medium heat.

I prepared the bread crumbs by tossing them with a bit of olive oil, salt, pepper and pimenton and letting them soak it in while the other ingredients cooked. On a whim I added half a can of chickpeas in with the bread crumbs. That must be traditional somewhere in Spain. I gave them around seven minutes in the pan before mixing all the other stuff back in and letting it cook for one more minute to let the bread soak up some of the accumulated juices.

And finally I served it topped with some chopped roasted peppers. I skipped the egg this time mainly because I seem to have used the last egg I had some time earlier this week.

The results are much improved. I pulled the bread a little quick so only a few bits crisped up, but it is softened up from staleness and soaked with flavor so no biggie. And the garbanzos are a good contrast in texture with their firm bite.

Big benefits from cutting back on the oil as I can actually taste the vegetables this time around. And since the meat isn't all shriveled up and dried out, each retains its own specific flavor contributing to the whole. The shrimp particularly are a nice addition with their sweetness balanced against the smokey saltiness of the rest of the dish.

It's not perfect; for one thing I cut the bread crumbs too big. The result is more panzenella than pilaf and I think the second is what I'm aiming at. Also, I forgot the tomatoes. It could use tomatoes. As for the egg, I dunno. It really didn't need any more fat, but the egg yolks would have bound it together a bit. I'll add an egg to a leftover serving and see how it goes.

Overall a respectable result and a pretty good dinner. I think it went well enough that next time I might experiment with flavors and do a non-Spanish version. I have a vision of a breakfast migas de pancakes I kind of want to try but I don't have all the details worked out yet.

Saturday, October 11, 2008

Migas de pan con huevos

I'm always on a lookout for recipes using stale bread. No matter how good the bread I bake is (and recently it's been pretty darn good) I can only eat so much and I usually end up with at least a heel slowly petrifying beyond edibility. Recipes for day old bread aren't uncommon; four day old bread is harder to find a use for.

So, I was watching the first episode of travel/food TV series Spain: On the Road Again and saw a demo of a fried-rice-like dish called migas that used bread crumbs for the starch base. A little poking around on-line turned up a Tex-Mex version that uses torn up tortillas and a wide range of Spanish versions. The type I'm making is a Central-to-Northern Spanish variety.

There is some variation on how to prepare the bread crumbs, which I think stems from varying assumptions on what sort of bread you're starting with and how stale it is. Light and fresh loaves can just be chopped up and tossed into the pan, but older, denser loaves like the country loaf I baked last week need to sprinkled with water, tossed with salt and pepper, and left to soften for up to 12 hours. This week's high humidity has kept my leftover bread soft so I discarded the iffy bits, chopped up the rest, sprinkled it with a couple handfuls of water and left it to absorb for an hour. I didn't use a whole lot of water as the bread needs to absorb plenty of fat later on.

The version I saw on TV added only garlic and chorizo and garnished with roasted red peppers and green grapes. Other recipes I found add onion and peppers along with other types of Spanish cured pork to the fried bits and a fried or poached egg to the garnish. Luckily, I've been stocking up on good quality Spanish ingredients. I've got the right sort of chorizo, roasted red peppers and pimenton all imported from Spain and some good quality jamon serano of unknown origins. My olive oil is Italian but it'll have to do.

Traditionally, migas is cooked in a special pan that looks like a cross between a paella pan and a wok. Turns out I've got one. I've always called it a flat-bottom wok, but it's a migas pan. Who knew?

Also, traditionally, I'm pretty sure the cooking method is to fry up the mix-ins, add the bread crumbs, fry some more, garnish and serve. I'm going to use the slightly more complicated fried rice method so the mix-ins don't get over-cooked. This, like fried rice, and the risotto I made a couple days ago, is a toss-in-the-leftovers dish so I'm not fretting about exact how much of what I'm using.

I set my heat to medium high and first into the pan is plenty of olive oil (half extra-virgin, half plain-old so I get some flavor and a decent smoke point too), followed by the garlic, onions and peppers. A few minutes later when they're golden but not brown they come out.


Next in are the chorizo and jamon serano. If I had a Spanish-style bacon, I'd also add that. A couple minutes of frying renders out the fat and gets the meat crispy around the edges. Out they go.


And then the bread bits along with a spoonful of pimenton. I have about 2 1/2 cups of bread here. I found that my latest loaf cubed too tidily so I tossed in some bread crumbs I had saved from previous loaves too rough things up. You want the results to be crisp on the outside but chewy inside--not quite croutons. That took around seven minutes for me (although I kept cooking a little longer). When it looks about ready everything else goes back in and tossed to combine. Then out into a bowl. I drained a little remaining unabsorbed grease which I used to quickly fry an egg. The Spanish style is to heat a 1/4 inch of oil on pretty high heat so the egg white bubbles and crisps and a bit of basting cooks the yolk.

The egg and some chopped roasted red peppers go on top. My bread started pretty dark so the bread crumbs don't look quite right. If you're starting from white bread, you want a bright gold color from the absorbed olive oil with a reddish tinge from the pimenton.

I found the results to be flavorful but heavy and greasy. Better than it looks in the picture, though. One problem is that I overcooked the bread crumbs a bit. And I think a lighter white bread would have been a better starting point. I've made some really fabulous croutons from that sort of bread before so I know what this could have been. Here's what it's supposed to look like. Also, my vegetable ratio was too low. I can see real promise here, but today's version didn't fulfill it. I'll have to try again.

Monday, September 8, 2008

Mahi escabeche

A while back, when I made shrimp escabeche, I wasn't entirely satisfied with the results. Oh, it was tasty enough, but my experiences with nanban zuke, the Japanese dish that evolved from escabeche, indicated that one important part of the dish was the interaction of the pickling vinaigrette and the yummy browned bits on fried fish. And since the shrimp was poached, it was lacking.

So, on a sudden whim I decided that today was the day to scratch that culinary itch and give fish escabeche a try. I chose this recipe, although if I hadn't already polished off my latest purchase of olives I would have made this one instead.

The procedure is pretty simple. First, skip the brining and just salt the pickling sauce. If you're going to let the fish soak for a while, it'll all work out the same.

Flavor the oil with the garlic, pepper and bay leaf.


Brown slices of fish.


Sweat the onion.


Cook down the sauce.


Combine and let sit in the refrigerator for a day or two.


It comes out looking nice (partially because I changed some settings on my phone-camera at my first attempt at deliberately making it look better than real life. Yes, my first food porn picture and it's still blurry. I think I need a proper camera if I'm going to keep this up.)

Mahi, it turns out, is definitely the wrong fish for the job. Something oily--swordfish or orange roughy, maybe sardines--would have both stood up better to the frying and had enough flavor to stand up to the vinegar and spices. The mahi turned into dry chewy bland fish-sticks. The pickling sauce I've got no complaints about. It's tart and rich and subtly spiced, but it needs something to bounce off of to work right.

I've got some spare smelt in the freezer. I'm going to fish out the mahi (I waited a day to do this and the mahi was much improved by the extra soaking time. The texture was a bit moister and flavors had become bright and citrusy. I'll have to give the smelt at least three days of pickling time to be fair.) and fry up a test smelt for some compare-and-contrast. Check back in with my in a few days for the results.

Saturday, August 30, 2008

CSA - South Indian Shrimp Curry

I checked my curry leaves today and while they were much faded from their prime, there was a still a little life left in them. That means one more South Indian curry before they get the toss. I do wish ? Farms would supply their more esoteric herbs in smaller batches; I can't imagine I'm the only one having trouble using them all up.

I didn't change the recipe from how I found it on Epicurious (from the latest issue of Gourmet it says there) other than compensating for the weak curry leaves so I'll ask you to click over for the specifics. Here I'll just illustrate the process and discuss the results. To do that I'm trying a new format: a picture post.


The recipe starts with frying up the aromatics: curry leaves, chilies (and plenty of 'em), garlic and ginger.


Then go in the spices: coriander, cumin, turmeric, mustard seeds, salt and pepper. The recipe said to turn the heat down and wait for the seeds to pop, but mustard seeds don't pop at medium heat so leave the heat up.


Next the onion, cooked until it's softened and soaked up the spices.


Then goes in tomato and coconut. My tomato was not very juicy and my coconut was dried so I ended up adding water now and again to keep the sauce saucy. I probably added a full cup by the time it was done.


Maybe that was a mistake as the flavors are not nearly as intense as I expected. (In the picture at Epicurious it looks like they didn't add water. But they don't seem to have peeled the shrimp either so it's designed for a beauty shot not for flavor and if you've read my review of Abokado you know how I feel about that.) There's a bit of heat and the warmth of the spices, but the main flavors are the tomato, the coconut, shrimp and, if you get a good bite of one, curry leaf each individual and not really tied together into a synergistic whole. After taking the pot off the heat, I added a second stem of curry leaves, crushed and lightly fried in oil to release their flavors; I'm glad that effort paid off, but all of those great aromas from the first couple steps of the cooking process are just background players, not strong enough to successfully unify the dish. Still and all, it's tasty if not fabulous. And, if you've got some peeling and chopping help in the kitchen, a cinch to make.

Thursday, August 28, 2008

Tahu goreng - fried tofu in peanut sauce

This is one of my favorite Javanese recipes. It's quick and easy to make and has a great distinctively Indonesian flavor.

You'll need:
1 pound medium to extra firm tofu. (You can get a lot of different textures from fried tofu depending on the firmness you start with and how long you fry it. I like mine a bit dried out and chewy but I think I'm in the minority. You definitely don't want the airy store bought pre-fried tofu. That's a different ingredient entirely and is good for different sorts of recipes.)
1/2 cup oil for shallow frying
1 large handful bean sprouts
1 clove garlic, sliced
1/2 green hot chili, sliced (something small and very hot is typical for Java)
1 teaspoon sugar
4 Tablespoons sweet soy sauce (a.k.a. kecap manis)
2 Tablespoons water
1 teaspoon lemon juice
2 Tablespoons crunchy peanut butter
2 scallions, sliced thin
3 Tablespoons crispy fried onions


Those crispy fried onions are a traditional Javanese condiment that's pretty similar to a traditional Ashkenazi Jewish condiment that goes with chopped liver. I think that's fried in schmaltz instead of peanut oil. If my mom's reads this, maybe she'll clarify in the comments.

You'll need:
1 small onion, halved and thinly sliced
1 large pinch of salt
1/2 cup oil for shallow frying

1. Toss the onion with the salt and spread on a paper towel over a draining rack. Let sit for five minutes.

2. Meanwhile, Heat the oil in a medium pan (cast iron preferably) until the surface shimmers and a test piece of onion sizzles but doesn't burn. Turn heat to medium.

3. Roll up the paper towel and squeeze gently to get a bit more water out of the onions and to get some of the salt to stick to the paper towel.

4. Add the onion to the pan in a single layer. Cook, stirring frequently, for 5 to 7 minutes, until the onions are a golden brown.

5. Remove onions to a new paper towel spread over the rack. Let sit for 15 minutes. They'll darken a little and get crispier.

6. Save the oil for deep frying the tofu.


OK, now back to the main recipe.

1. Start some rice cooking. Short grain and kind of sticky would be appropriate. Sushi rice is a fair approximation if you don't rinse it.

2. Cut the tofu into inch-thick slices. Pat dry and maybe squeeze out some of the moisture. Heat oil the same way as for the onions and fry at least until light brown on both sides. I prefer to go a little longer, but it's up to you. Remove to a paper towel on a draining rack and set aside.

3. Put a medium pot of water on the boil.

4. In a mortar, crush the garlic, chili and sugar until enough juice has been released to dissolve the sugar. Add the soy sauce, water, lemon juice and peanut butter and stir until fairly smooth.

5. When the water has boiled add the bean sprouts. Wait until the water has returned to a boil, no more than 30 seconds. You just want a quick blanch. Remove bean sprouts.

6. Cut the tofu into cubes. Or don't if you don't want to.

7. For each serving, put the rice in a bowl, then the tofu, cover with the bean sprouts, spoon over the sauce and garnish with the scallions and onions. You can serve hot or at room temperature, but remember that room temperature in Java is around 85 degrees.

(both recipes are adapted from The Indonesian Kitchen by Copeland Marks and Mintari Soeharjo)


In each bite you can get soft rice, chewy tofu, crunchy bean sprouts and scallions and the crisp onions. The tofu gains a savory flavor from the frying, the sauce is sweet and earthy, the onions salty and the vegetables...um...herbaceous? Anyway, there's an enormous amount going on for such a simple dish. And if you don't care about that, it's just really tasty.

It occurs to me that this dish has kid-friendly flavors and is pretty easy to pack (rice, tofu and vegetables in one bowl, sauce in another and a small bag of onions). I'll bet it makes a mighty impressive elementary school lunch. (It probably makes an impressive work lunch too, but my coworkers have long ceased inquiring about all but the most aromatic of what I've brought in.) If any mothers want to try it, do please report back on how it goes.